Everything you need to use KISE SACCO, step by step
This guide walks members and every staff role through the system with screenshots — from signing in securely and depositing with M-Pesa,
to appraising loans, closing the books and running the SACCO. Pick your role to show only what applies to you, or search for any task.
Screenshots use fictional sample data. Your screens show your own SACCO’s information, and menus only list what your role is allowed to use.
Welcome
KISE SACCO is one secure system for the whole co-operative: a public website, a member self-service portal and a complete management suite for staff.
Members check balances, deposit through M-Pesa, request withdrawals, apply for loans, respond to guarantor requests and download statements.
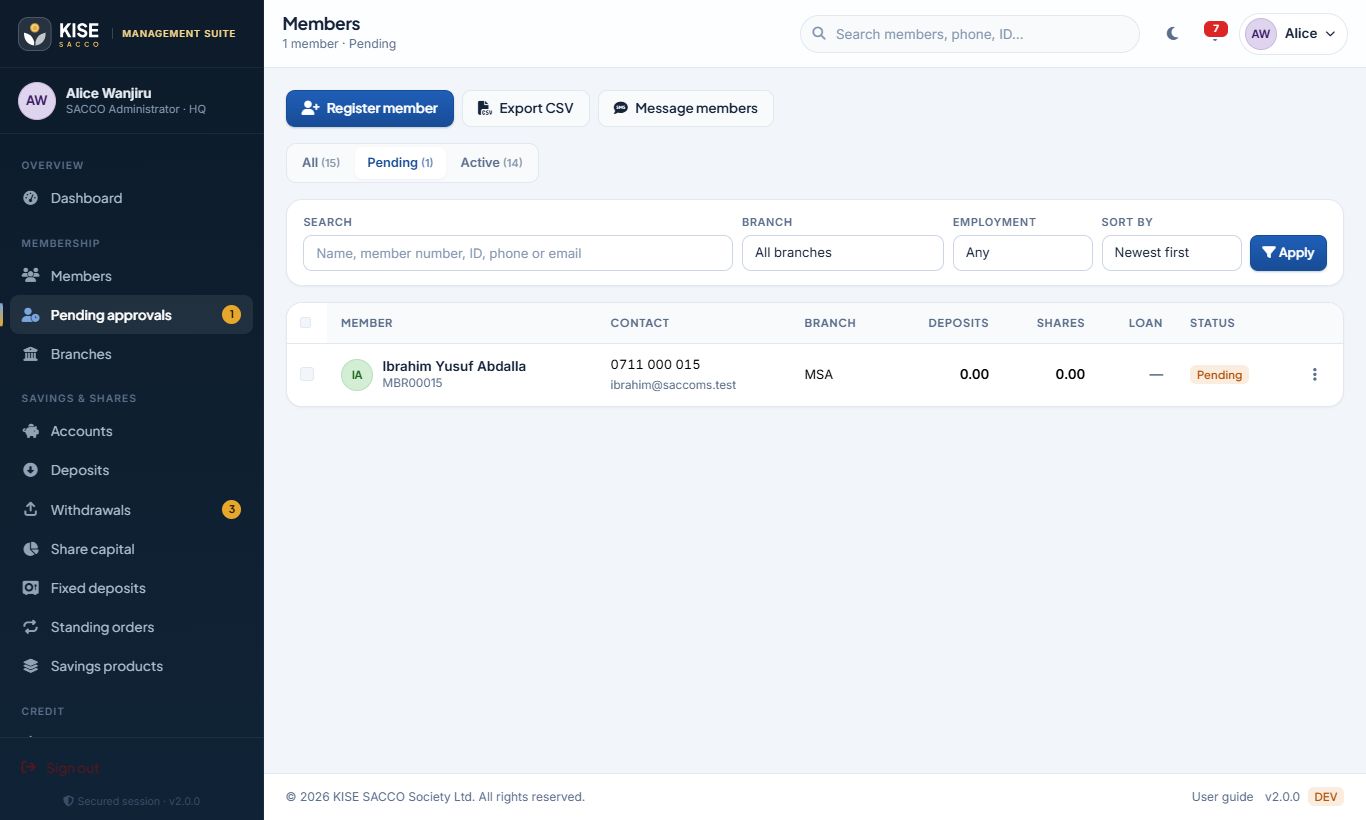
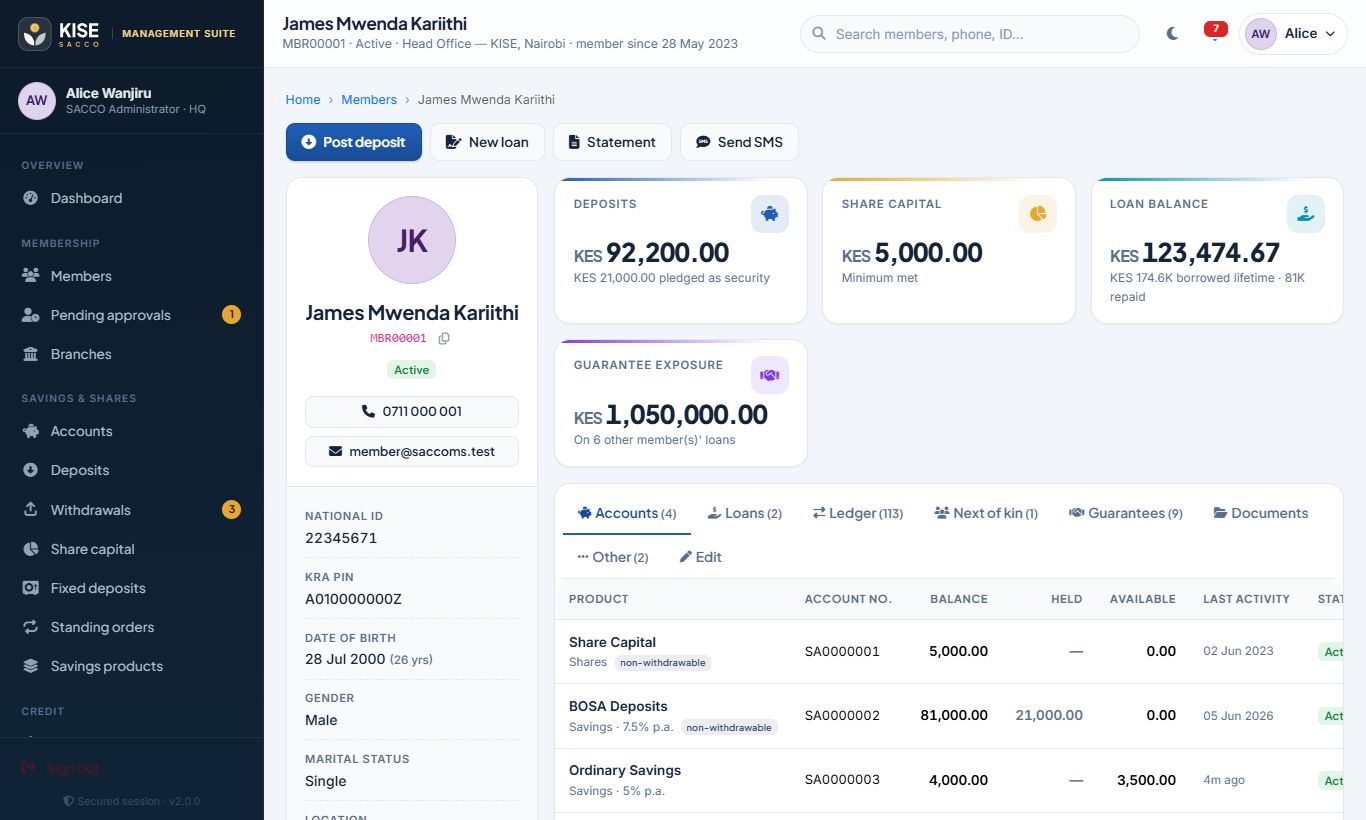
Staff register members, post cash, run the full loan lifecycle, keep double-entry books, pay dividends, message members and produce reports.
Leadership sees live KPIs, portfolio quality, meetings and minutes, and a tamper-evident audit trail.
Security first. Staff sign in with a password and an authenticator app. Sessions end automatically after 15 minutes without activity, sensitive administration asks you to confirm your identity again, and every action is recorded. All data is encrypted — the whole database on disk, sensitive personal details inside it, uploaded documents and every backup.
Where to go
What
Address
Public website
/index.php
Sign in (members & staff)
/login.php
Apply for membership
/register.php
This guide
/SystemDetails.html
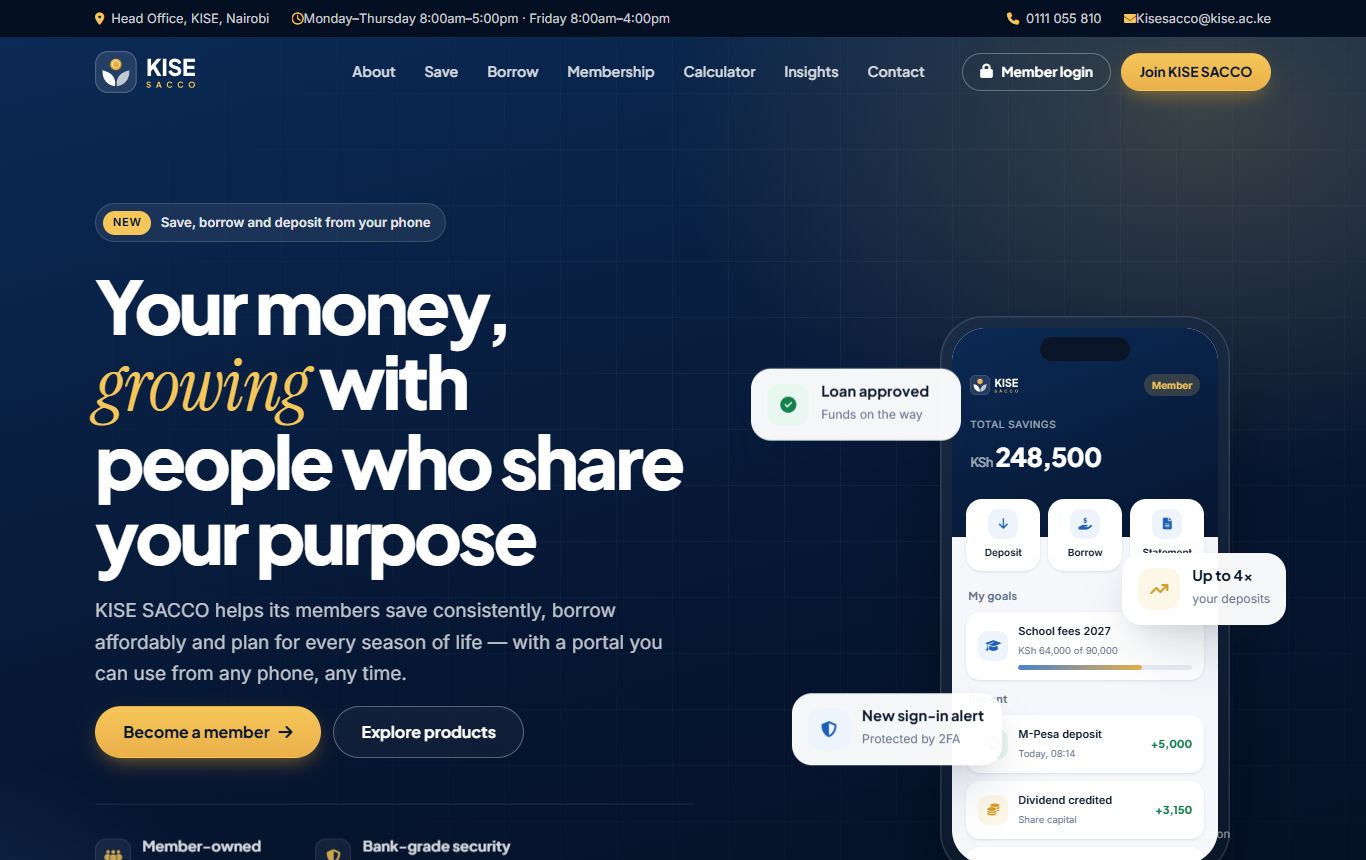
The public website — members and visitors start here.
Signing in, two-factor authentication, installing the app, passwords and staying safe.
All membersAll staff
Signing in
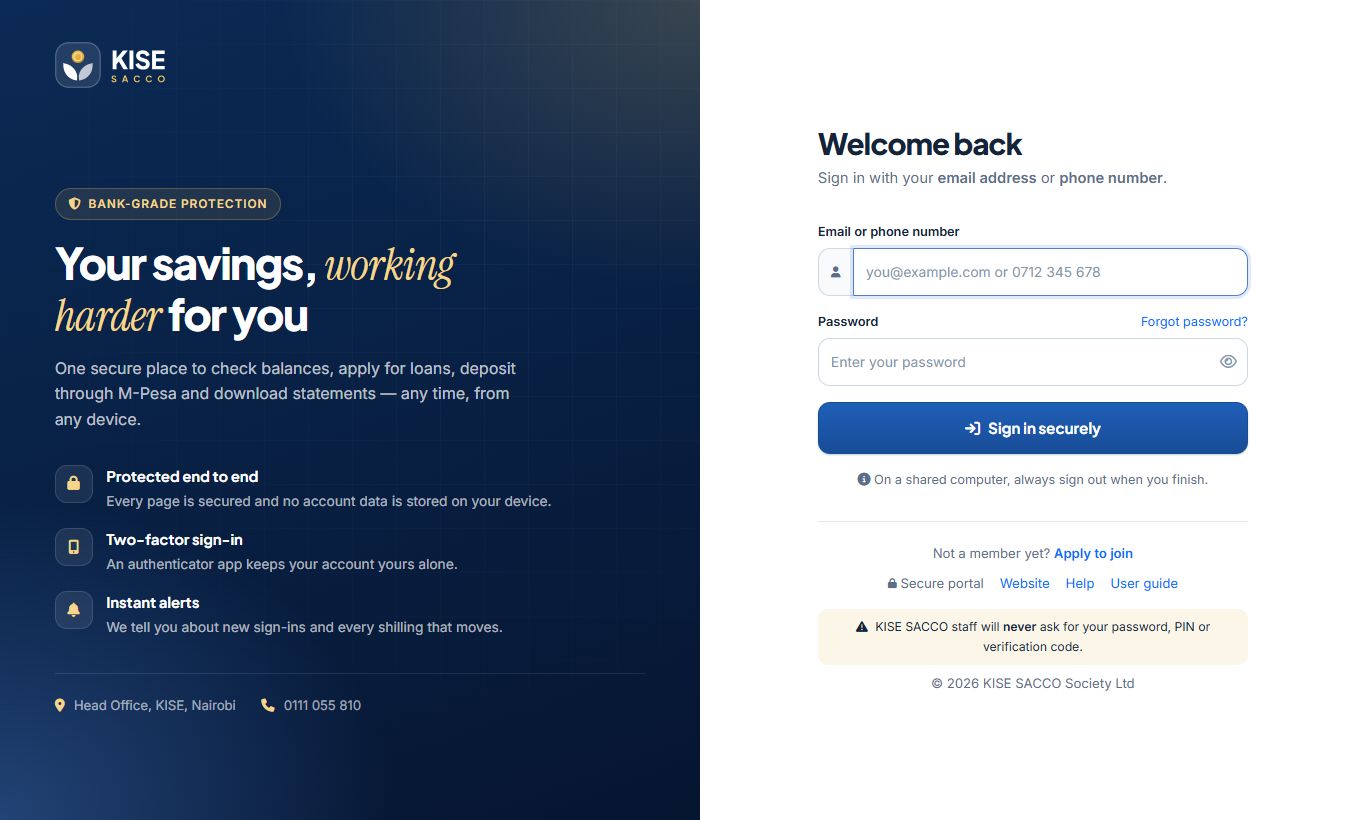
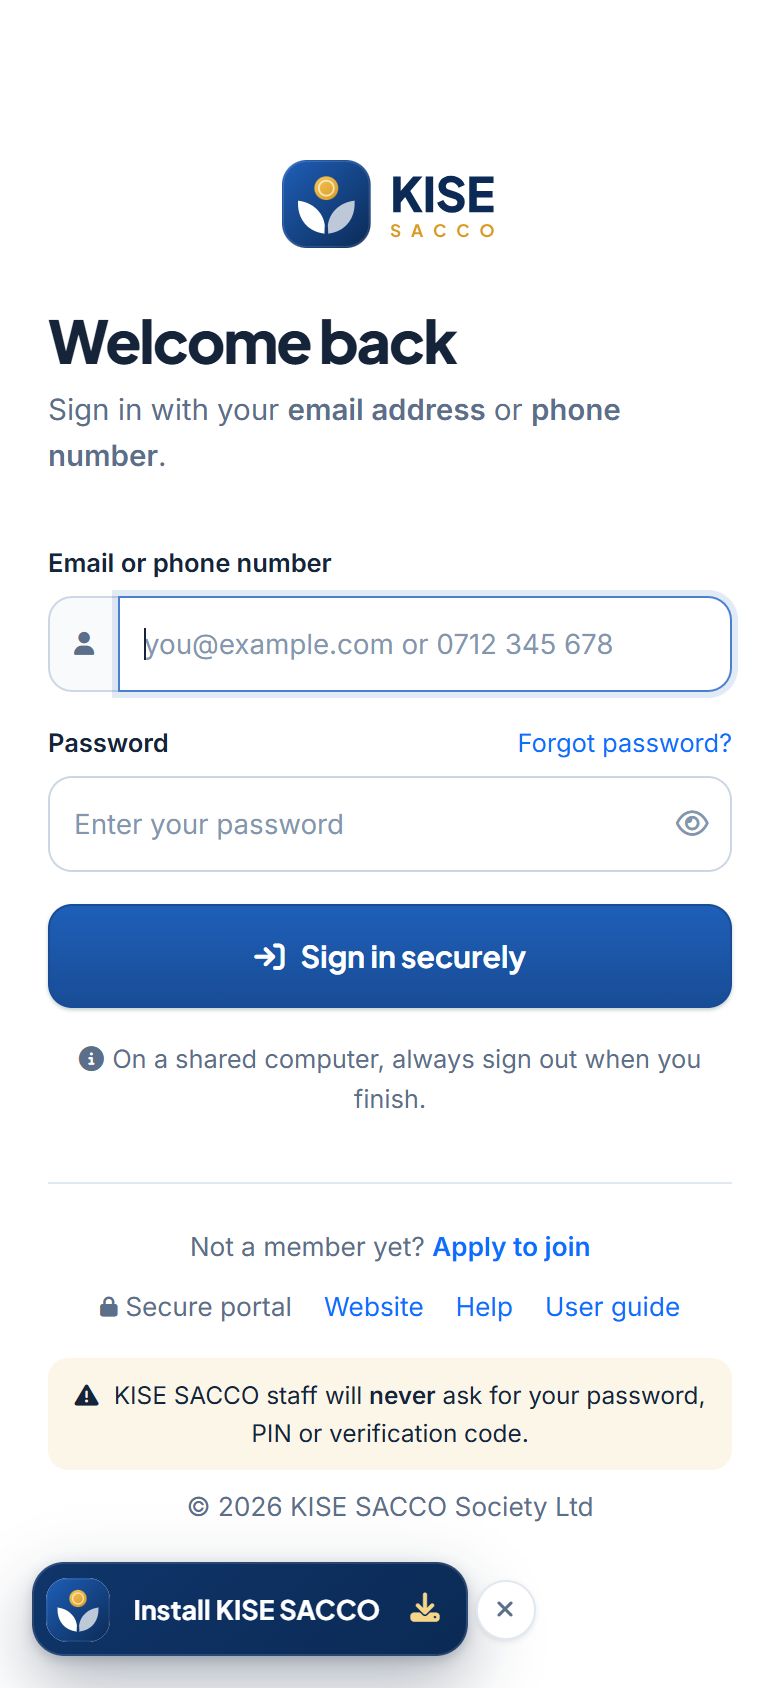
Open /login.php (or tap Member login on the website).
Type your email address or phone number — either works, e.g. 0712 345 678.
Enter your password and click Sign in securely.
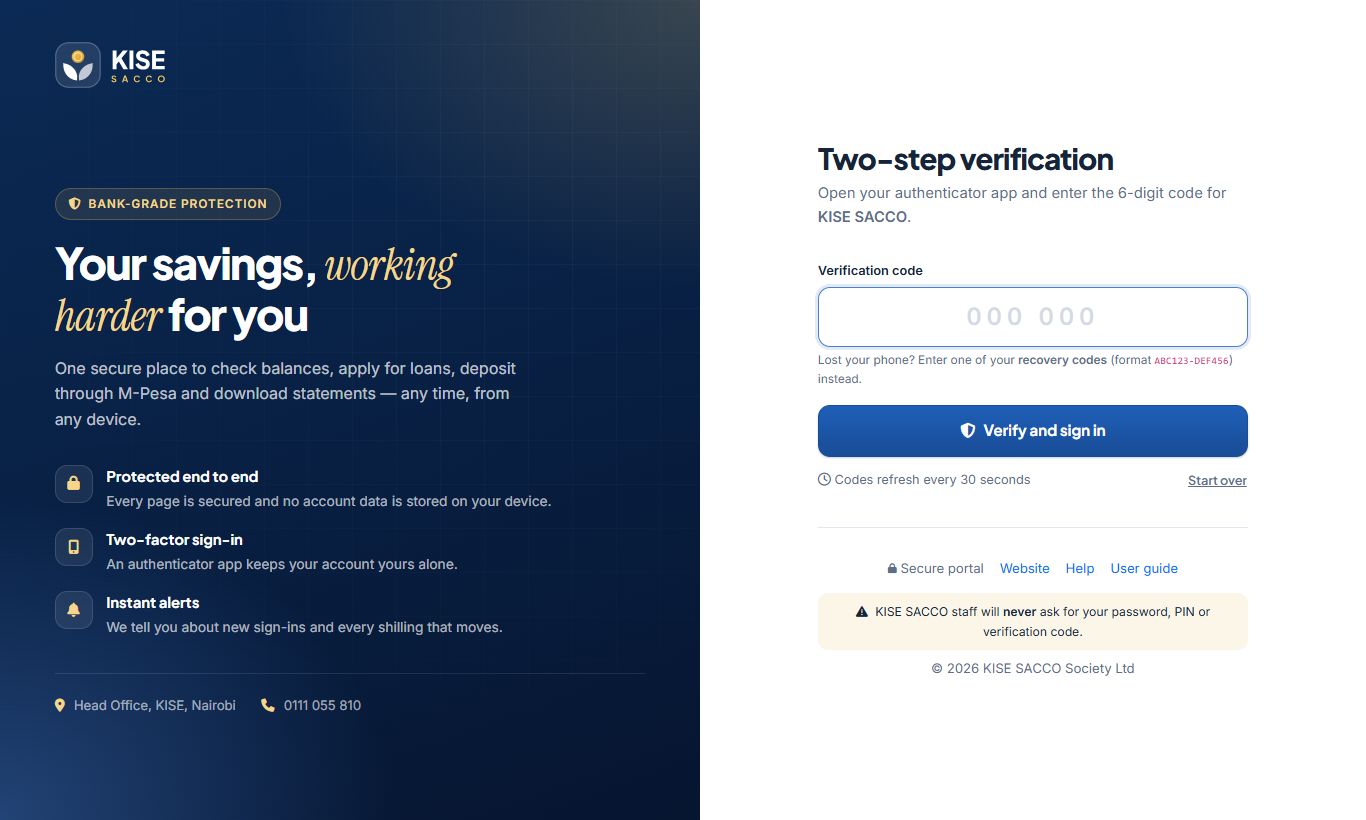
If two-factor authentication is on, enter the 6-digit code from your authenticator app (see below).
After 5 wrong passwords the account locks for 30 minutes (longer if it keeps happening), and the account holder is notified. An administrator can unlock it from Staff & users.
When you sign in from a new device or browser we send you an alert. If it wasn’t you, change your password immediately and choose Sign out other devices on your profile.
Sign in with your email or phone number.
Two-factor authentication (authenticator app)
Two-factor authentication (2FA) means that even if someone learns your password, they cannot get into your account without your phone.
It is required for every staff account — you will be taken to the setup page the first time you sign in — and strongly recommended for members.
Set it up (about one minute)
Install Google Authenticator, Microsoft Authenticator or Authy on your phone.
Open Account menu → Two-factor authentication (members: Two-factor security in the sidebar).
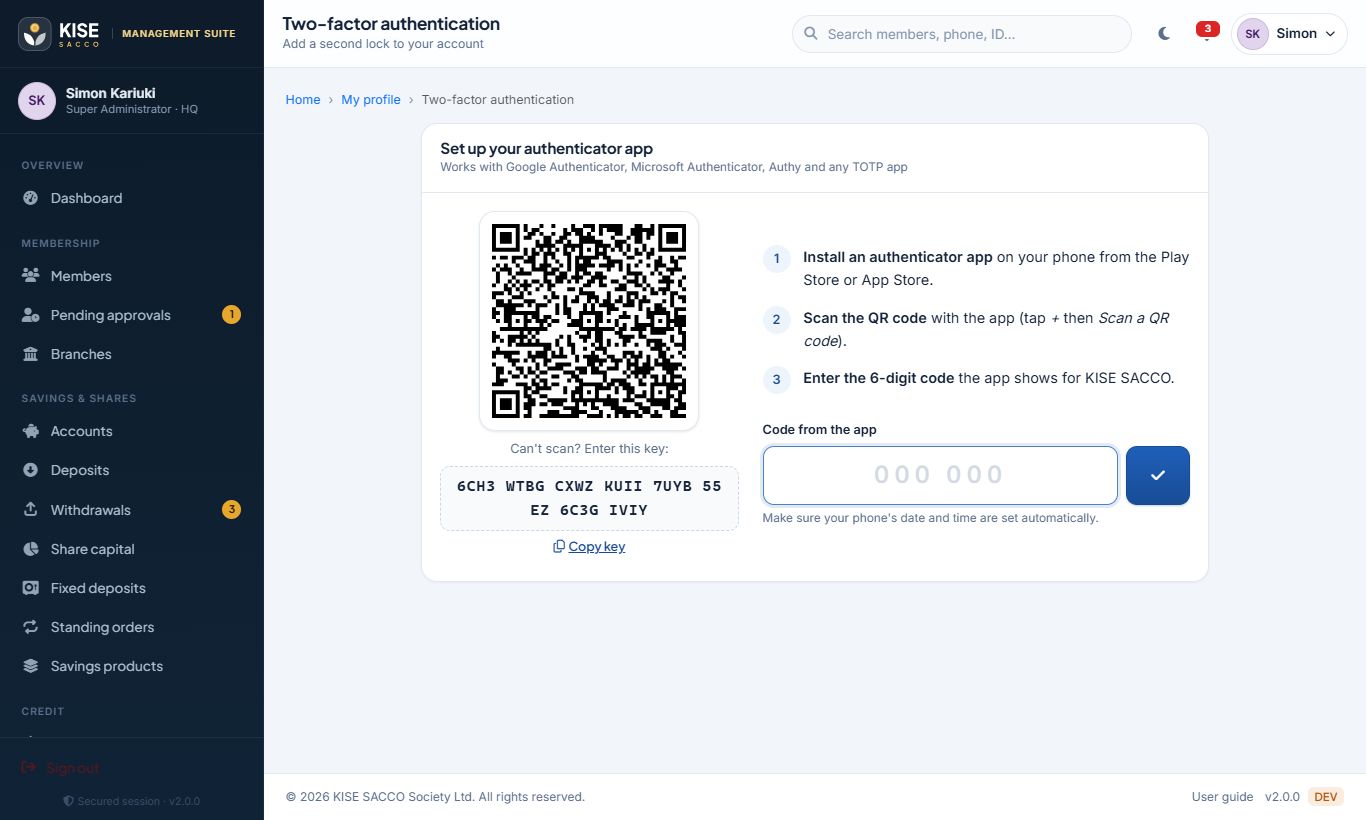
In the app tap + → Scan a QR code, and scan the code on screen. Can’t scan? Type the key shown under it.
Enter the 6-digit code the app shows and click the tick.
Save your 10 recovery codes — copy or print them and keep them somewhere safe and offline. They are shown only once.
Scan the QR code, then confirm with a code from the app.
After your password, enter the current code from your app.
Signing in with 2FA
Codes change every 30 seconds; each code works once.
You have 5 minutes to enter the code. Five wrong codes lock the account.
Code rejected? Make sure your phone’s date and time are set automatically.
Lost or changed your phone?
New phone, old one still works: go to Two-factor authentication → Move to a new phone, confirm with your password and a current code, and scan the new QR code.
Phone lost, but you saved recovery codes: enter a recovery code (format ABC123-DEF456) instead of the 6-digit code, then set up the new phone.
No access to the authenticator and no recovery codes: ask a Super Administrator for a one-time sign-in code — see below.
No access to your authenticator app? Get a one-time sign-in code
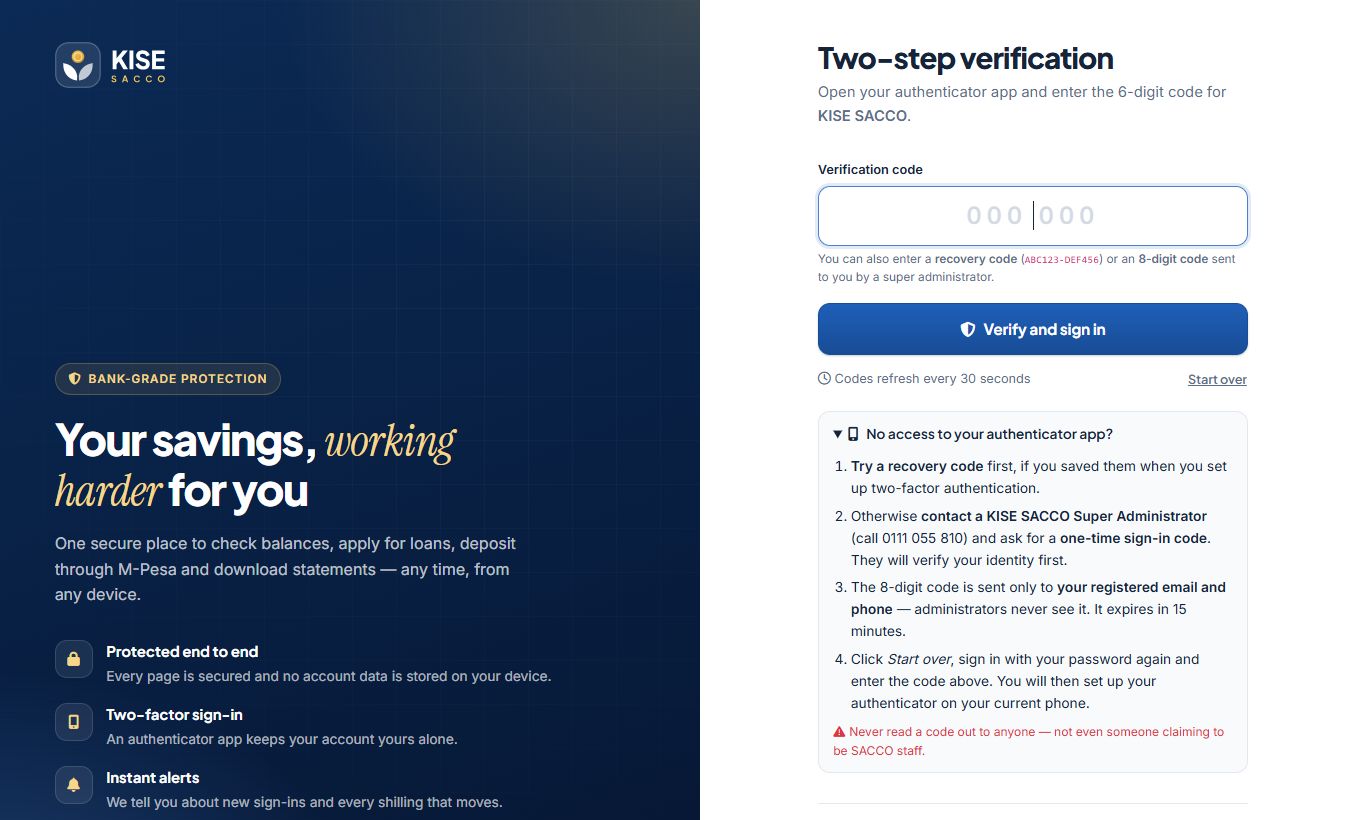
On the verification screen, open “No access to your authenticator app?” for these instructions:
Contact a KISE SACCO Super Administrator (in person or by calling the SACCO office) and ask for a one-time sign-in code.
Prove it is really you. The administrator will check your ID in person or call you back on the phone number already on your account. This protects you — attackers often pretend to have “lost their phone”.
The administrator clicks Generate sign-in code. An 8-digit code is sent straight to your registered email and phone. The administrator never sees it.
On the sign-in page click Start over, sign in with your password, and type the 8-digit code in the verification box. The code works once and expires in 15 minutes.
You are taken straight to Two-factor authentication: scan the new QR code with the authenticator app on the phone you have now and confirm. Your old device stops working, and you receive fresh recovery codes — save them.
Received a sign-in code you did not ask for? Someone may be trying to get into your account. Do not share it with anyone — not even someone claiming to be SACCO staff — and call the SACCO immediately. You will also see an in-app notification whenever a code is issued for you.
Instructions on the verification step when you cannot use your authenticator.
Installing the KISE SACCO app on your phone or computer
KISE SACCO works as an installable app — no app store needed. When the app can be installed, an Install KISE SACCO button appears at the bottom-left of the sign-in page and of every page once you are signed in.
Android / Chrome / Edge: tap Install KISE SACCO, then Install. The app appears on your home screen or desktop.
iPhone / iPad (Safari): tap the button to see the steps: Share → Add to Home Screen → Add.
Open KISE SACCO from your home screen. It opens full-screen, like any other app.
For your security the app never stores account data on the device — balances and statements always load fresh. If you are offline you will see a friendly “You’re offline” screen.
Tapped × by mistake? The button returns after 7 days, or install from your browser menu (⋮ → Install app).
The install button, bottom-left.
Passwords: forgotten, changing and rules
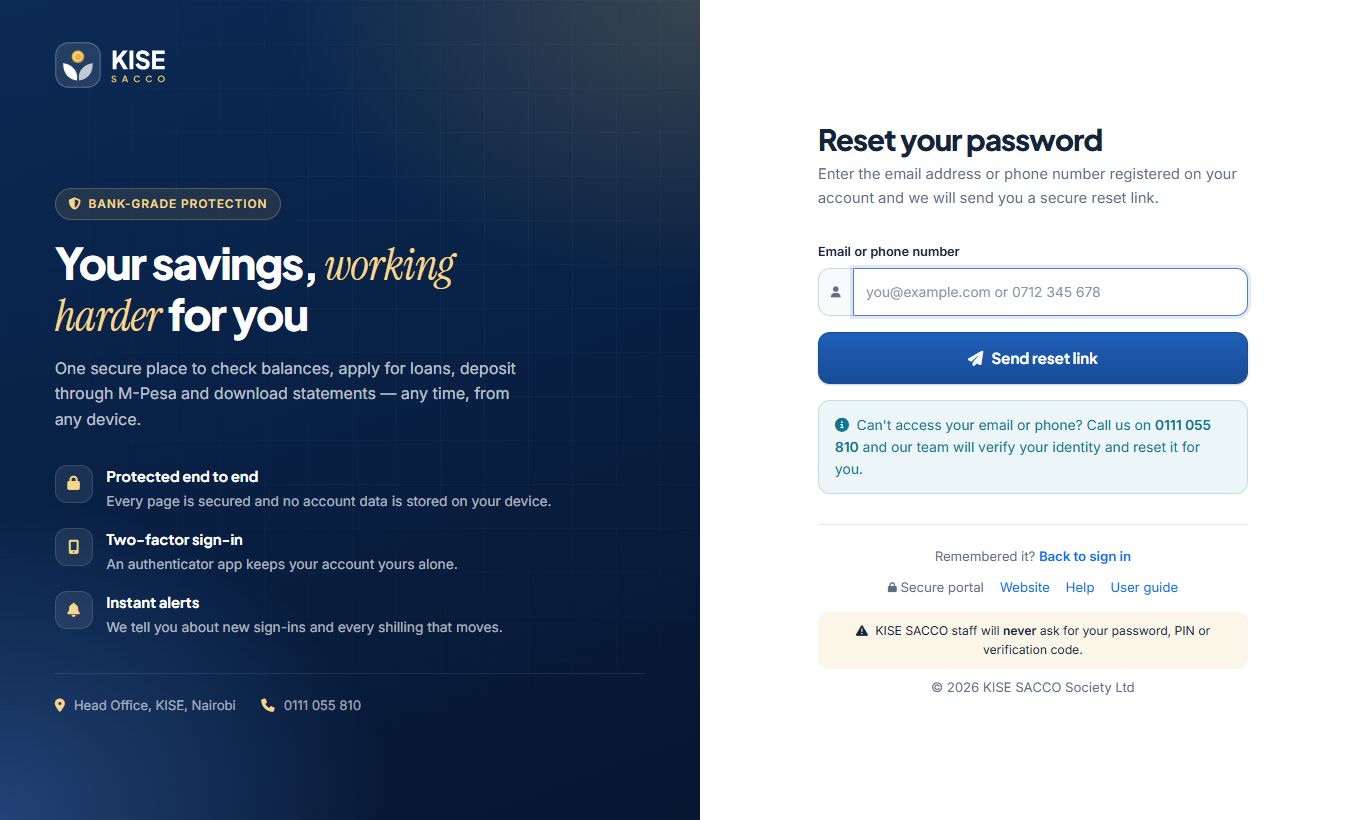
Forgot your password?
On the sign-in page click Forgot password?
Enter your email or phone number and click Send reset link.
Open the link within 30 minutes (it works once) and choose a new password.
Password rules
At least 10 characters with upper- and lower-case letters, a number and a symbol.
Not a common password, not a keyboard sequence, and not containing your name, email, phone or ID number.
Not one of your last 5 passwords. Staff passwords expire every 90 days.
To change your password any time: Account menu → Change password. Changing it signs you out of every other device.
Staff-created accounts and resets receive a strong temporary password, which must be changed at first sign-in.
Request a one-time reset link.
Your profile, devices and signing out
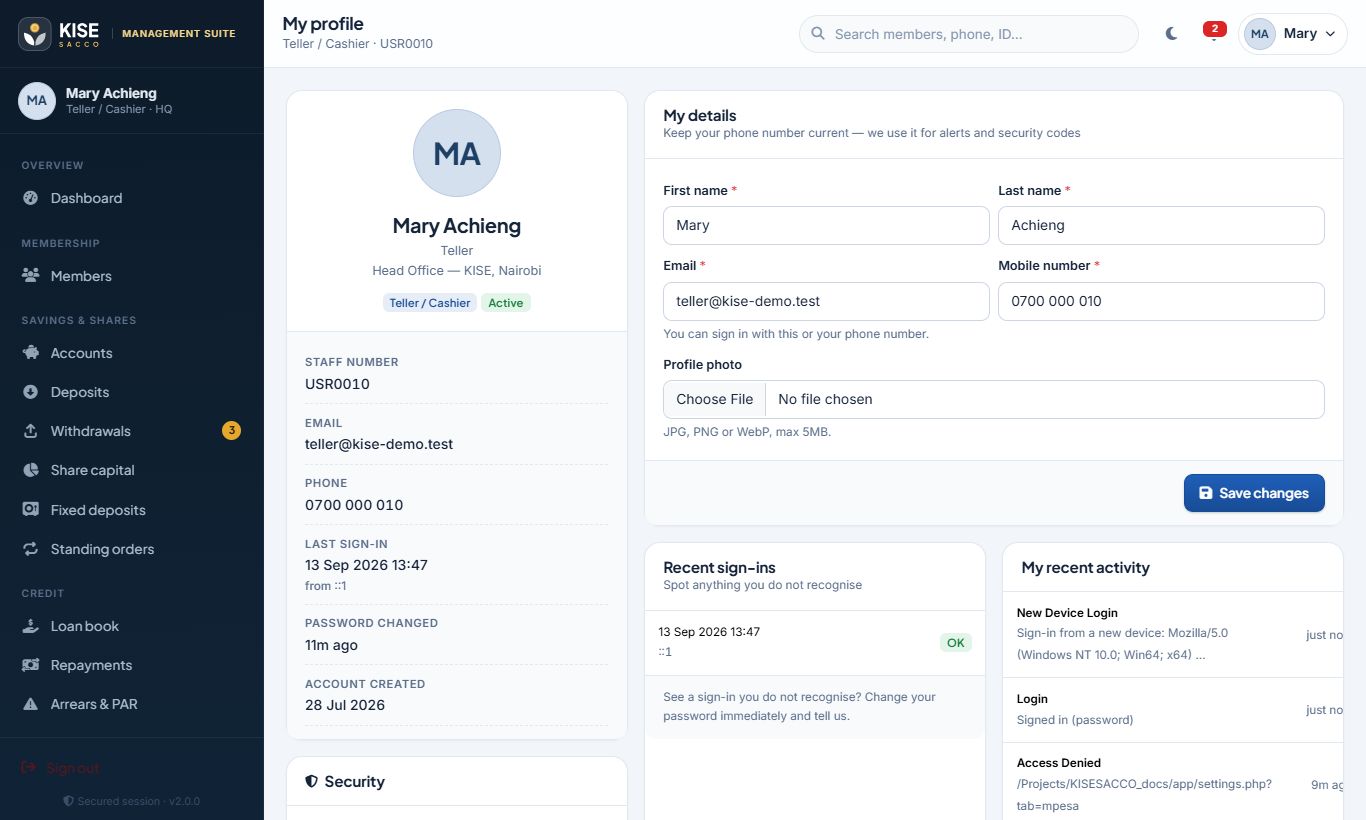
Account menu → My profile — update your name, email, phone and photo.
Active sessions lists every device signed in to your account. Sign out other devices ends them instantly.
Recent sign-ins shows successful and failed attempts, so you can spot anything unusual.
Sign out from the account menu or the bottom of the sidebar. Always sign out on shared computers.
If you are idle for 13 minutes a bar warns you; click Stay signed in. At 15 minutes you are signed out automatically.
Profile, security settings and sessions.
Stay safe: KISE SACCO staff will never ask for your password, M-Pesa PIN, verification or recovery codes — by phone, SMS, email or WhatsApp. Pay only to the official paybill using your member number as the account.
Member portal
Everything a member can do from a phone or computer.
Members
Applying to join
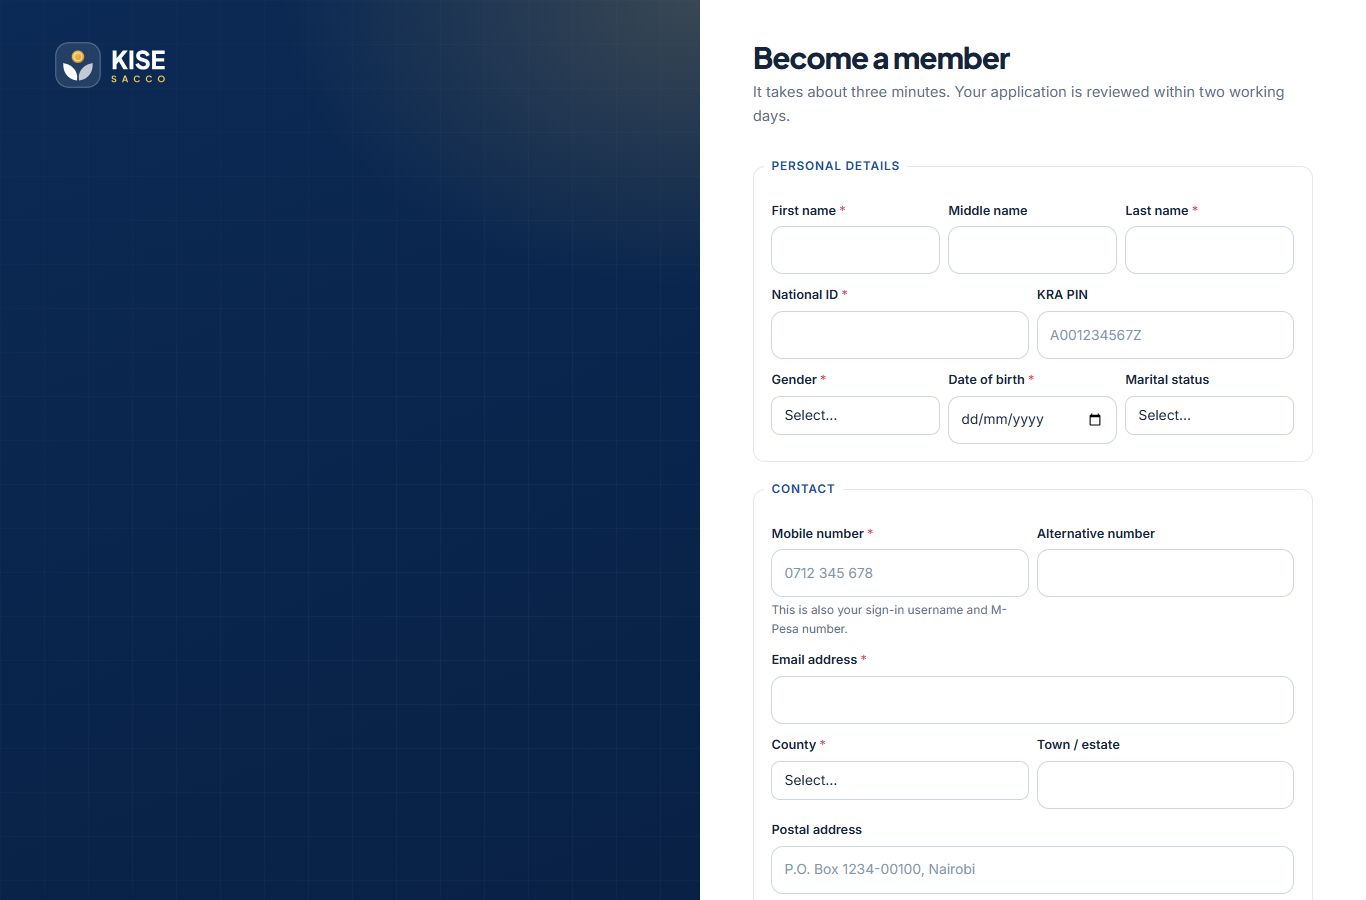
Go to /register.php or click Join KISE SACCO on the website.
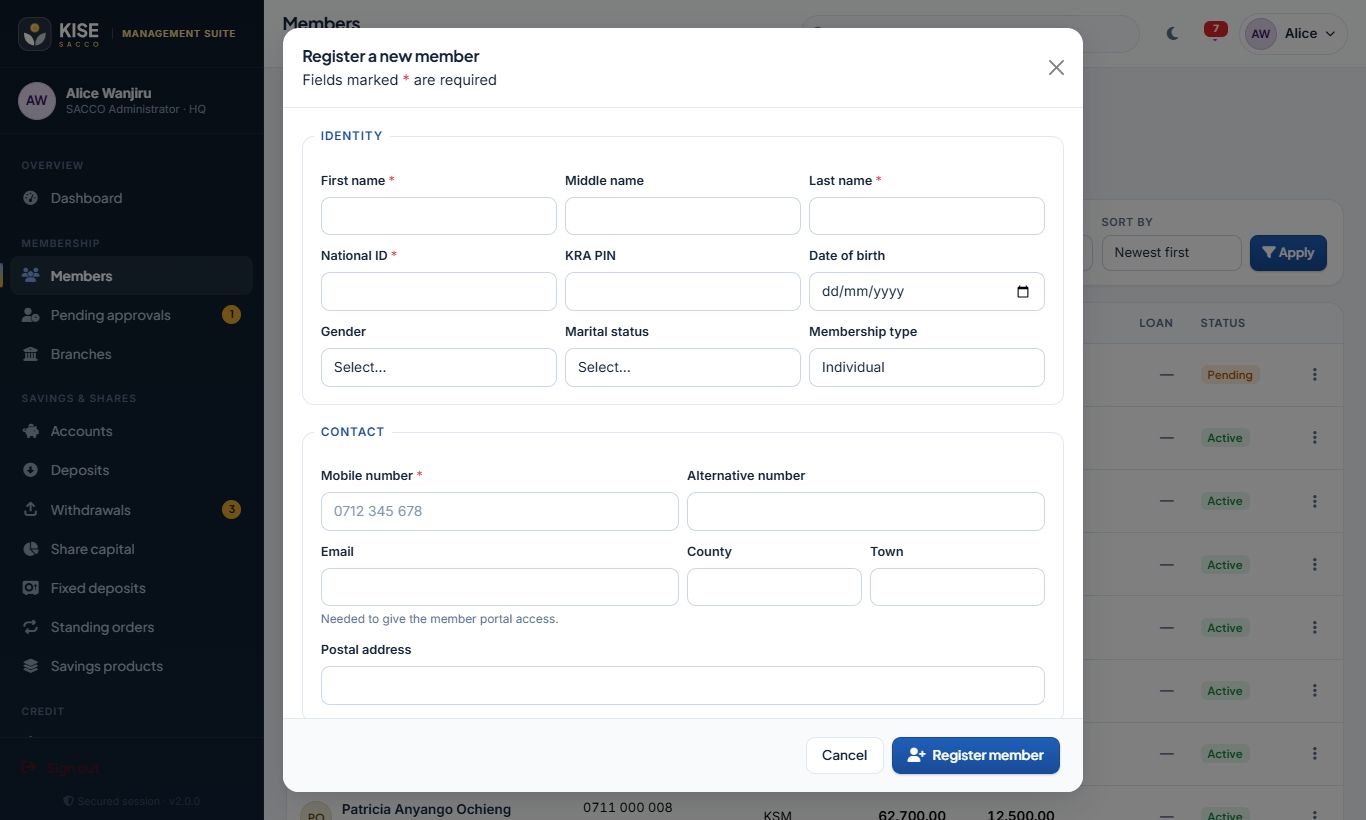
Fill in your personal details, contacts, employment and next of kin, and create a password.
Accept the by-laws and submit. You receive an application number.
Staff verify your details. Once approved you receive your member number by SMS and can sign in.
While your application is pending you cannot sign in yet — you will see a message explaining this.
The online membership application.
Your dashboard
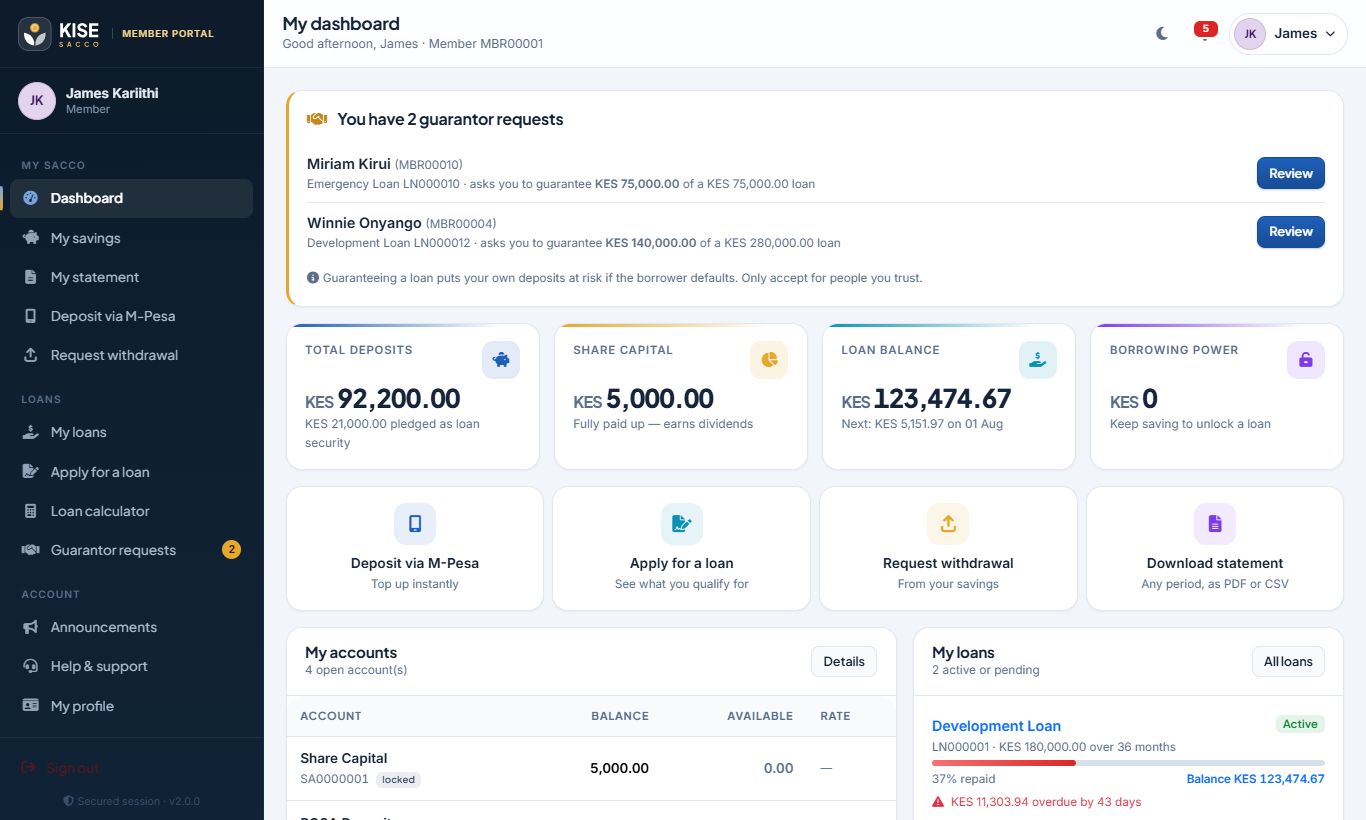
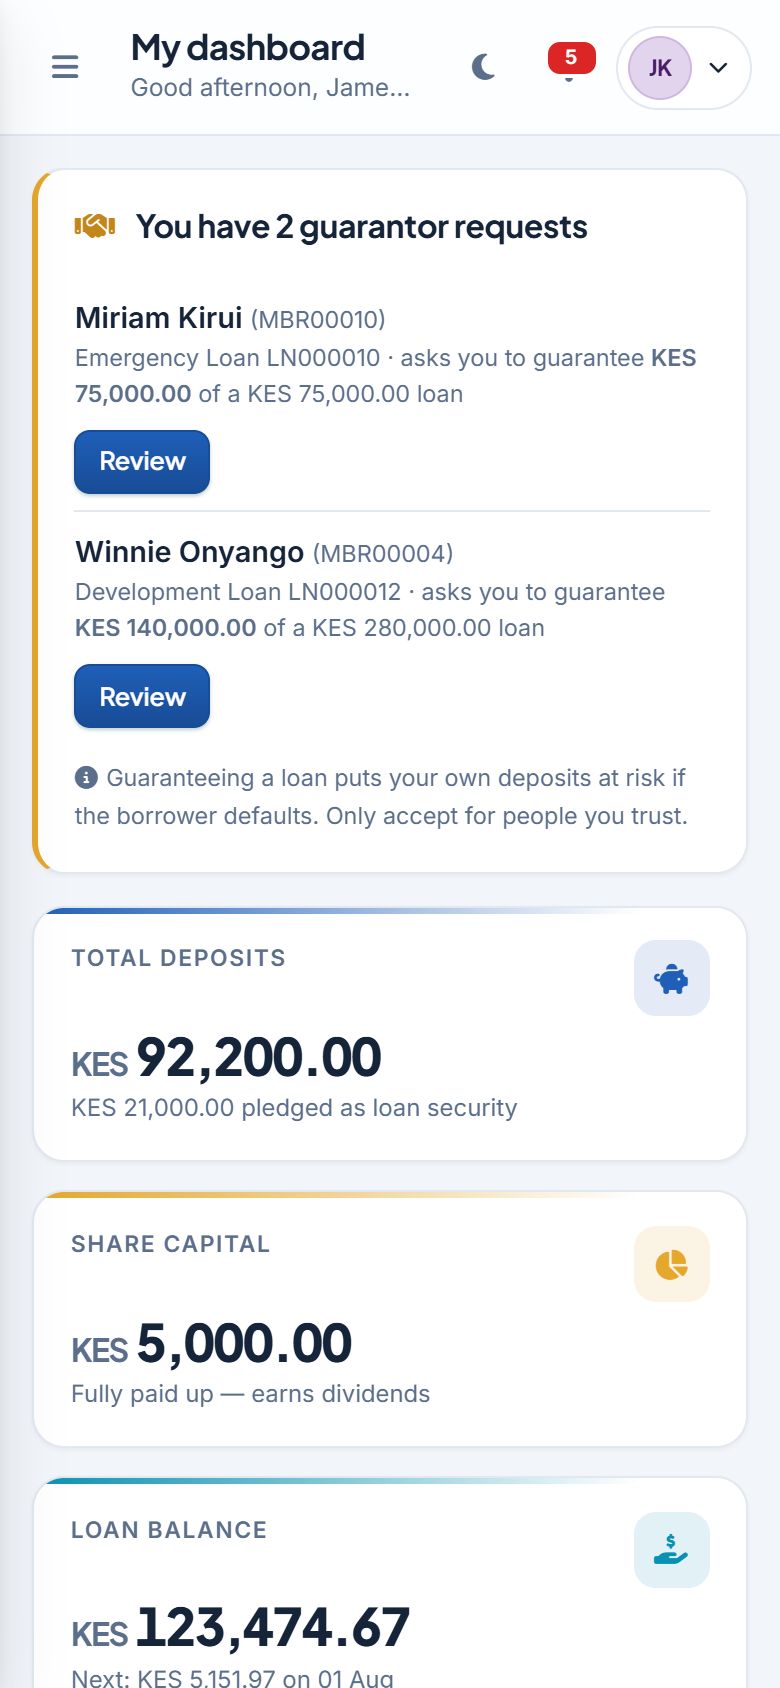
Total deposits, share capital, loan balance and borrowing power at a glance.
Action cards — guarantor requests waiting for you, overdue instalments with a Pay now with M-Pesa button.
Quick actions: deposit, apply for a loan, request a withdrawal, download a statement.
Accounts, loans, savings goal, recent activity and notices further down.
DesktopPhone
My savings and statements
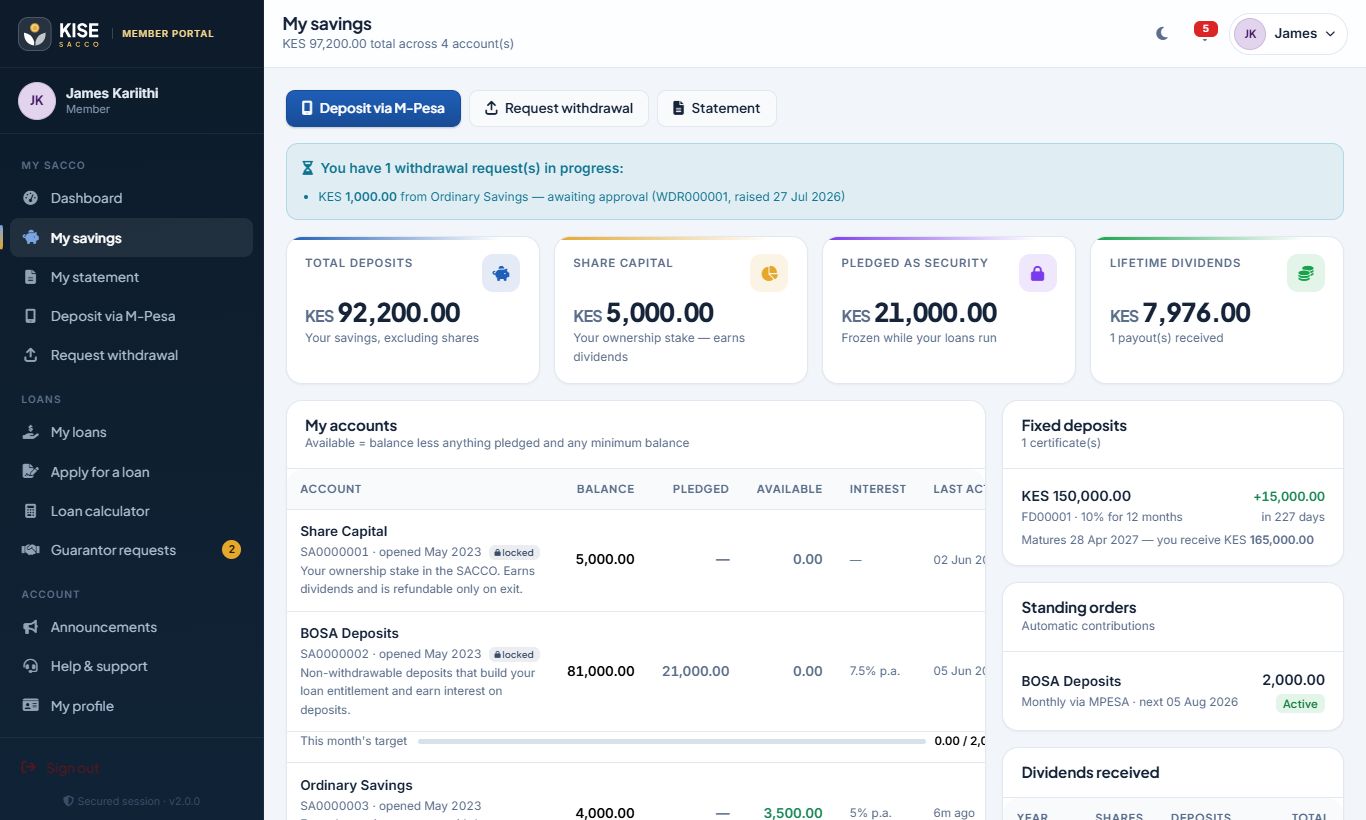
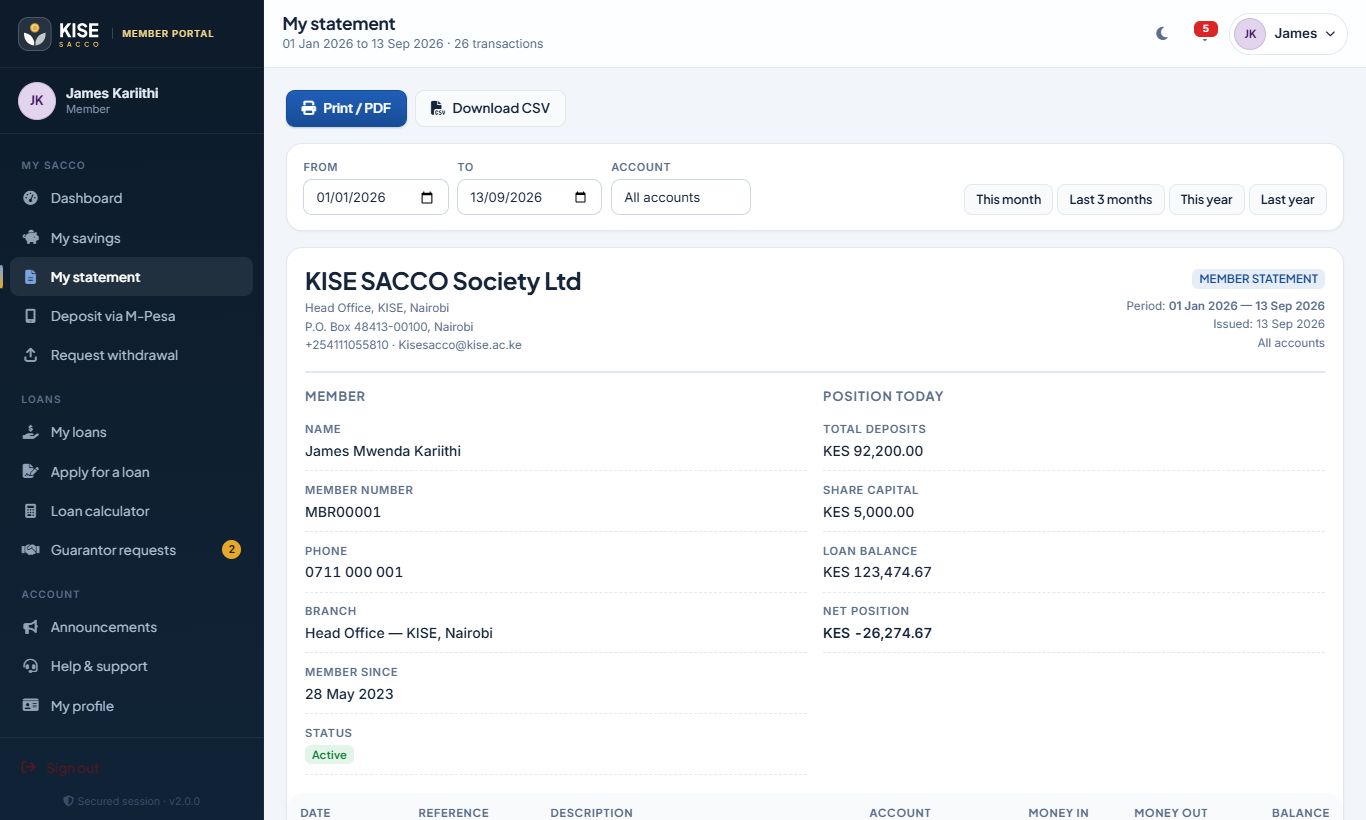
My savings — every account, balance, amount on hold and interest rate.My statement — choose an account and date range, then print or save as PDF.
On hold means part of your deposits is pledged as security for your own loan or a loan you guarantee; it is released automatically when the loan is repaid.
Depositing with M-Pesa
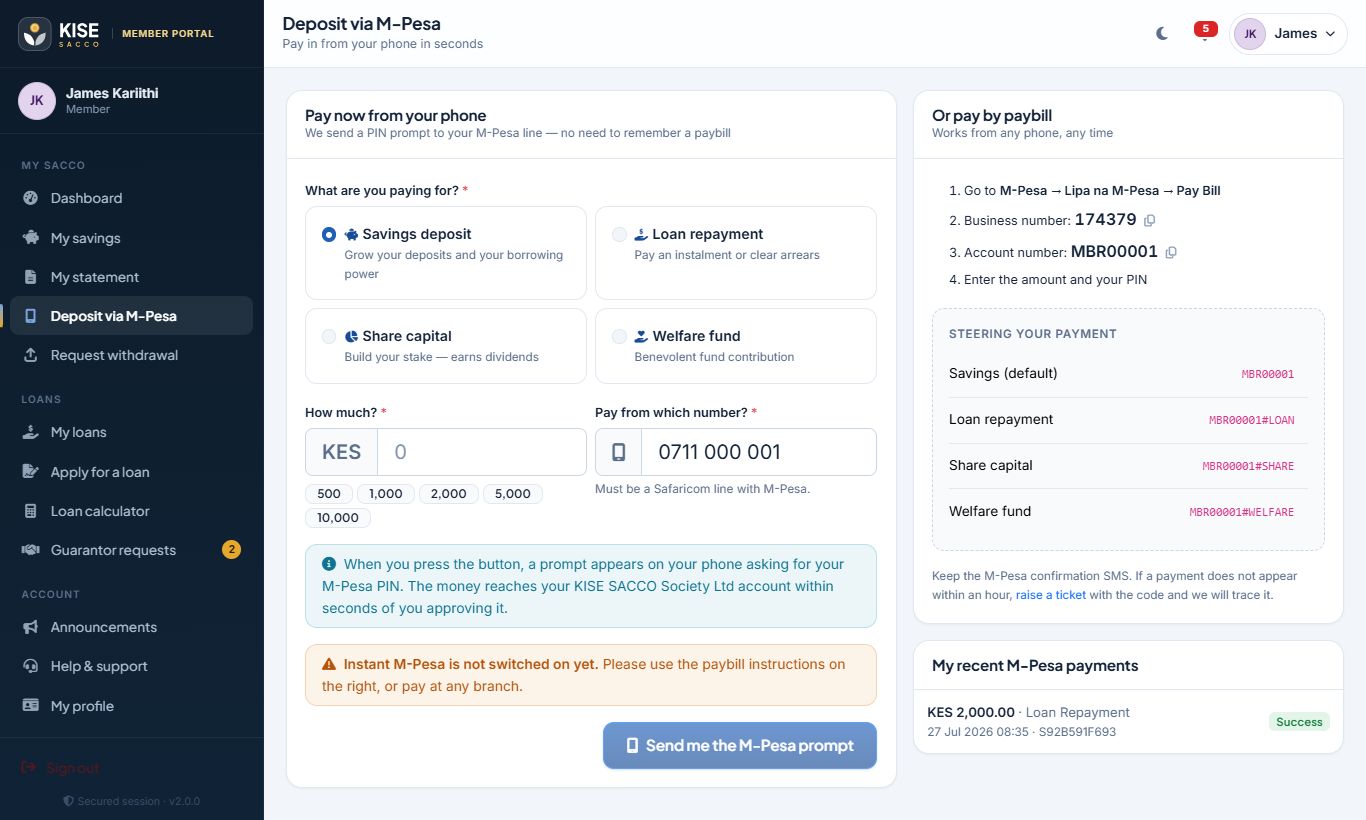
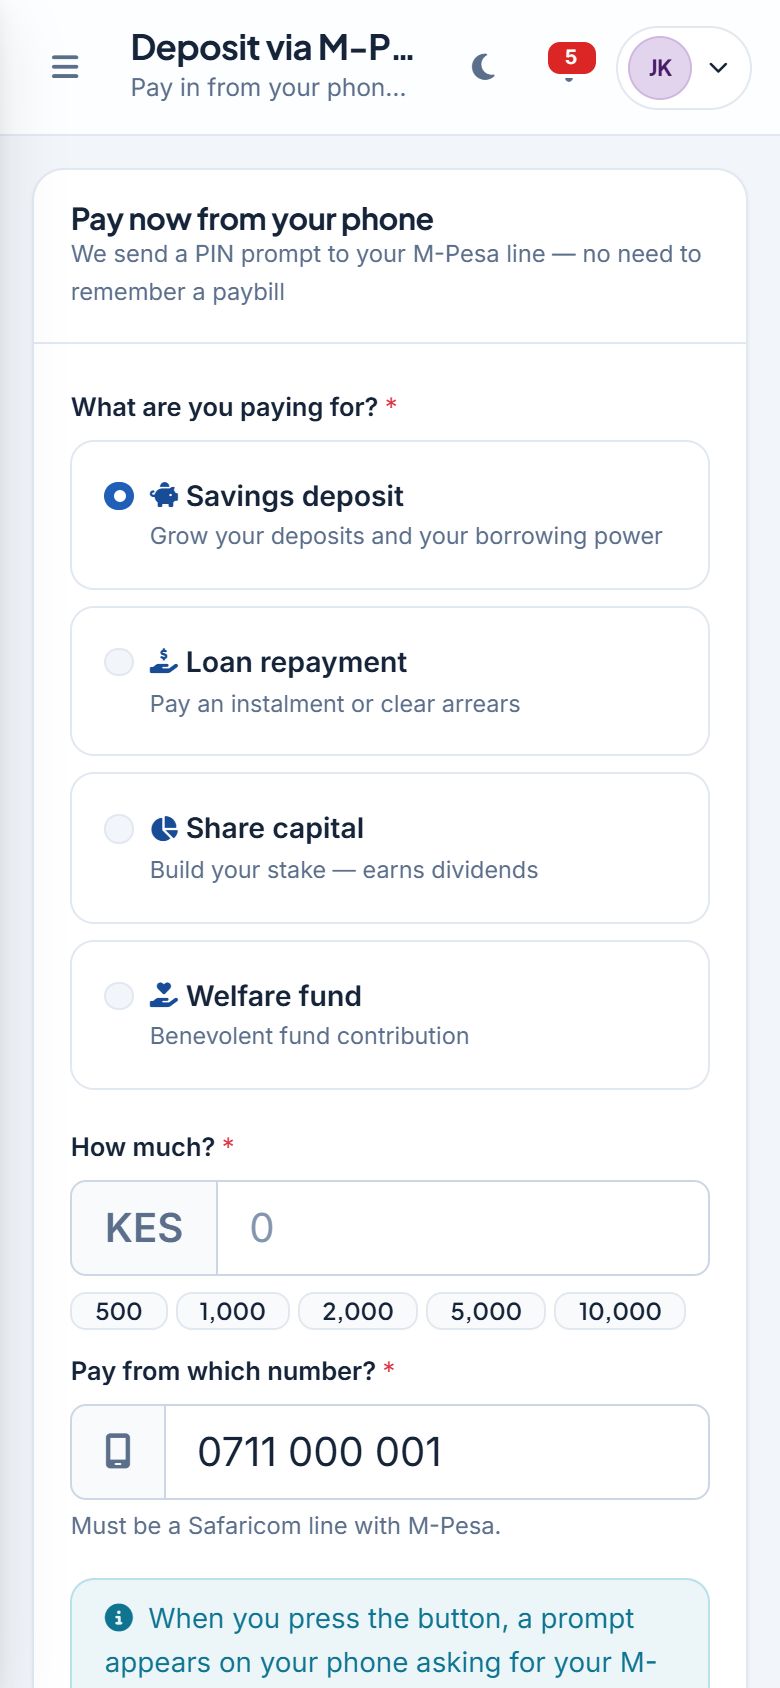
Open Deposit via M-Pesa.
Choose what you are paying for — savings, shares, welfare or a loan repayment.
Enter the amount and the M-Pesa number to charge (defaults to your registered number).
Click send. A prompt appears on your phone: enter your M-Pesa PIN on your phone only.
When M-Pesa confirms, the money is posted and you get a notification. Track it in the list of your recent M-Pesa payments on the same page.
Paying by paybill instead? Use the SACCO paybill and your member number as the account, e.g. MBR00001. Add #LOAN, #SHARE or #WELFARE to direct the payment, e.g. MBR00001#LOAN.
Choose, enter amount, approve on phone.On a phone
Requesting a withdrawal
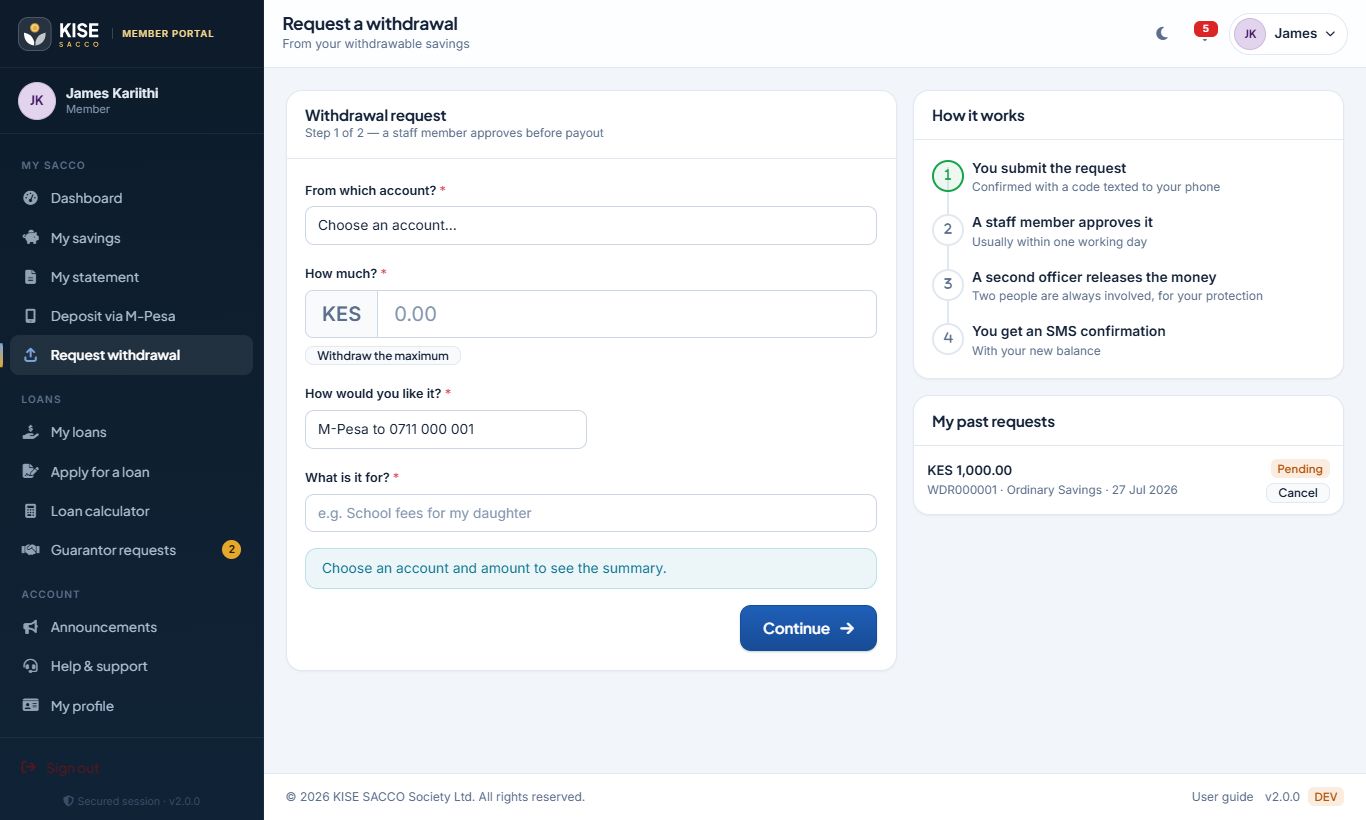
Open Request withdrawal and pick an account that allows withdrawals.
The page shows what is available (balance minus minimum balance and any holds) and any fee or notice period.
Enter the amount, how you want to be paid (M-Pesa, bank or cash) and a reason.
Confirm with the one-time code sent to your phone and click Submit request.
Staff approve the request and a second officer releases the money. You are notified at each step, and you can cancel while it is pending.
Withdrawals are approved and paid by two different officers.
Loan calculator and applying for a loan
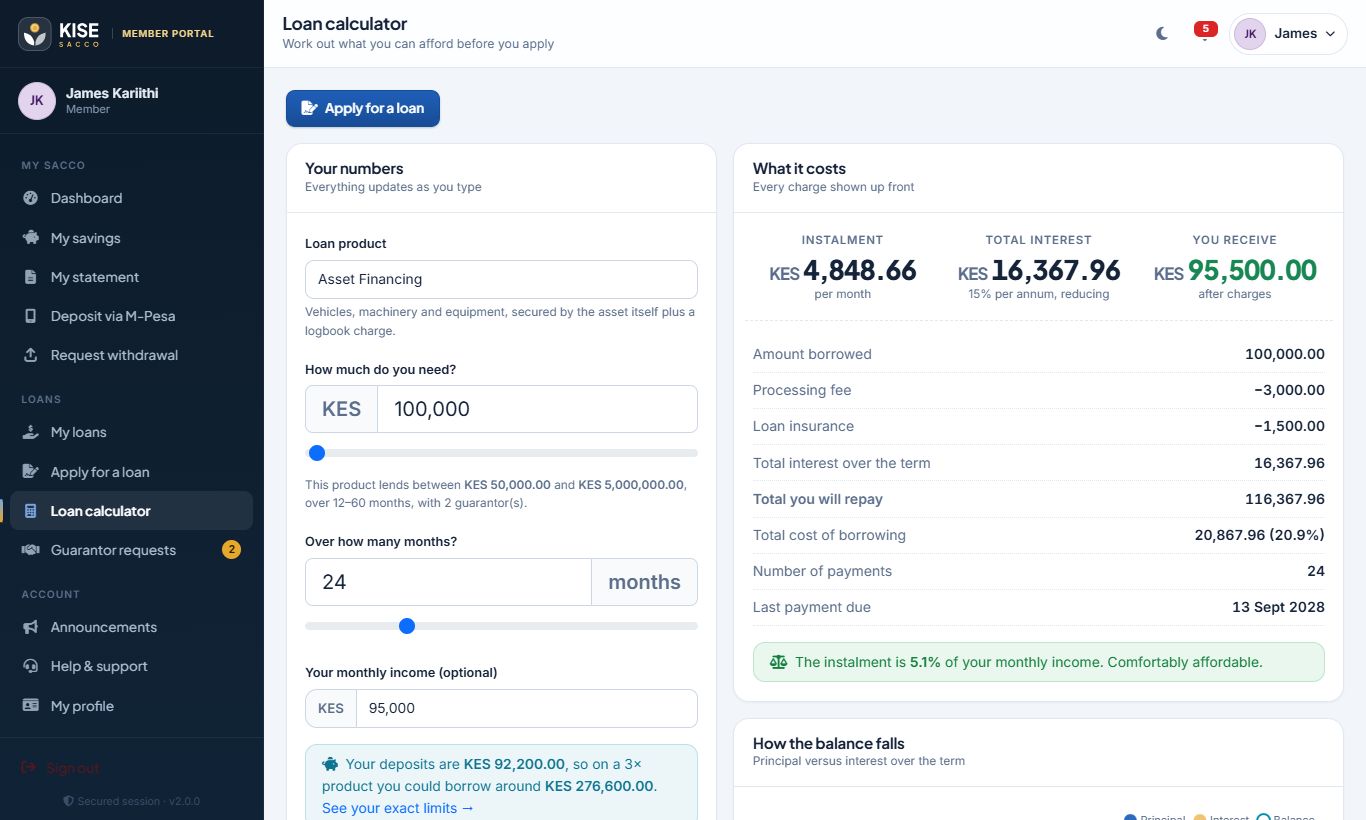
Try the Loan calculator first to see instalments for any product, amount and period.
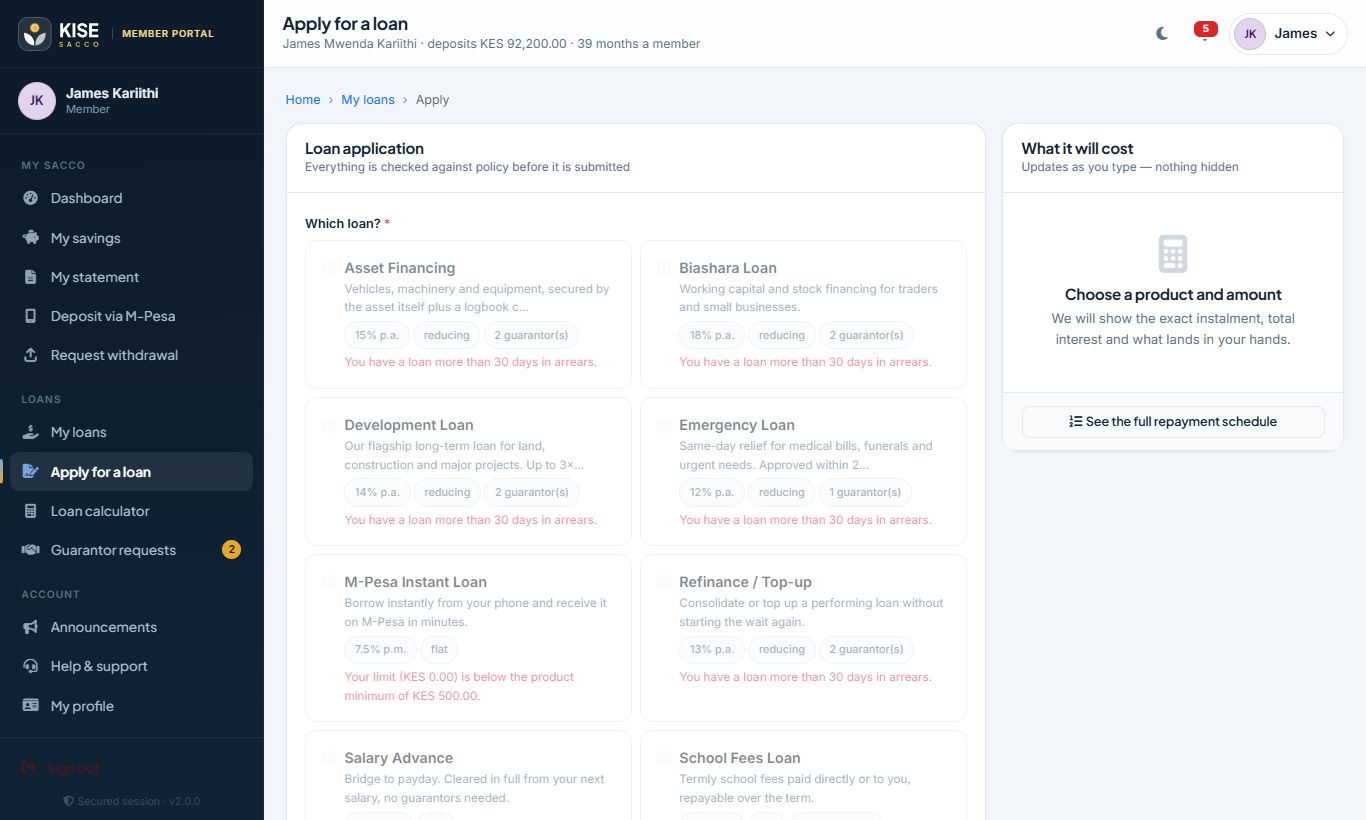
Open Apply for a loan and select a product. Products you don’t yet qualify for explain why.
Enter the amount and period. The quote updates live: instalment, total interest, processing and insurance charges, and what you actually receive.
Add guarantors for any amount above your own deposits — search by name or member number; each guarantor’s capacity is shown.
State the purpose and click Submit application. Your guarantors are asked to accept from their portal.
Follow progress in My loans: pending → guarantors accepted → appraised → approved → disbursed.
The system blocks applications above your limit (a multiple of your deposits, minus existing loans and guarantees). Borrow what you can comfortably repay.
Live quote while you apply.Loan calculator with full schedule.
My loans and guarantor requests
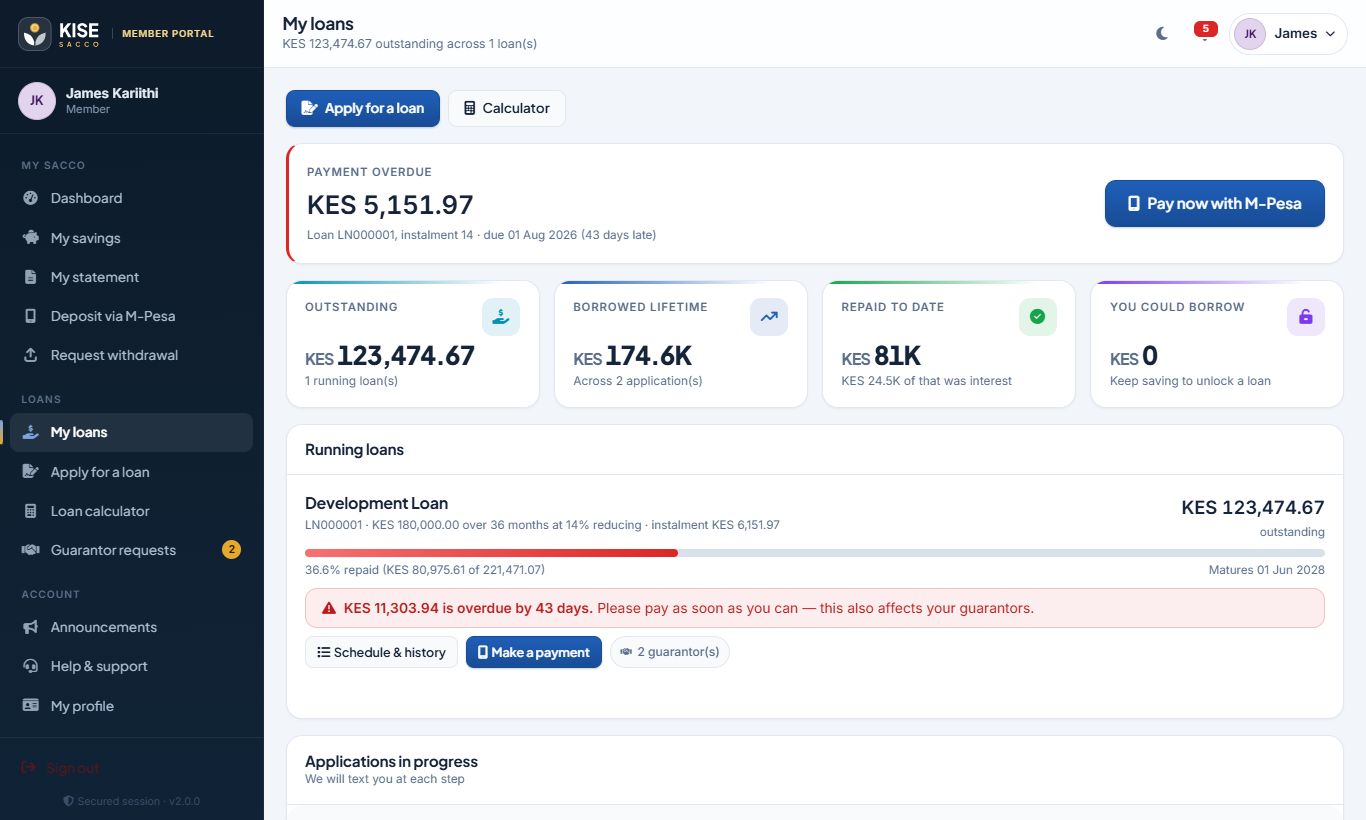
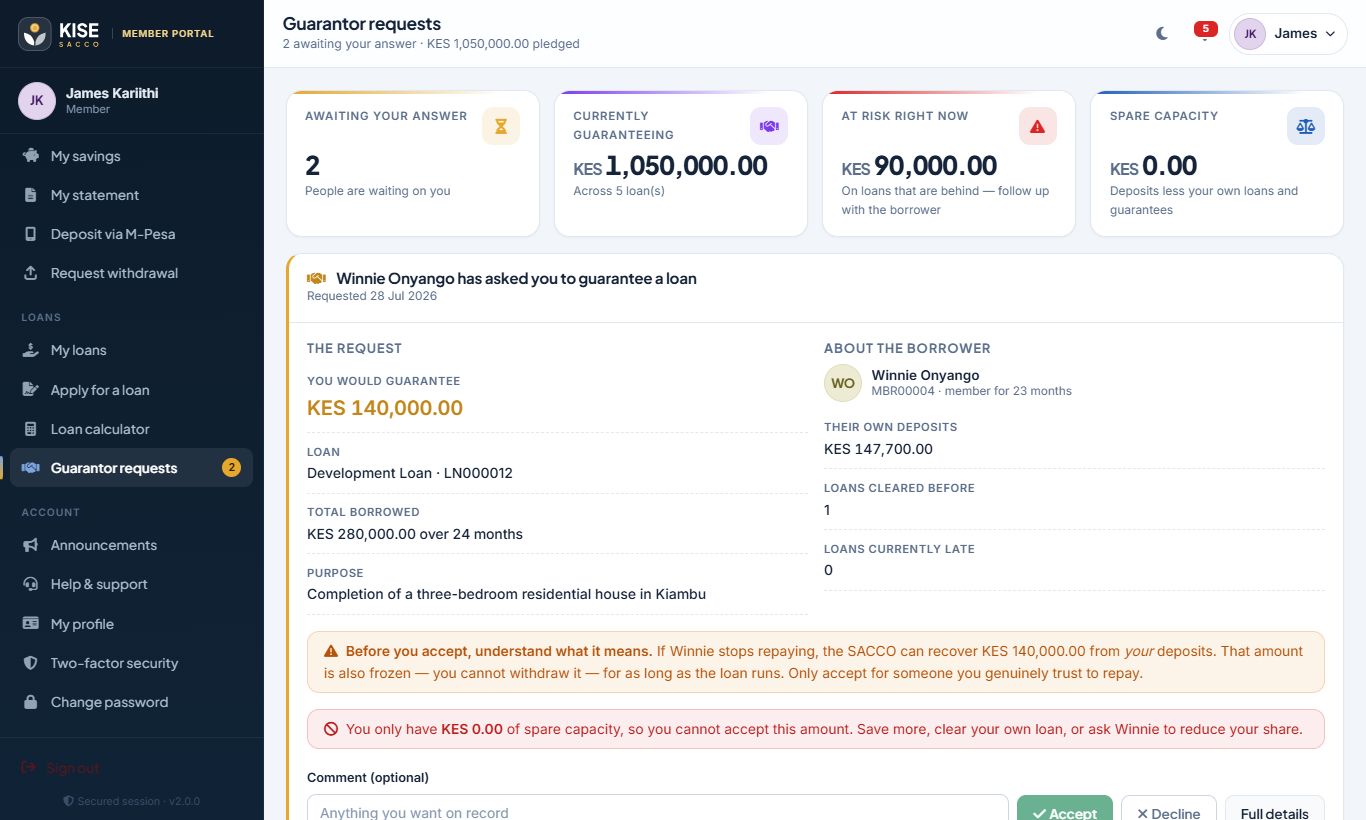
My loans — balances, progress, overdue amounts and the repayment schedule. Use Pay now with M-Pesa to clear arrears.Guarantor requests — accept or decline, see your remaining capacity and the loans you already guarantee.
When you accept a guarantee, that amount of your deposits is held until the loan is repaid, and may be recovered from you if the borrower defaults. Only accept for people you trust and can afford to support.
Help & support, announcements and notifications
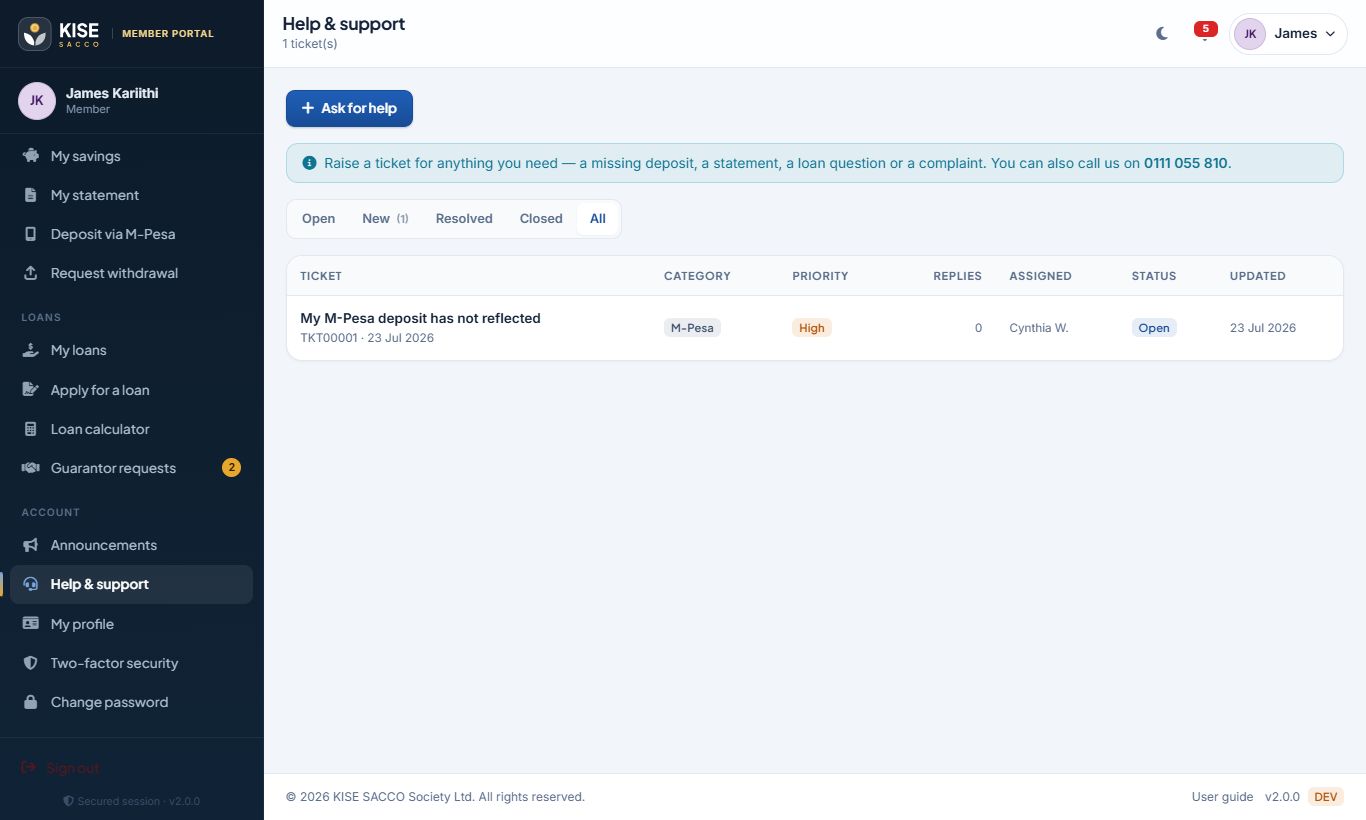
Help & support → Ask for help: choose a category (account, loan, M-Pesa, statement, complaint…), describe the issue and submit. Replies appear in the same ticket and you are notified.
Announcements — news, AGM notices and dividend updates from the SACCO.
The bell shows notifications: deposits received, loan decisions, guarantor requests and security alerts.
Raise and track support tickets.
Staff essentials
The dashboard, navigation and habits every staff member should know.
All staff roles
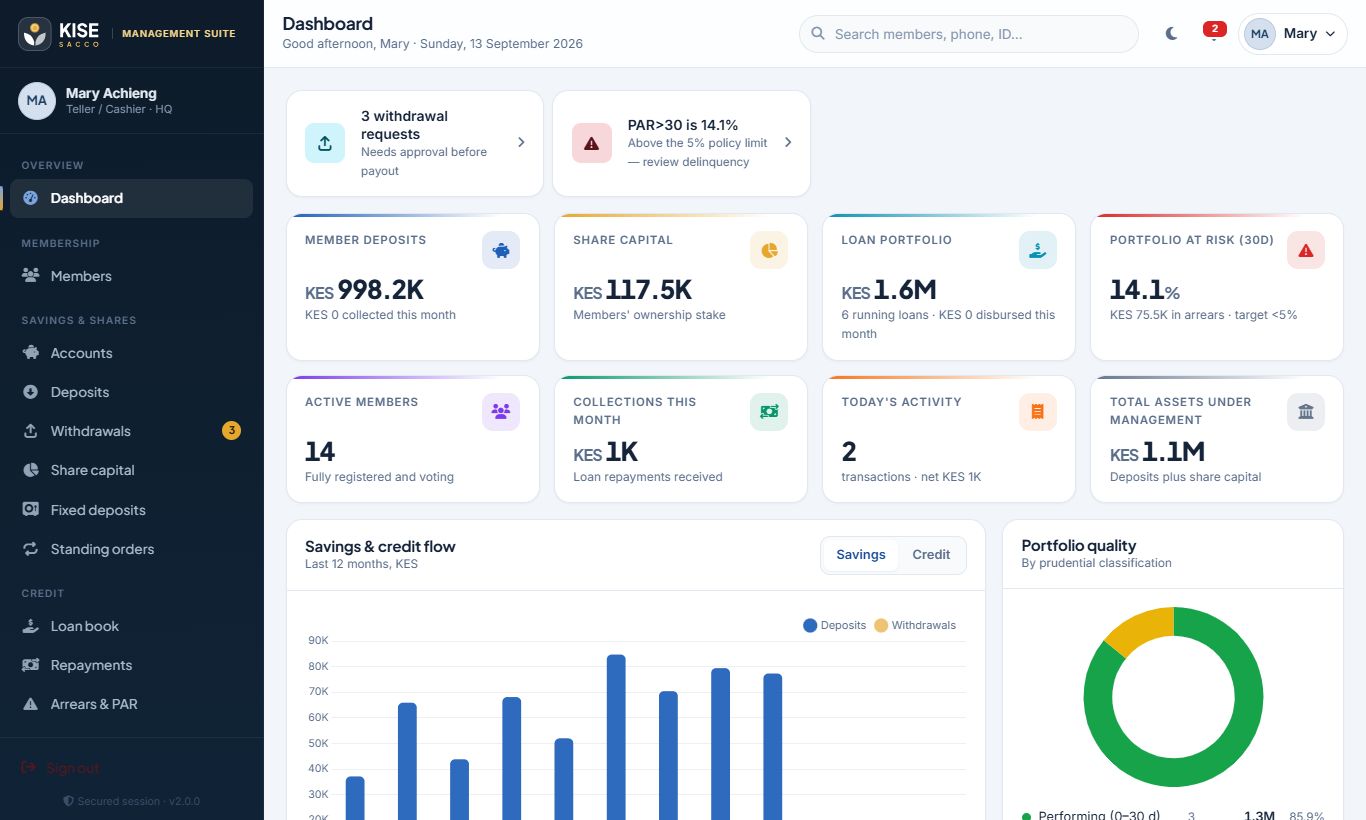
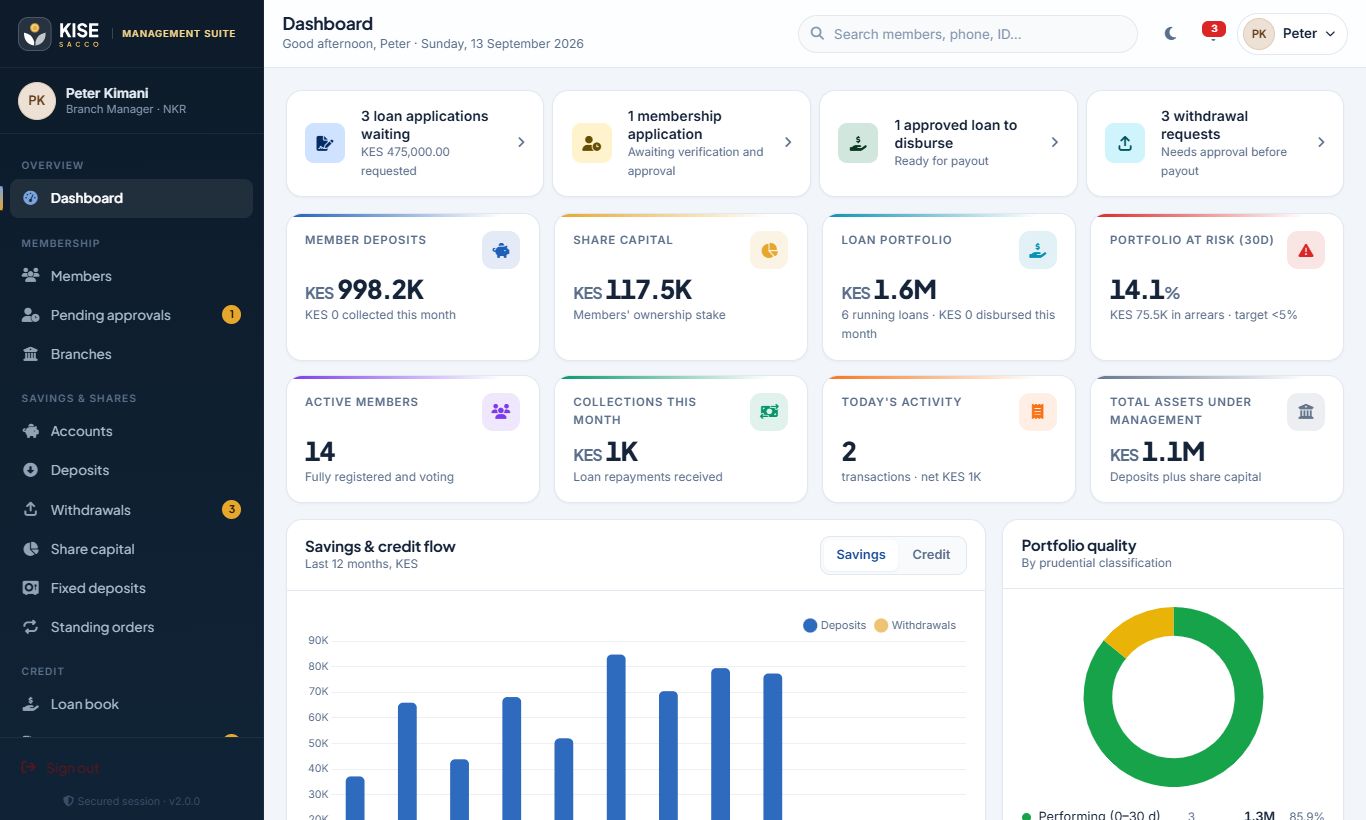
The staff dashboard
Attention strip — work waiting for you: loan applications, membership approvals, loans to disburse, withdrawal requests, open tickets, high arrears.
KPI tiles — deposits, share capital, loan portfolio, portfolio at risk (PAR 30), members, collections and today’s activity.
Charts — 12-month savings and credit flows, and portfolio quality by prudential grade.
Sidebar — only shows modules your role can use. Badges show counts waiting.
Search (top bar) — find a member by name, member number, phone or ID.
“Confirm it’s you” — before opening Settings, Roles, Maintenance or Brand & contacts, or changing staff accounts, you may be asked to re-enter your password and authenticator code. This protects the SACCO if a signed-in computer is left unattended.
Separation of duties is enforced by the system: the person who approves a loan cannot disburse it, the person who approves a withdrawal cannot pay it out, and nobody can approve their own expense.
Dashboard as seen by a teller.Branch managers see only their branch’s members.
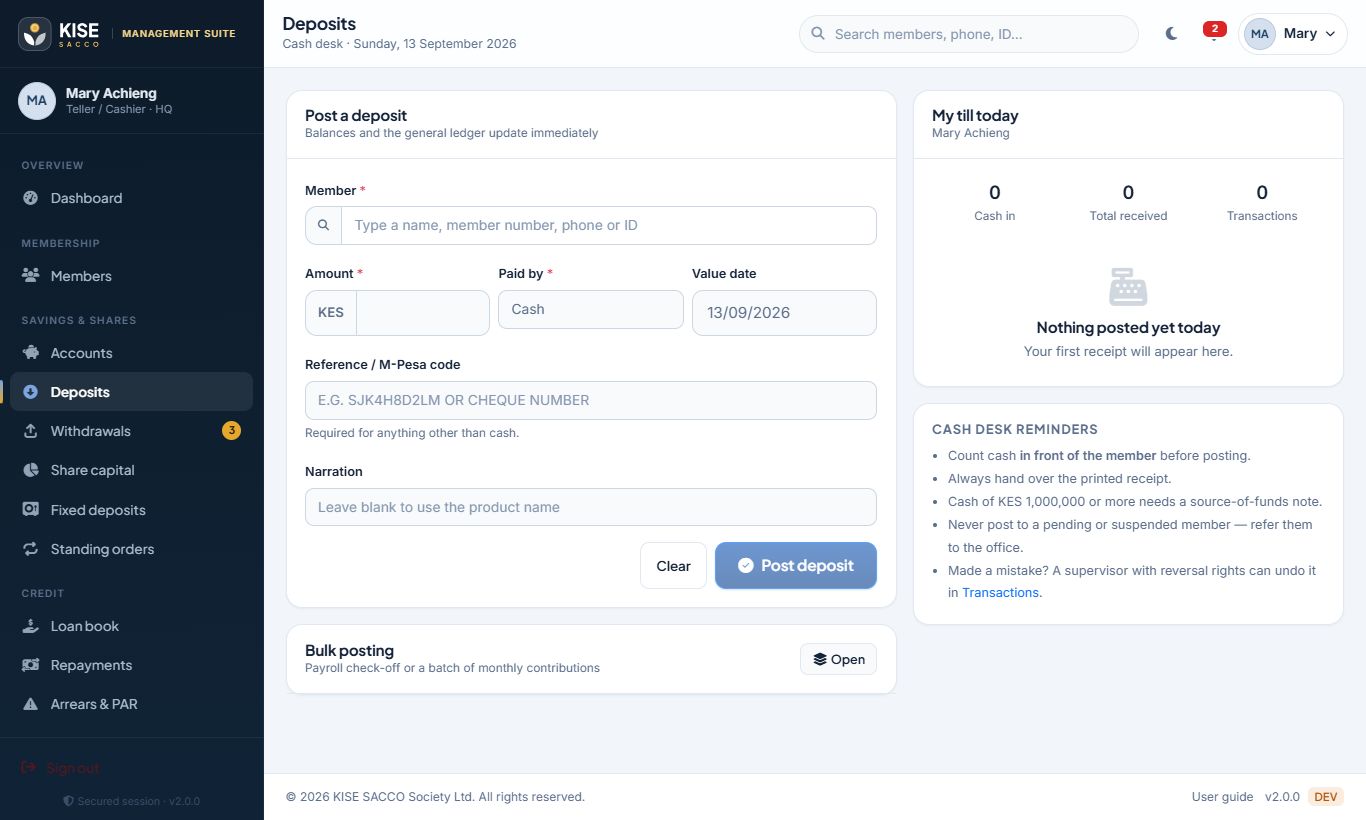
Open Savings & Shares → Deposits and search for the member.
Choose the account (savings, BOSA deposits, shares, welfare…).
Enter the amount, method (cash, bank, cheque or M-Pesa) and reference, then post.
Print the receipt. The balance updates instantly and a balanced journal entry is created automatically.
Bulk deposits (e.g. a payroll check-off list): open Bulk, paste member no, amount, reference lines and click Post batch. Each line is validated and reported.
Deposits with receipts.
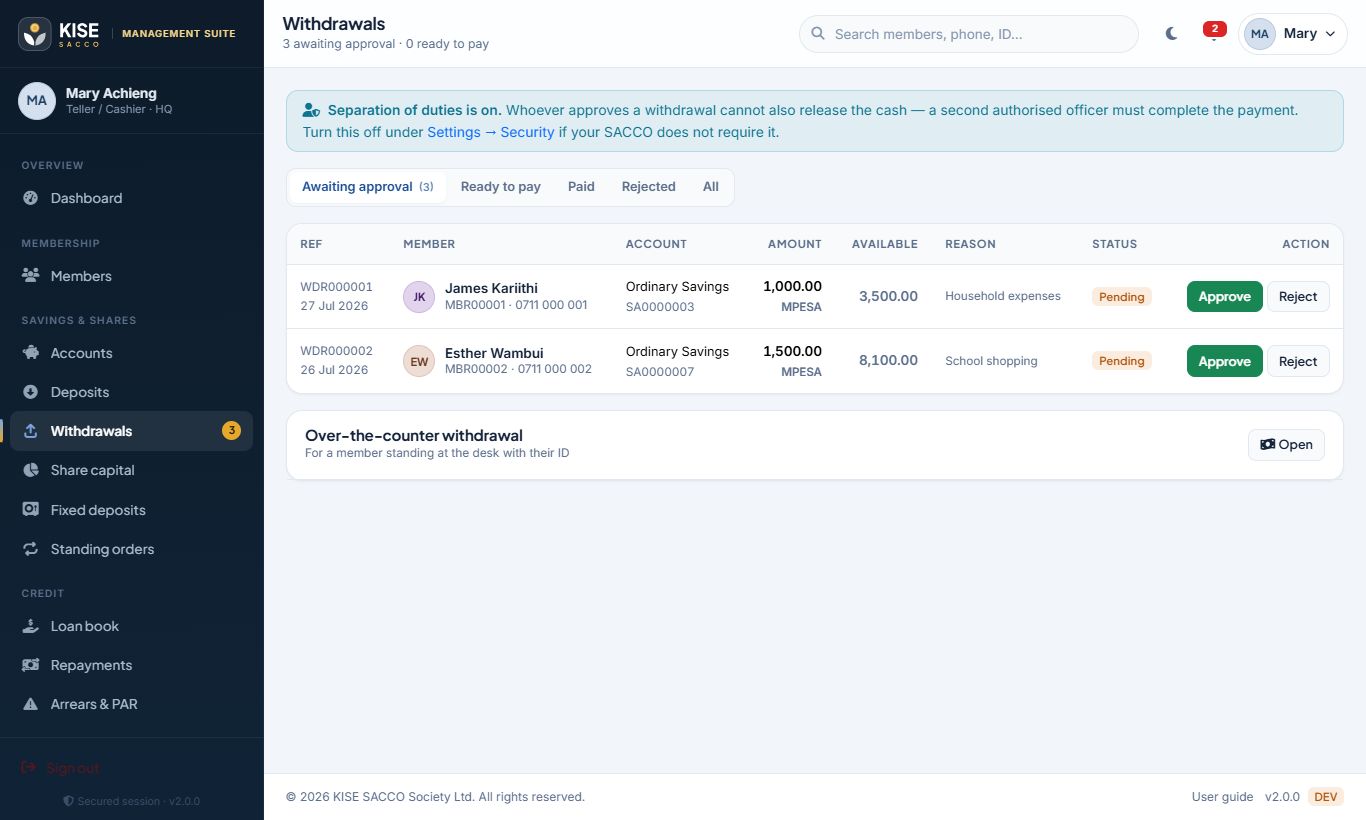
Withdrawals (maker–checker)
Pending requests and counter withdrawals.
Open Savings & Shares → Withdrawals. Member requests from the portal appear here.
Approve (or reject with a reason) after checking the available balance and notice period.
A different officer clicks Pay out and confirms the method. M-Pesa payouts are sent through Daraja B2C when configured.
For a member at the counter, use the counter withdrawal panel.
The system refuses withdrawals that would break the minimum balance, touch pledged funds or break product rules.
Share capital, fixed deposits and standing orders
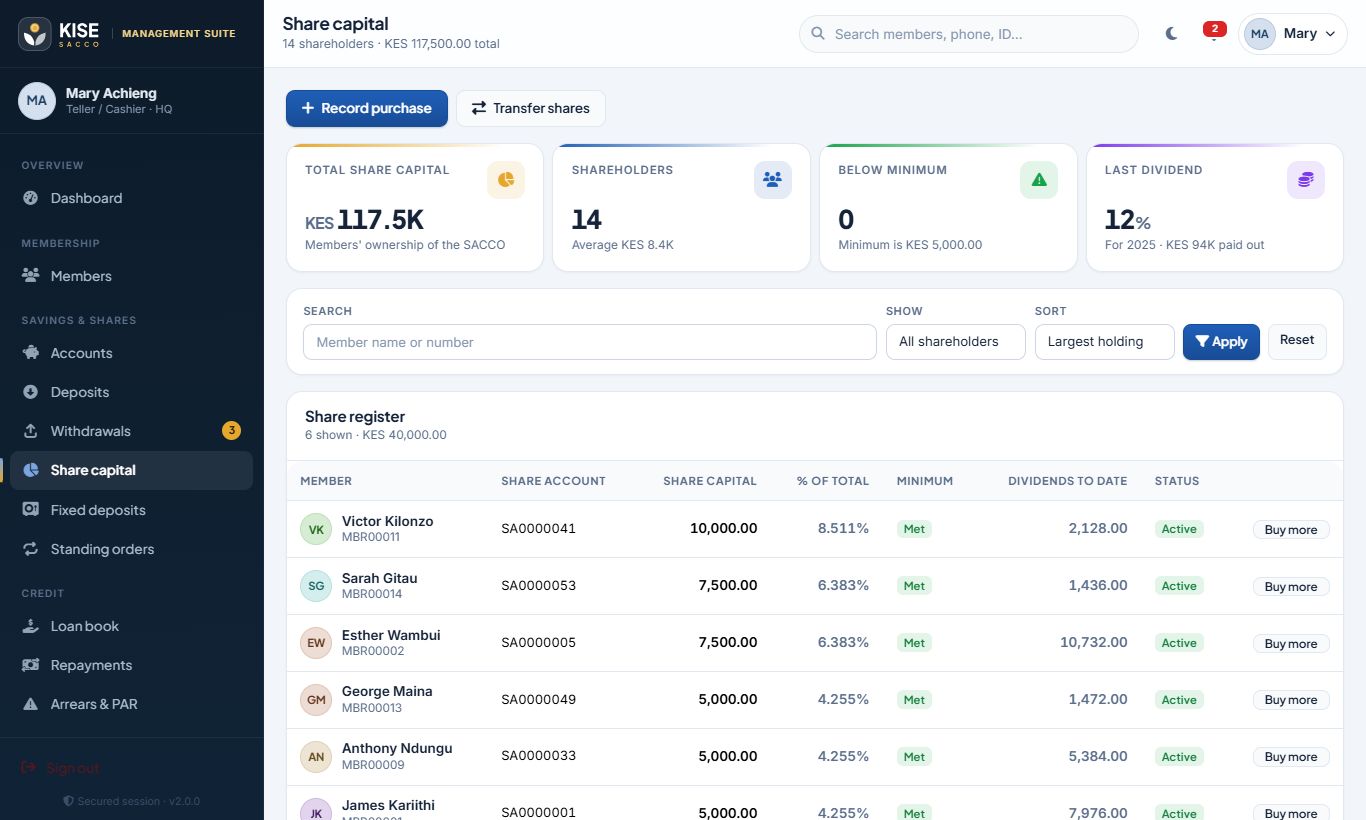
Share capital — record share purchases and transfer shares between members; see who is below the minimum.
Fixed deposits — open a certificate, set the term and rate, then mature, roll over or break early (with penalty).
Standing orders — recurring collections from savings into shares, welfare or loan repayments; run daily by the scheduler.
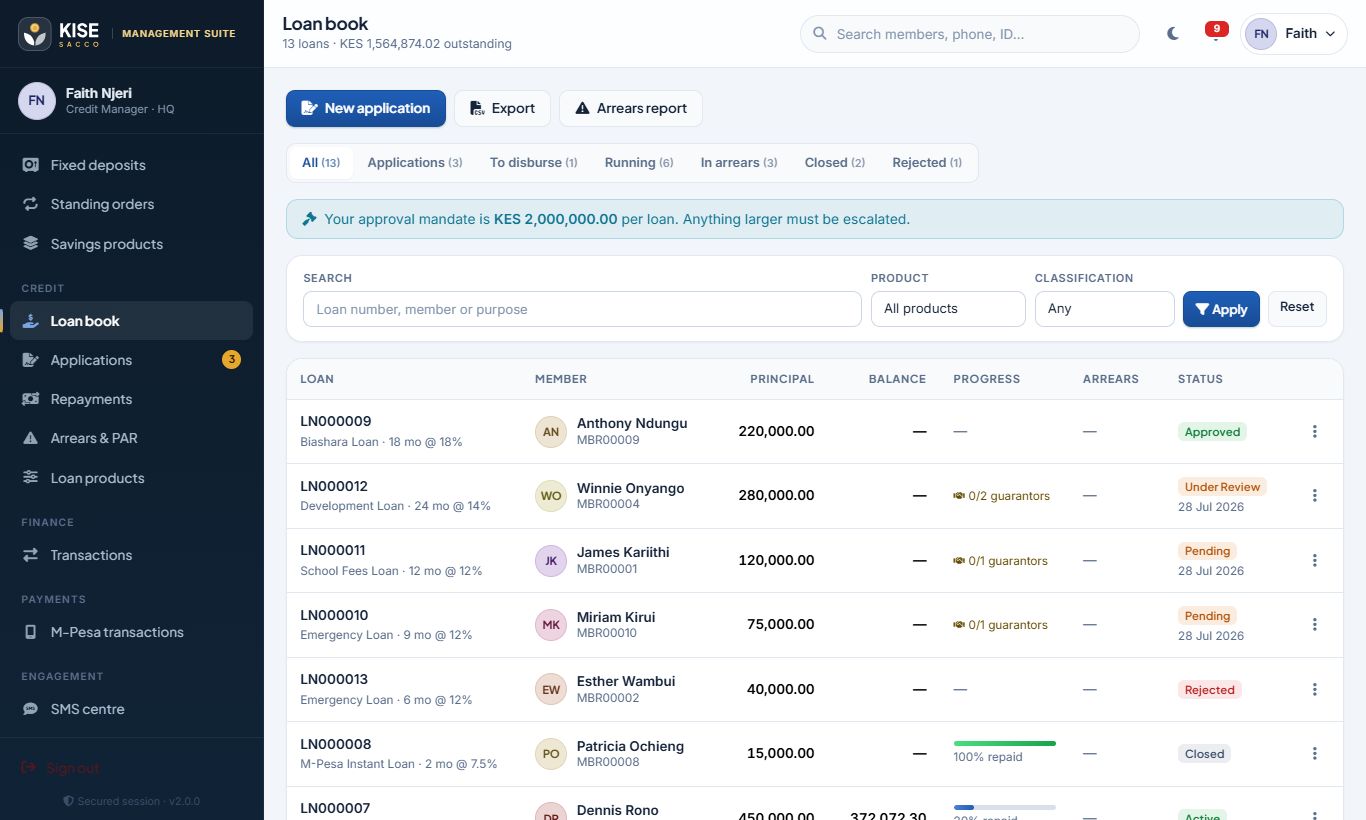
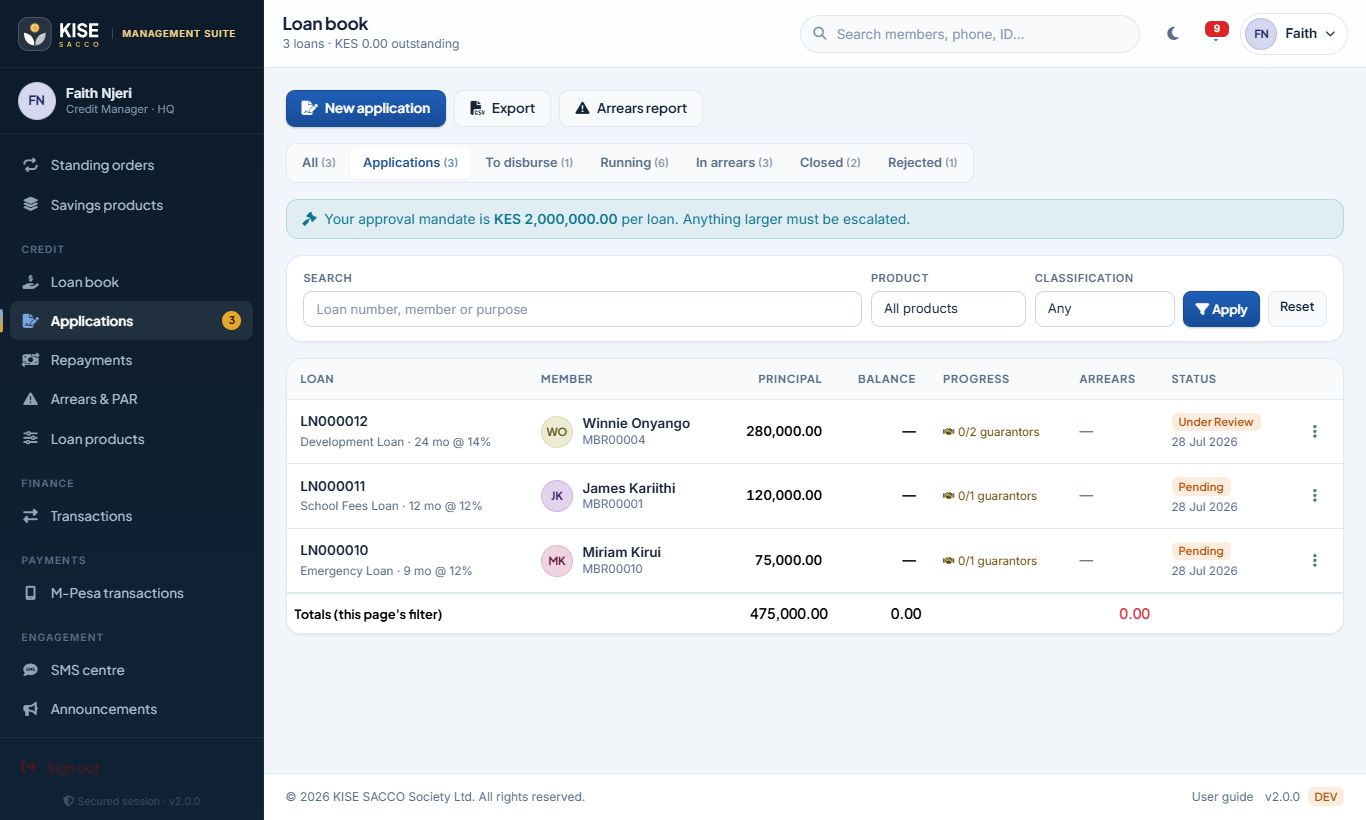
Credit → Loan book — filter by status, product, branch or arrears.Credit → Applications — everything waiting for appraisal or approval.
Loan officers can capture an application for a member at the office from the member profile (New loan) using the same live quote the member sees.
Appraising and approving a loan
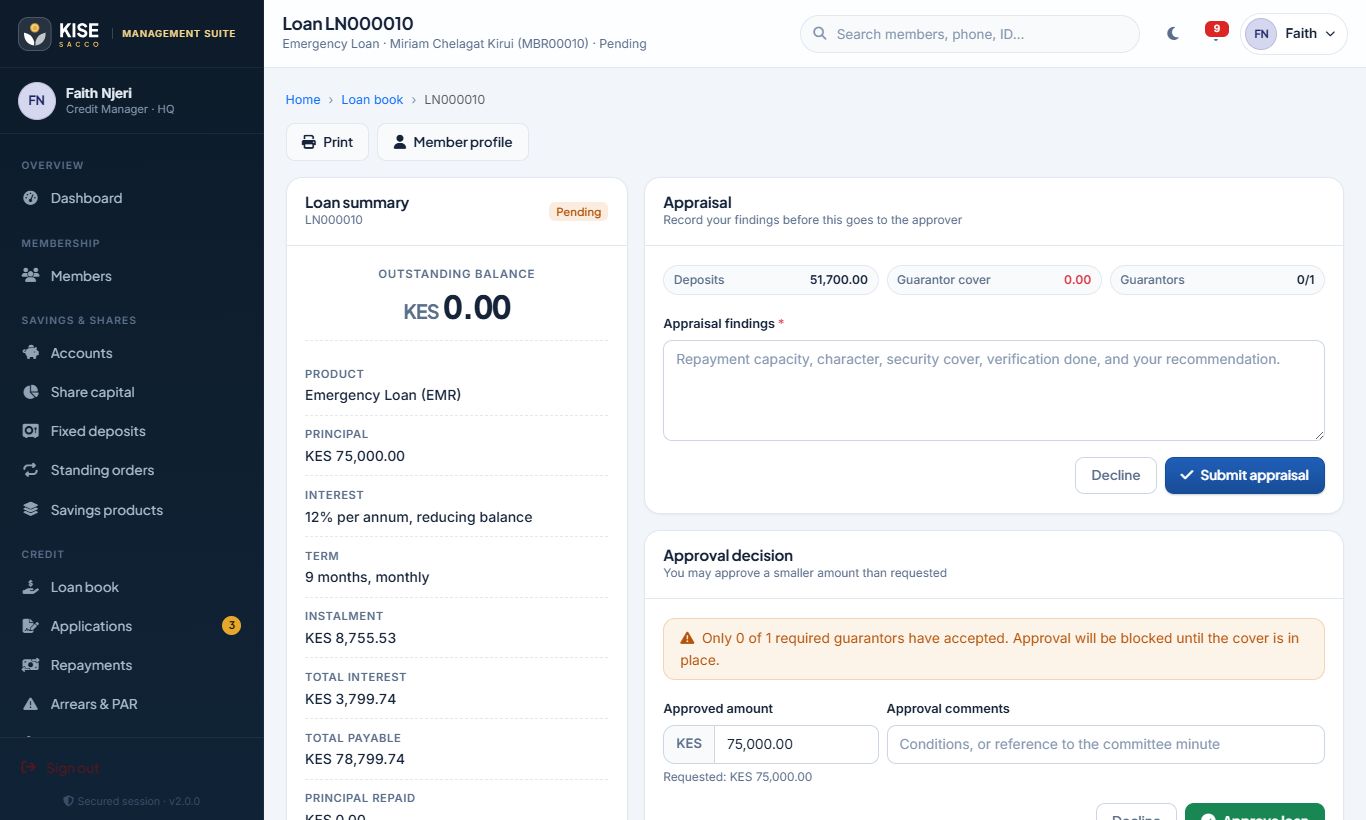
Open the application. Check eligibility, deposits, existing exposure, guarantor coverage and the repayment schedule.
Loan officers / credit: record the appraisal (recommended amount, term, notes) and click Submit appraisal.
Approvers: click Approve loan or Decline with a reason.
Approval mandate (default)
Up to
Loan officer
KES 50,000
Branch manager
KES 500,000
Credit manager
KES 2,000,000
CEO / board
Above that
Mandates are configurable in Settings → Credit policy.
An application being appraised.
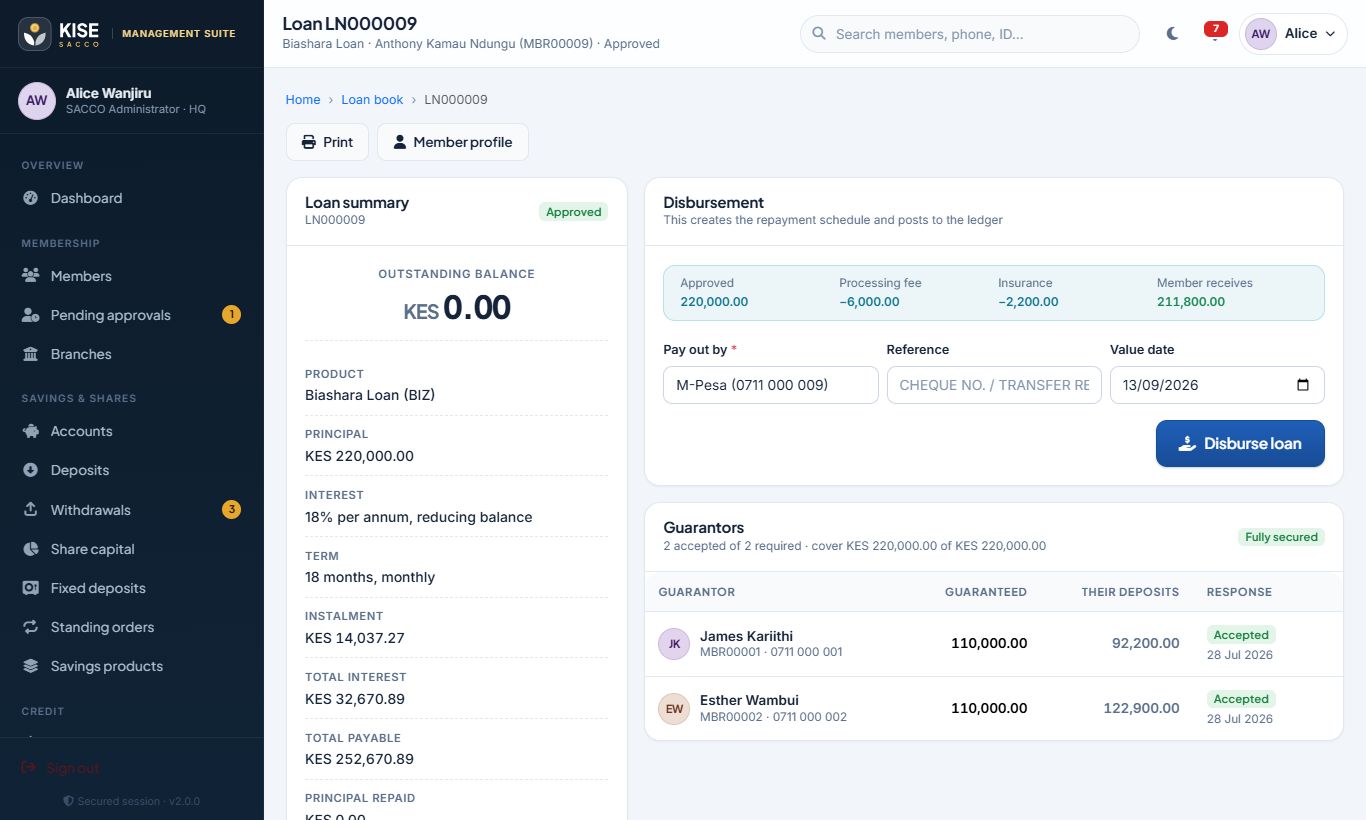
Disbursing an approved loan
Disbursement shows the charges deducted and the net amount paid.
Open an approved loan. The person who approved it cannot disburse it.
Choose the method (to savings, M-Pesa, bank, cash) and value date, then click Disburse loan.
The system deducts processing and insurance fees, generates the schedule, places holds on the borrower’s and guarantors’ deposits and posts the accounting entries.
Repayments, arrears and closing
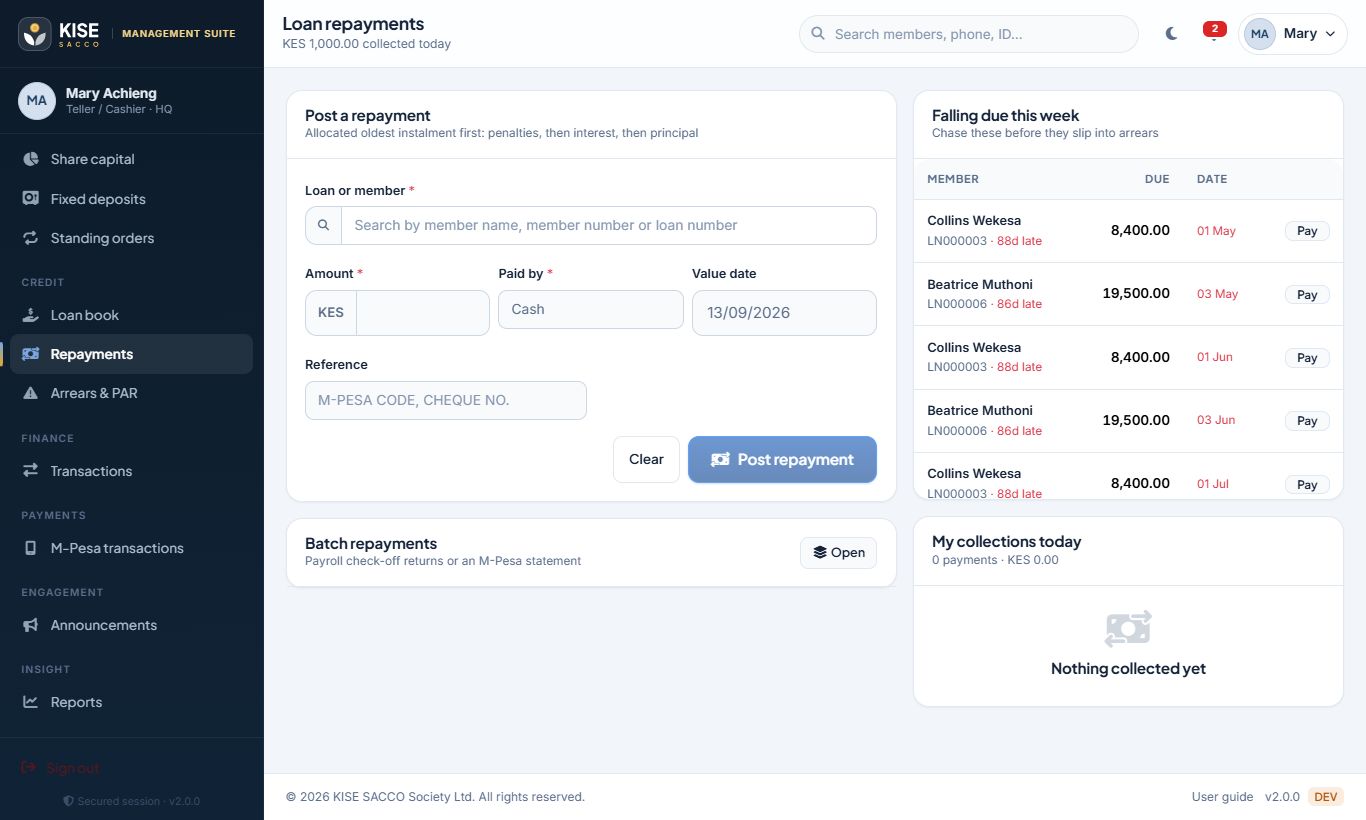
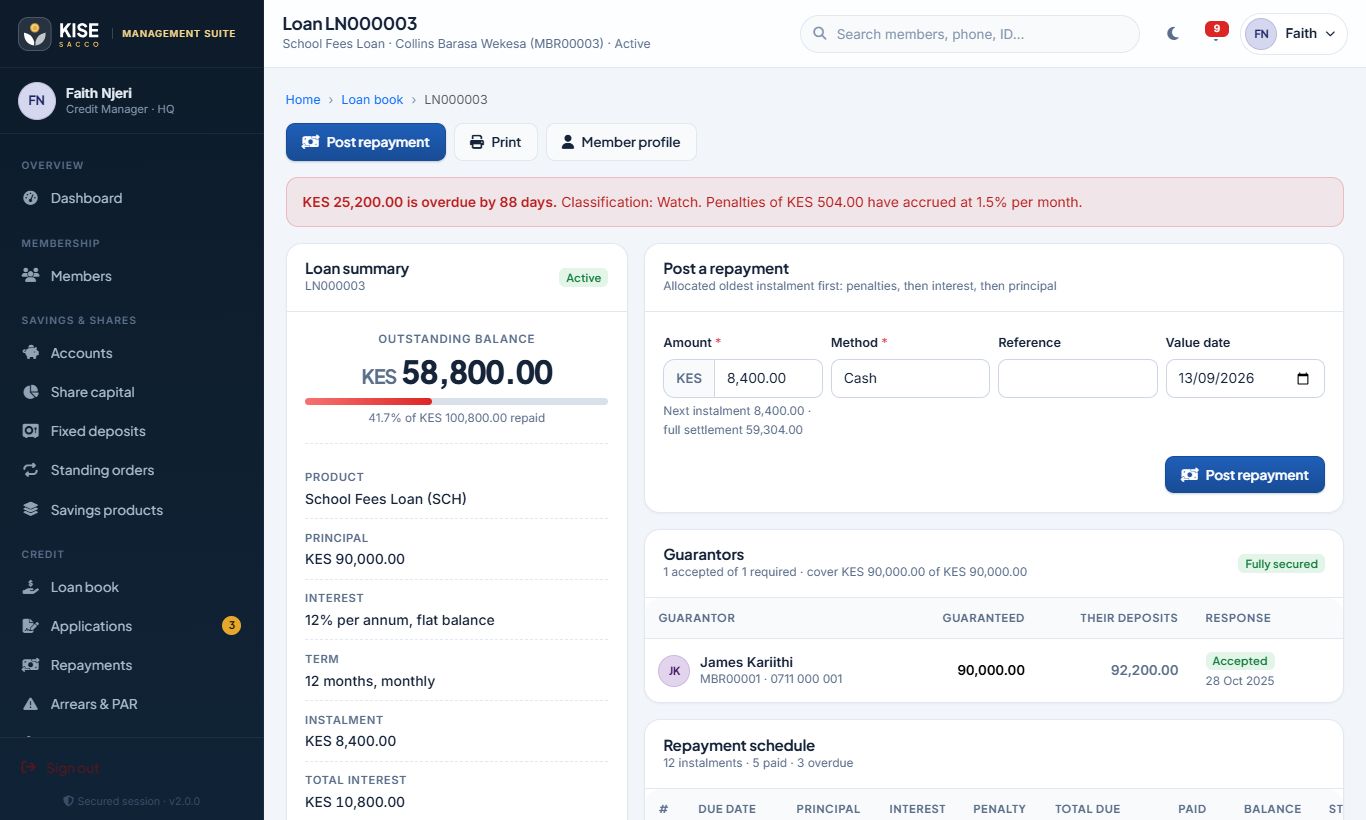
Credit → Repayments: search the member, choose the loan and use the quick buttons — One instalment, Clear arrears or Settle in full.
Choose the method and reference and post. Each payment clears the oldest instalment first, in the order penalty → interest → principal.
When the balance reaches zero the loan closes and every hold and guarantee is released automatically.
M-Pesa repayments (portal or paybill with #LOAN) post automatically.
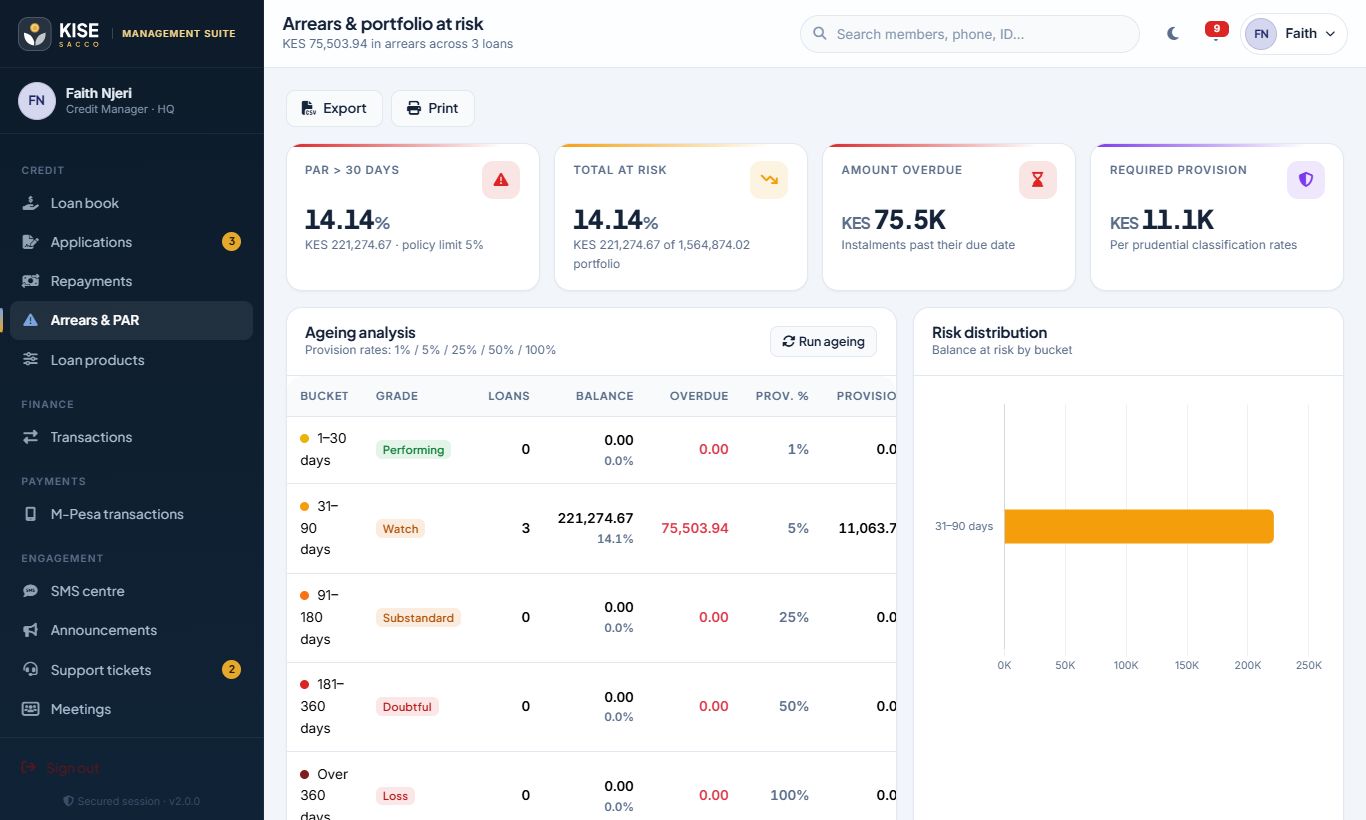
Credit → Arrears & PAR ages overdue loans into performing, watch, substandard, doubtful and loss, shows provisions and lets you SMS members in arrears.
Posting a repayment.Portfolio at risk.
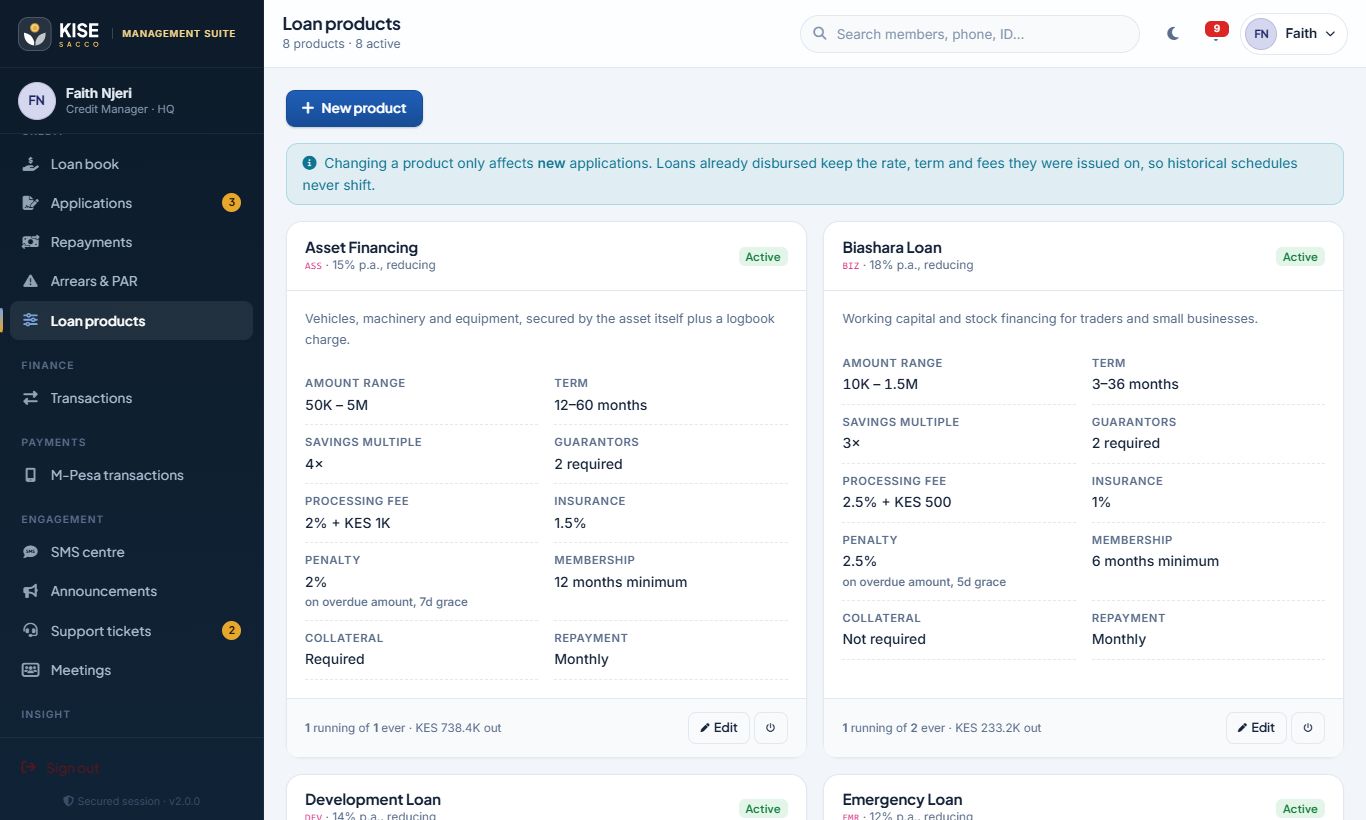
An active loan: schedule, repayments, guarantors, collateral and approvals.Loan products: rates, method, limits, fees, penalties, multiplier and guarantor rules.
Credit managers can also reschedule a loan or write it off (with permission), each requiring a reason that goes to the audit trail.
Finance & accounting
A true double-entry general ledger — every money movement posts balanced entries automatically.
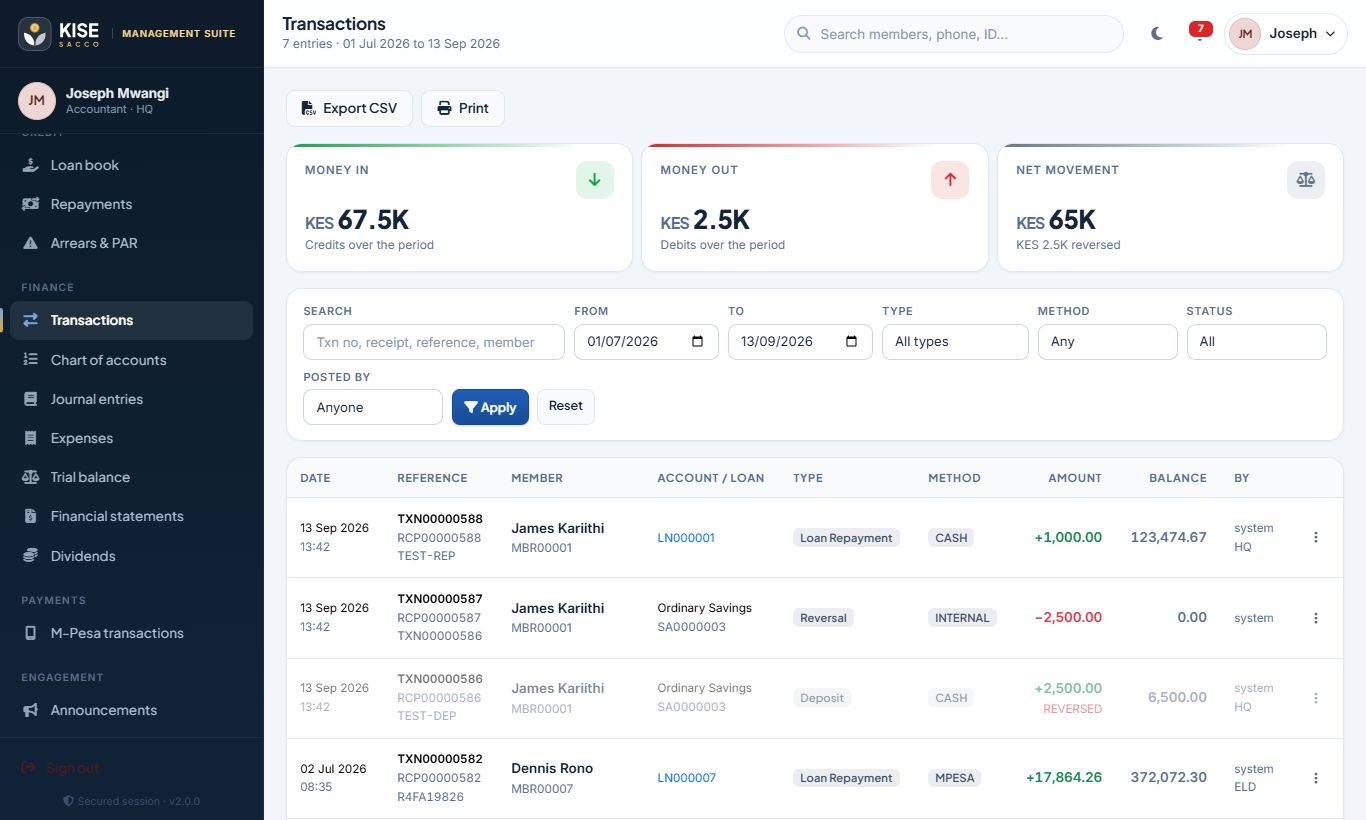
Finance → Transactions lists every deposit, withdrawal, fee, repayment and transfer with filters and CSV export.
To correct a mistake, open the transaction and Reverse with a reason. The original is kept; an equal and opposite entry is posted.
Nothing is ever deleted — that is what keeps the books auditable.
The transaction ledger.
Chart of accounts and journal entries
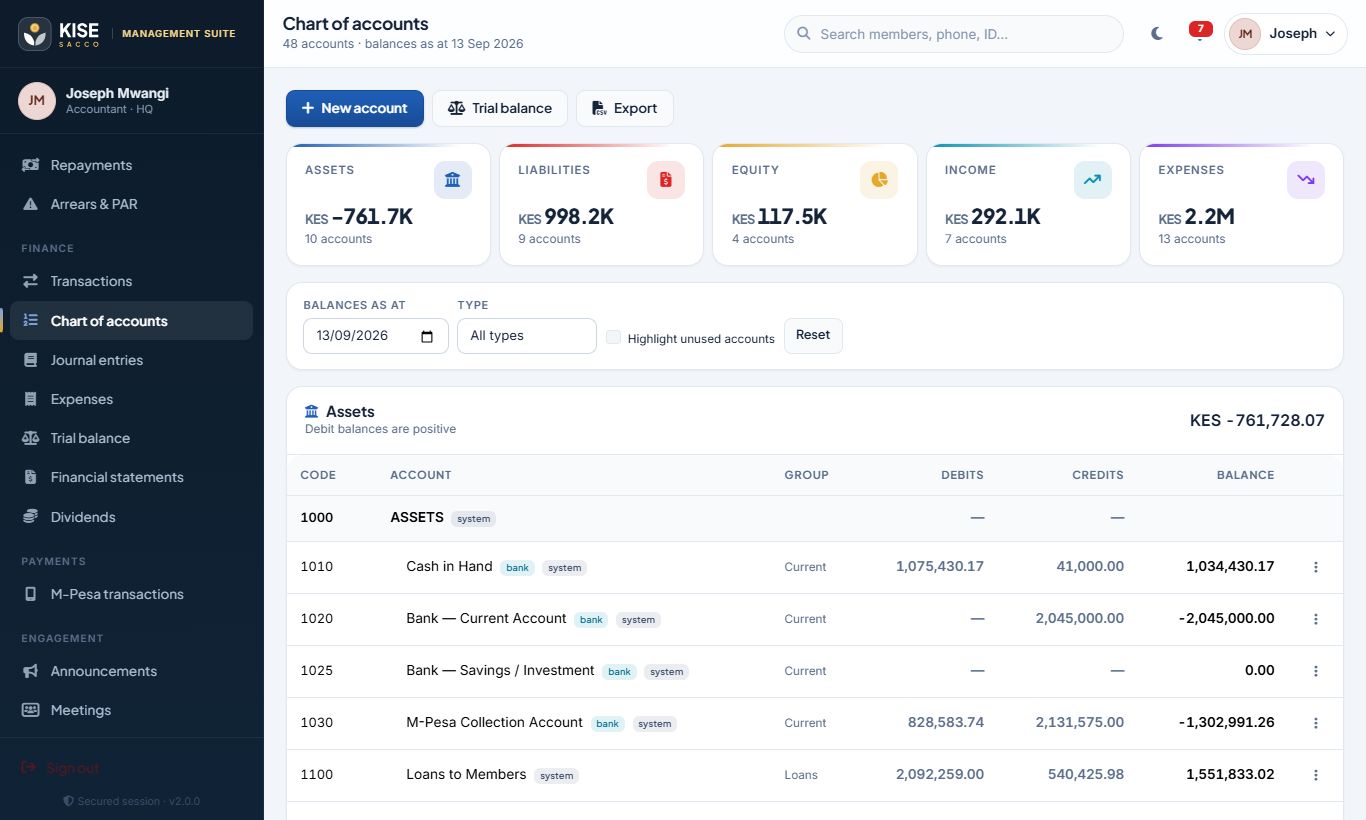
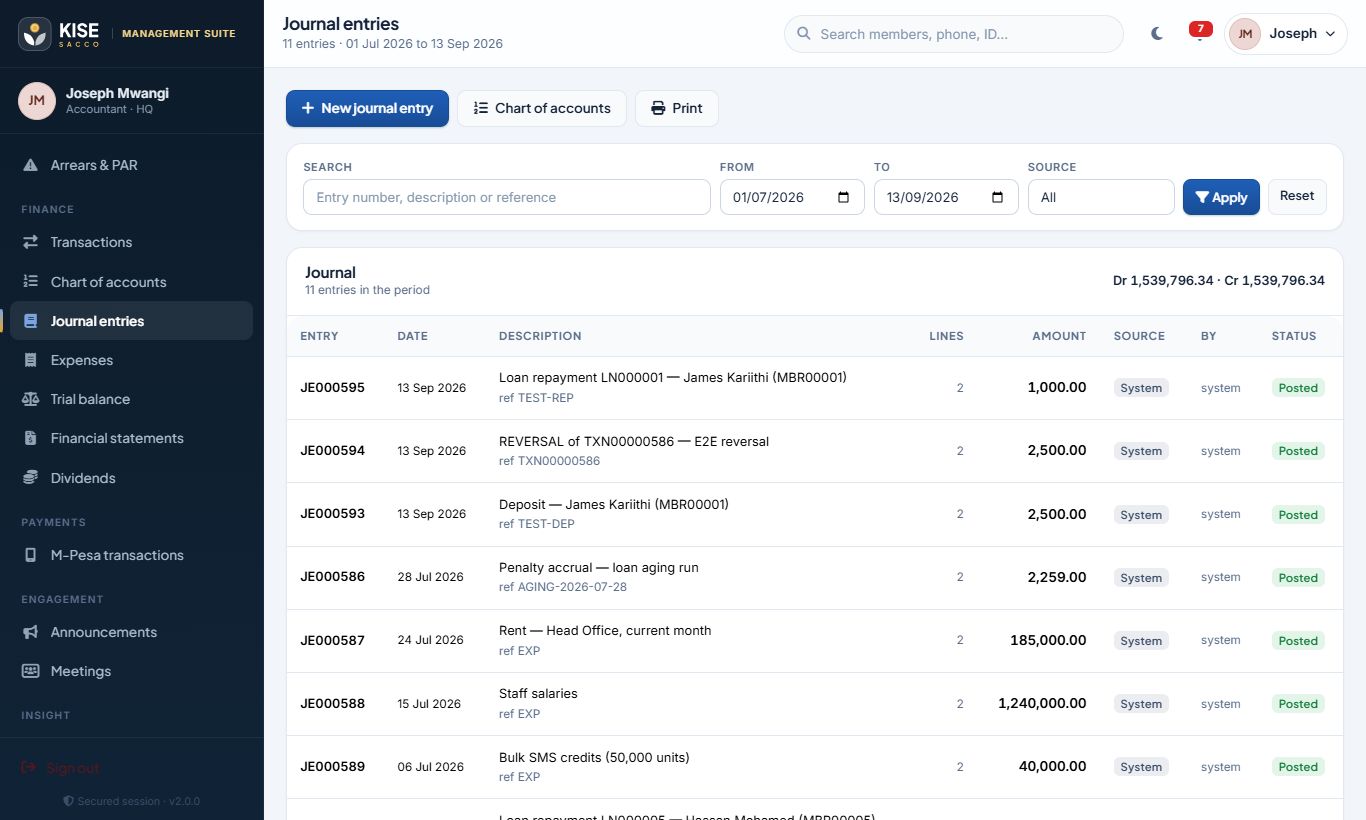
Chart of accounts — balances per account; add accounts under headers.Journal entries — New journal entry, add lines, post only when debits equal credits.
The system refuses to post an unbalanced or empty entry. Automatic postings use the GL mapping in Settings → General ledger mapping.
Expenses
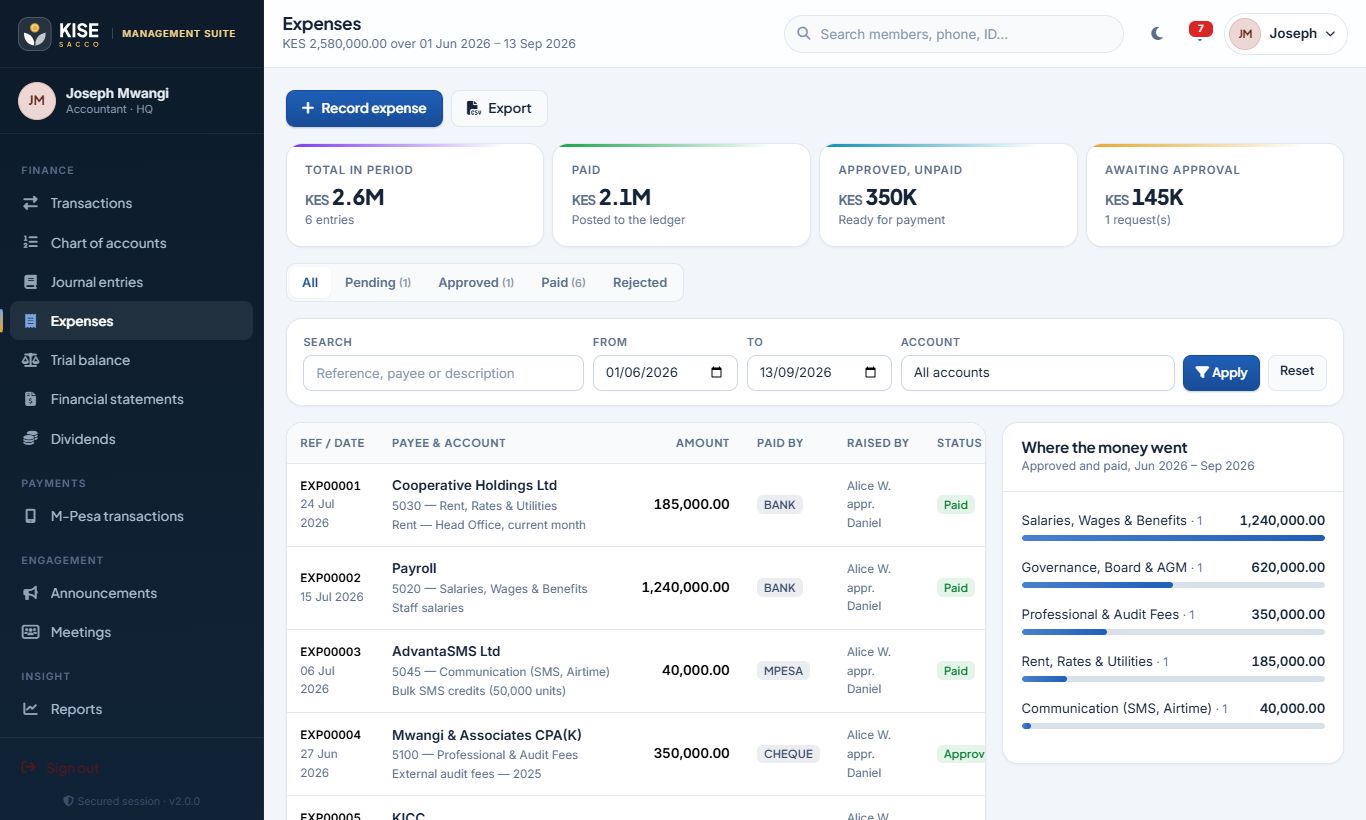
Finance → Expenses → Record expense: category, amount, payee, date and receipt upload.
Another authorised person approves or rejects it — you cannot approve your own expense.
Mark it paid; the journal entry posts automatically. Receipts are private files viewable only by staff with expense access.
Expense approvals.
Trial balance and financial statements
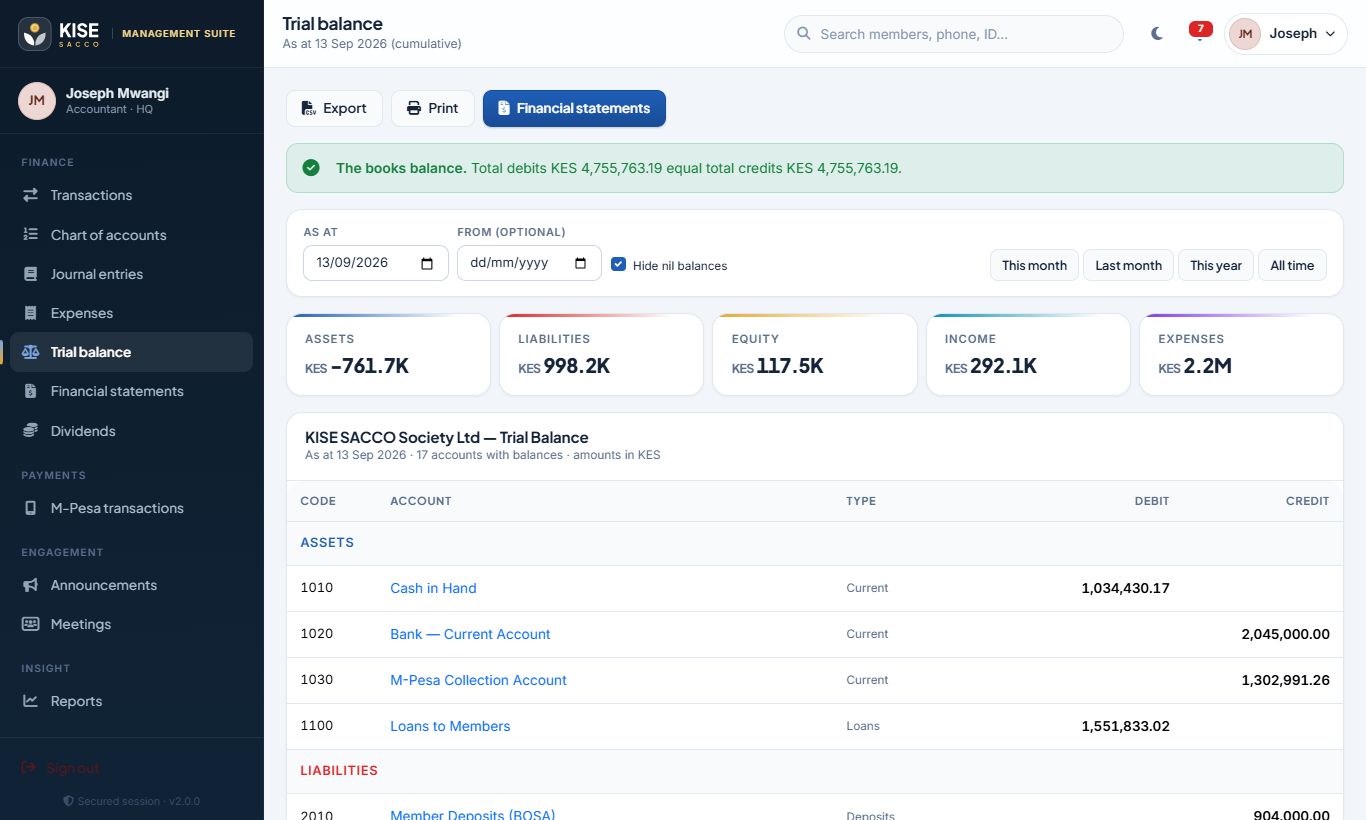
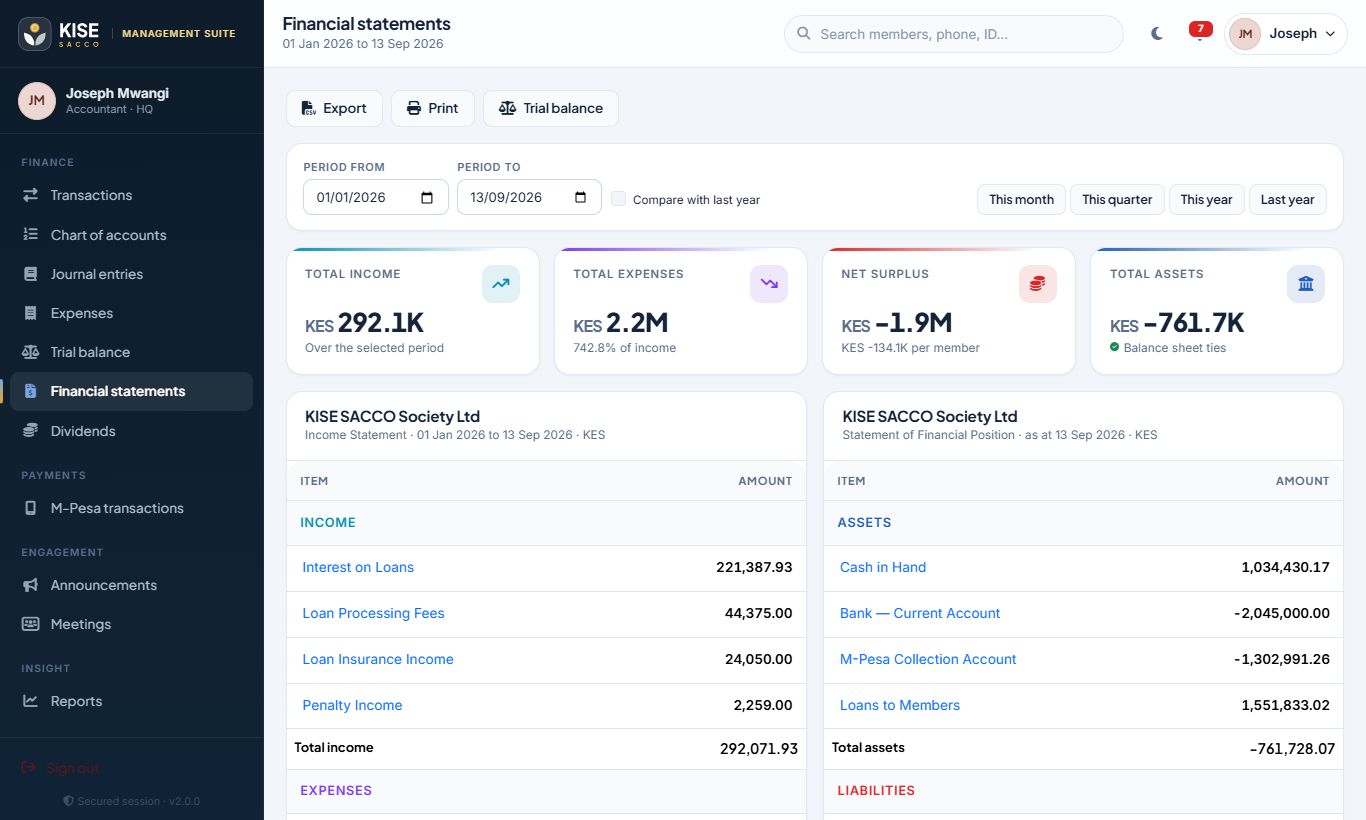
Trial balance at any date — confirms total debits equal total credits.Financial statements — income statement, balance sheet and prudential ratios; print or export.
Dividends and interest on deposits
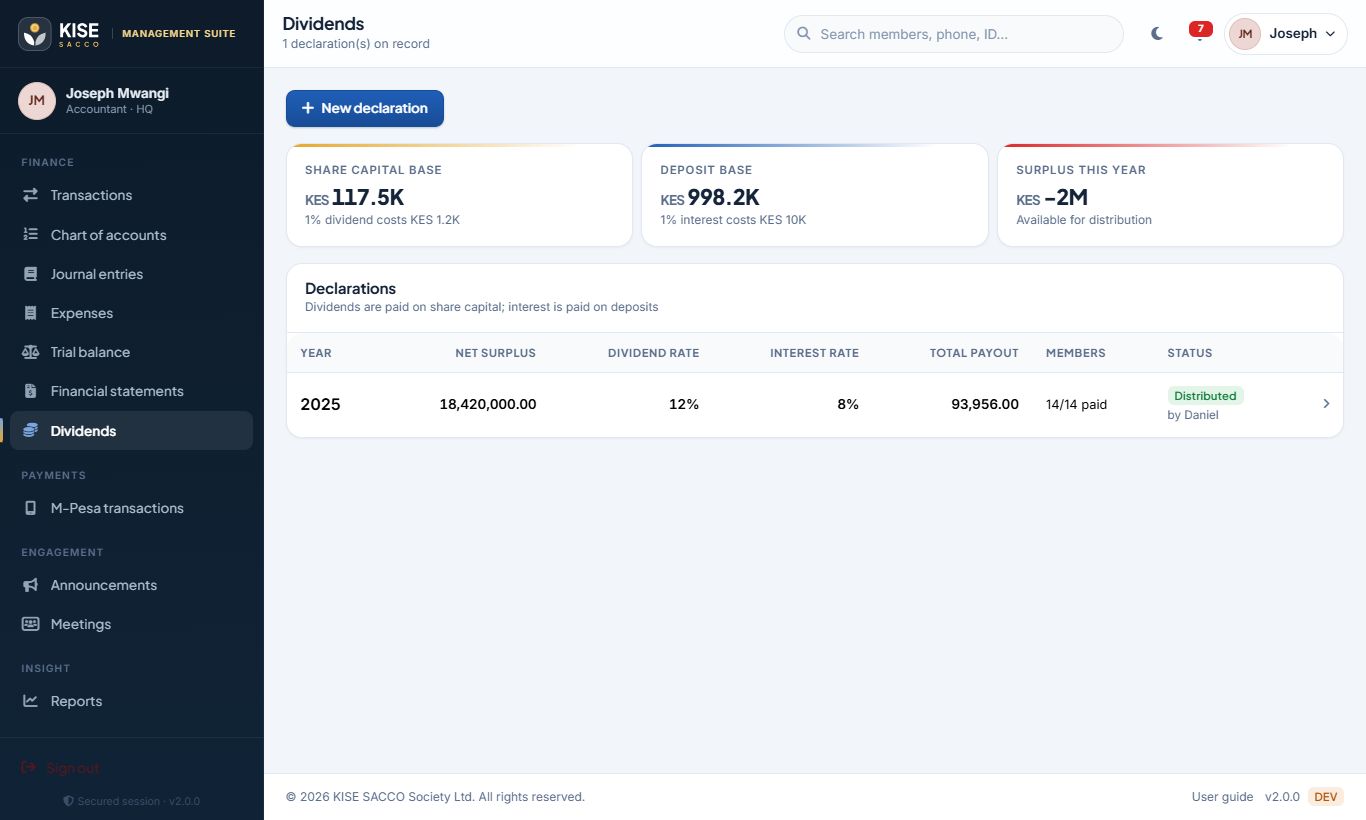
Finance → Dividends → New declaration: financial year, dividend rate on shares and interest rate on deposits (as approved by the AGM).
Compute payout schedule — see every member’s dividend and interest amounts before anything is paid, and export the schedule.
Declare dividend, then Distribute to savings or Capitalise into shares. Members are notified.
Dividend declarations and payout schedules.
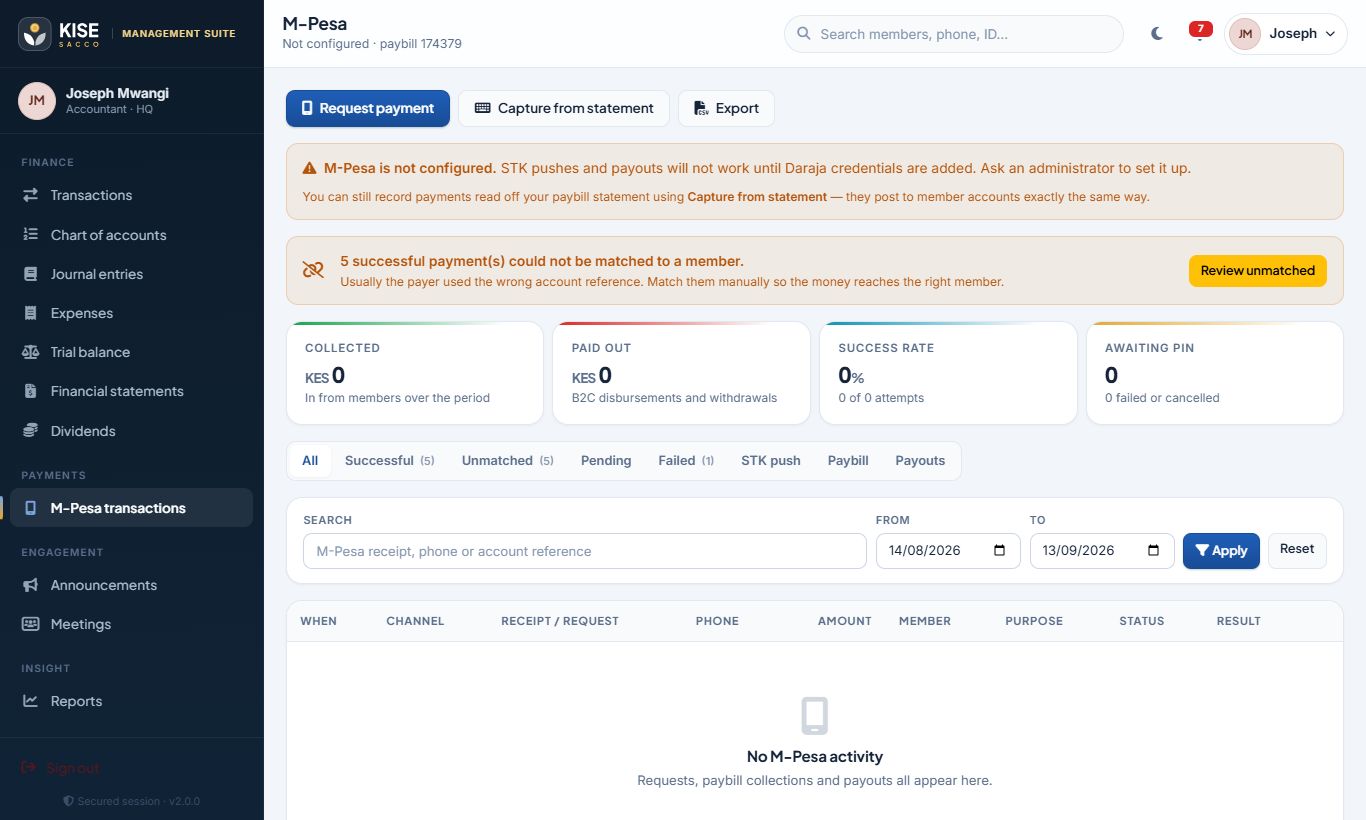
M-Pesa transactions
STK, paybill (C2B) and payouts (B2C) in one place.
Request payment sends an STK prompt to a member’s phone.
Unmatched payments (wrong account reference) wait here — use Match to a member to post them.
Capture from statement records a paybill receipt manually; duplicates are refused by receipt number.
Query status checks a pending STK with Safaricom.
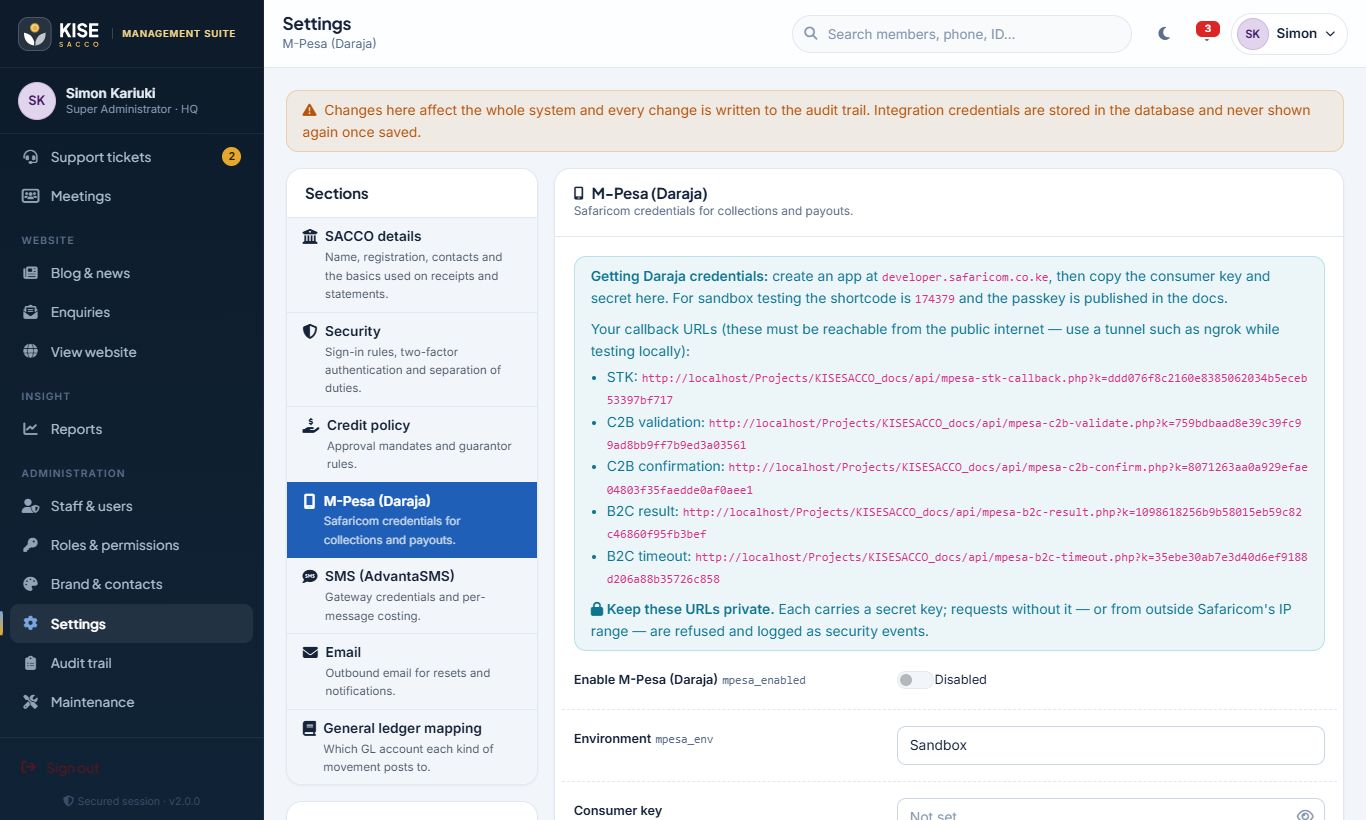
Only genuine Safaricom callbacks can credit accounts: each callback URL carries a secret key and must come from Safaricom’s IP addresses. Forged requests are refused and logged as security events.
Engagement & governance
SMS, announcements, the support desk and meetings.
Customer ServiceMarketingHRBoardCEO
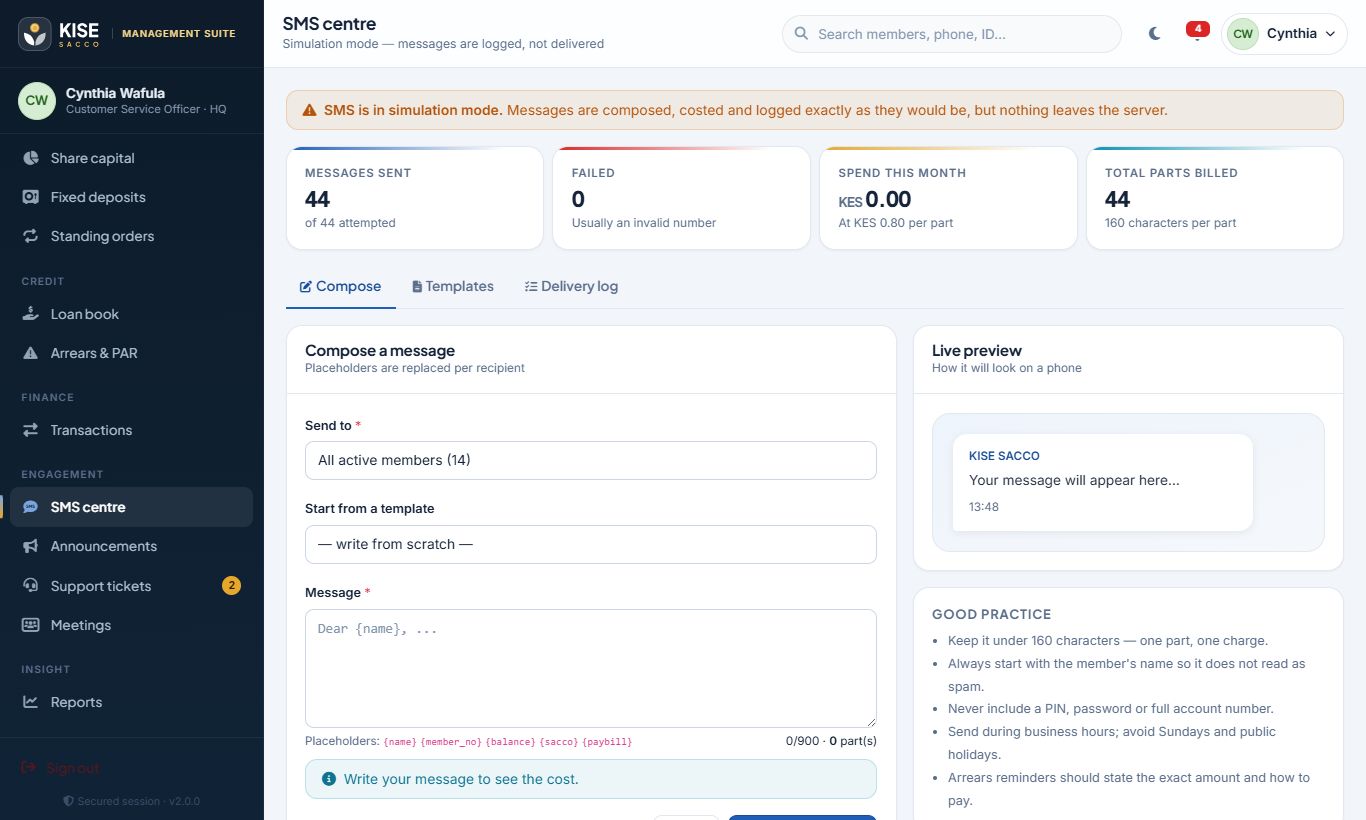
SMS centre
Engagement → SMS centre. Pick an audience — all members, a branch, members in arrears, due this week, dormant, below minimum shares — or individual numbers.
Write the message or start from a template; placeholders such as {name} and {member_no} are filled per member.
Check the recipient count and cost estimate, then Send message. Delivery results appear in the log.
Until live SMS credentials are added in Settings, messages are composed and logged but not delivered (simulation mode).
Targeted bulk SMS with cost estimates.
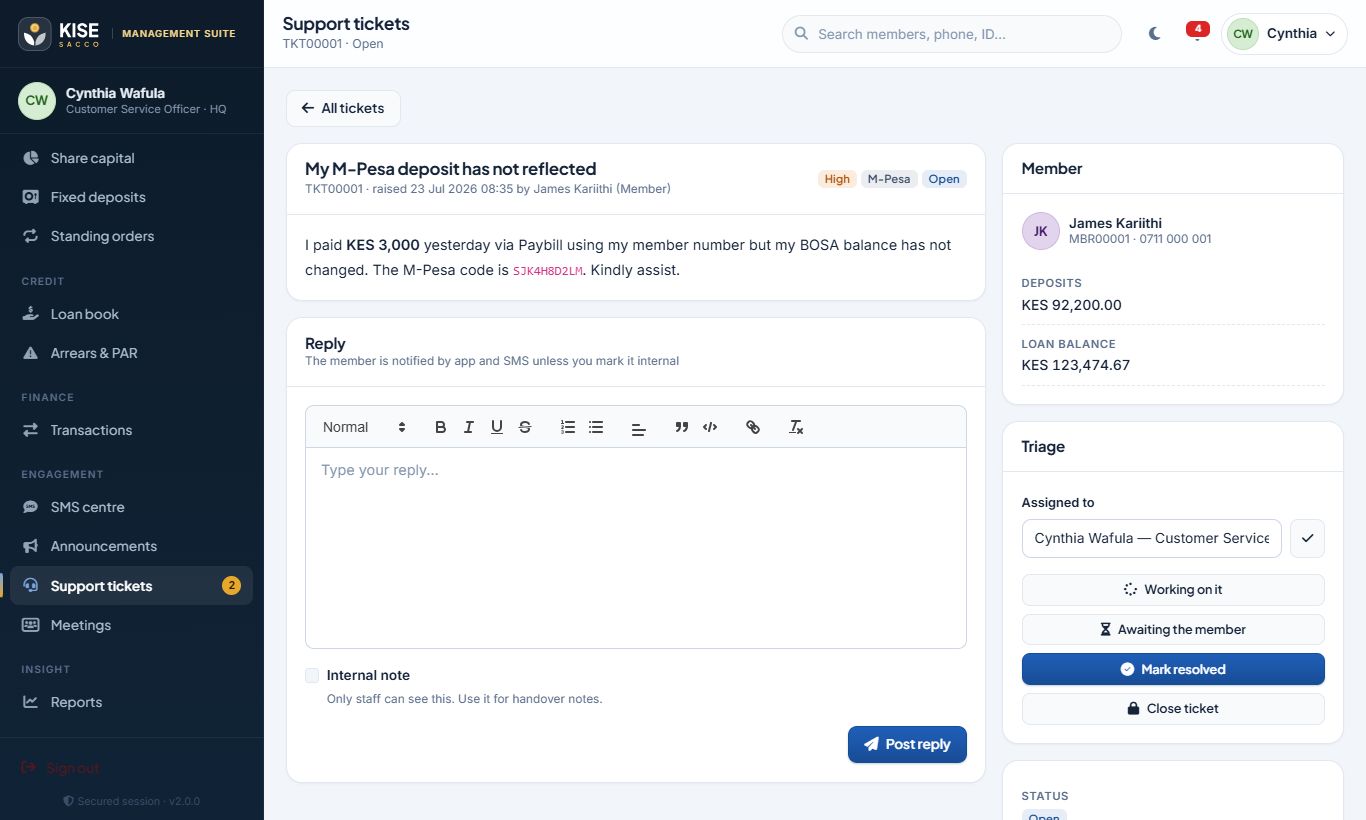
Support tickets
A ticket with replies and internal notes.
Tickets come from members’ portal or are created by staff for walk-ins and calls.
Assign to a colleague, set priority, reply (the member is notified) or add an internal note members never see.
Move status through open → in progress → awaiting member → resolved → closed.
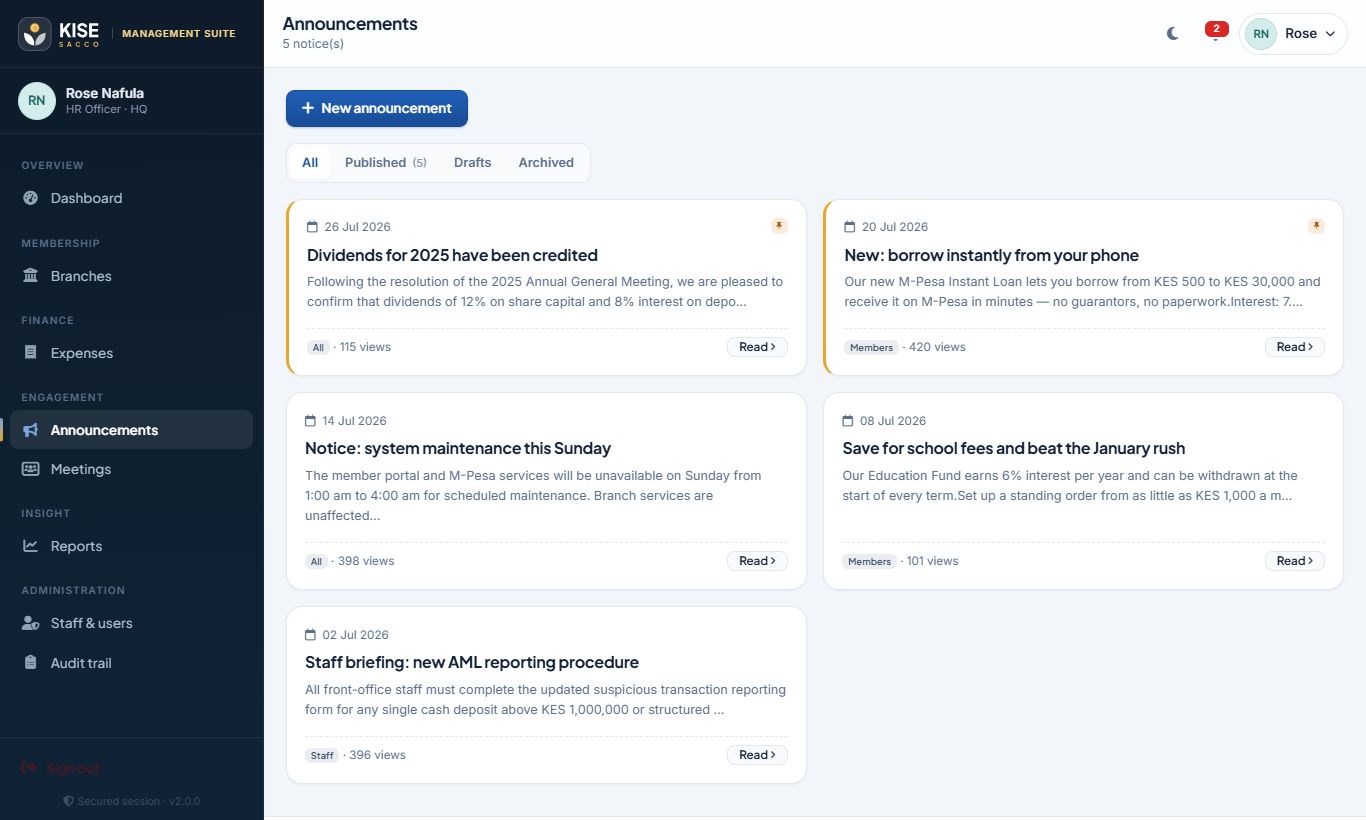
Announcements
Engagement → Announcements → New announcement.
Write with the rich-text editor, choose the audience (everyone, members, staff or a role), pin if important and set an expiry.
Save as draft or publish. Members see it on their dashboard and announcements page.
Announcements for members and staff.
Meetings, minutes and resolutions
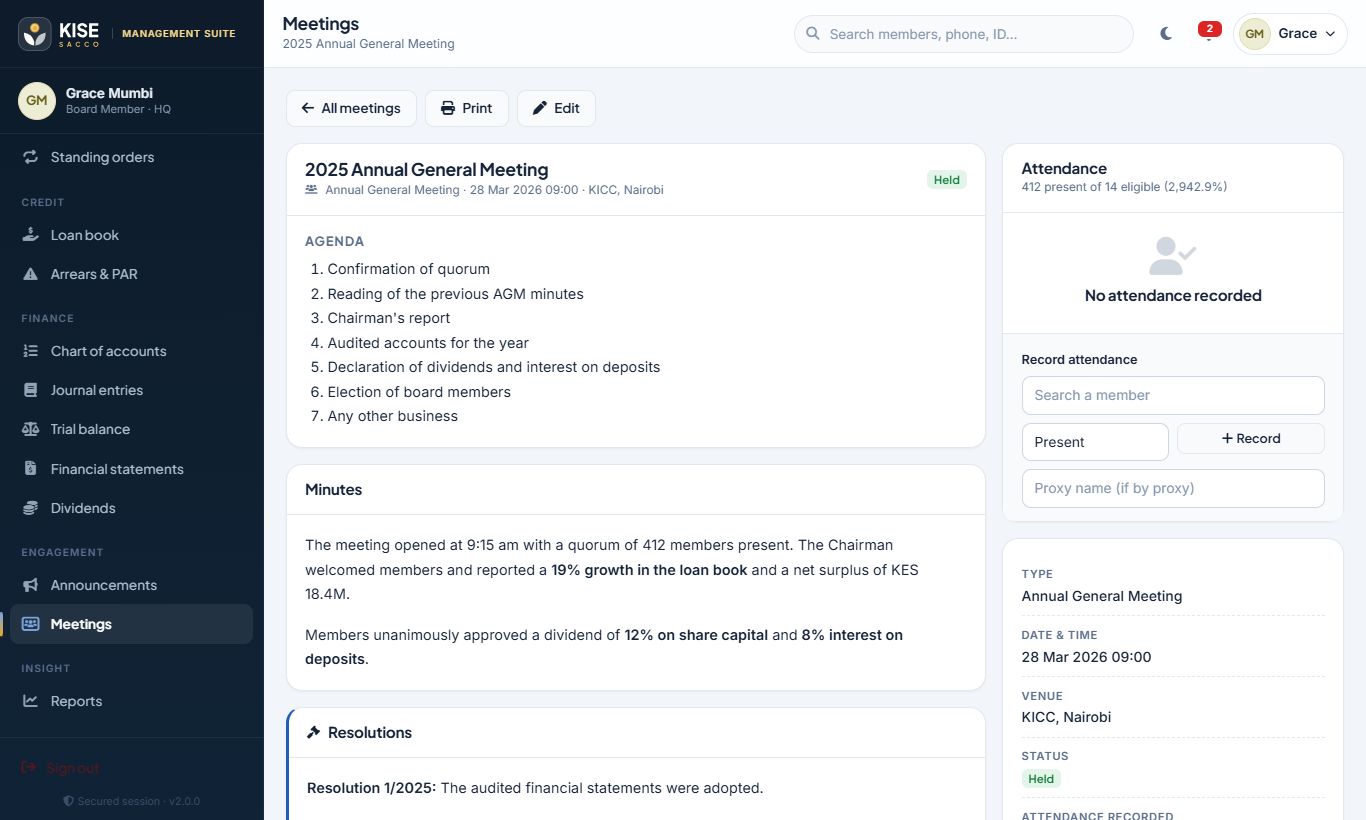
AGM with agenda, minutes and attendance.
Schedule AGMs, SGMs, board, committee, staff and training meetings with venue and agenda.
Record attendance (present, apology, proxy), minutes and resolutions.
Members see AGM and SGM notices; board members access every meeting’s minutes.
Reports
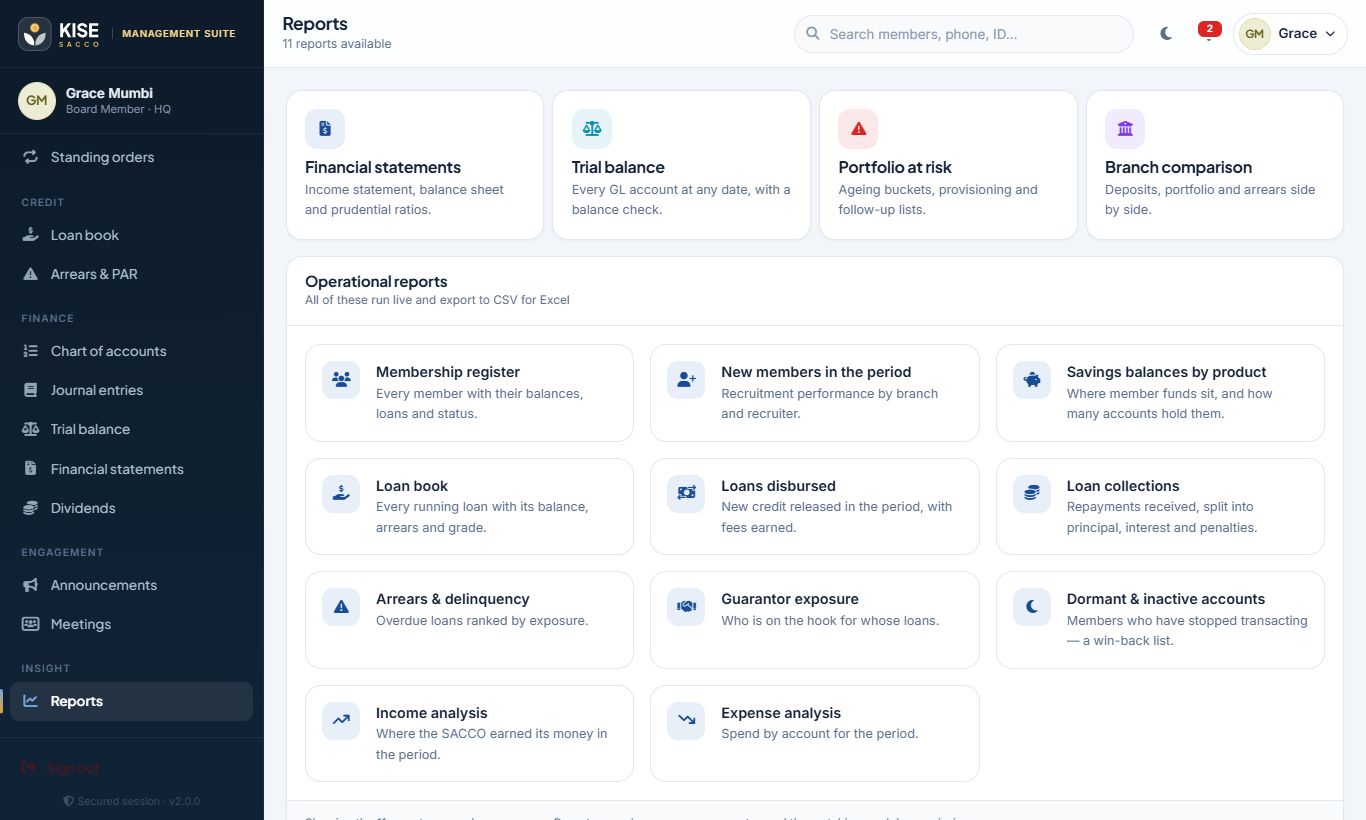
Operational and financial reports, all exportable to CSV for Excel.
Insight → Reports — membership register, new members, savings balances by product, deposits collected, withdrawals paid, loan book, loans disbursed, loan collections, arrears & delinquency, guarantor exposure, dormant accounts, teller cash-up, M-Pesa reconciliation, income and expense analysis, reversed transactions and SMS spend.
Filter by date, branch or product, then Export (requires reports.export). Exports are logged.
Branch managers’ reports are limited to their branch.
Report library.
Managing the public website
Publish articles and news, and answer enquiries from the contact form.
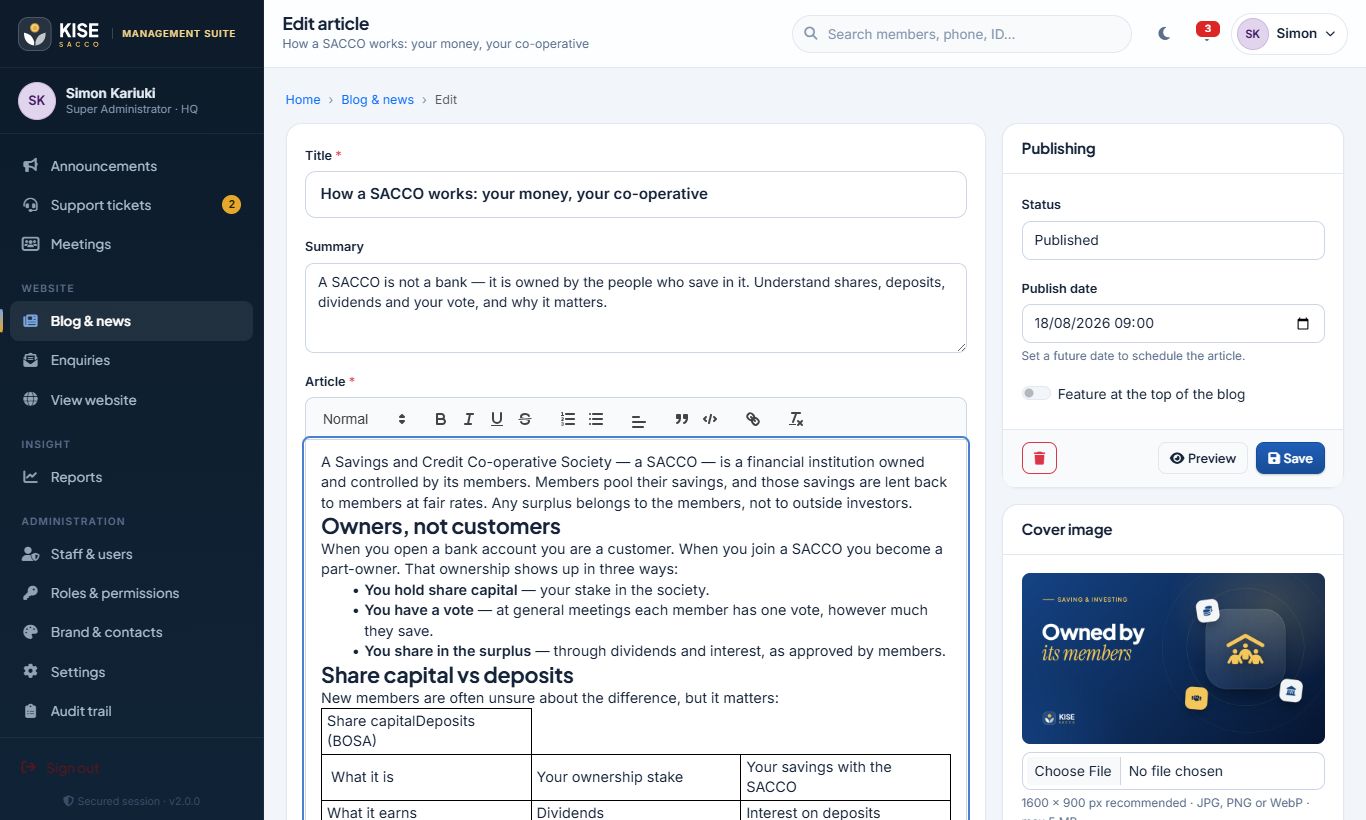
Add a clear title and a one-to-two-sentence summary, then write the article using headings, lists and quotes.
Upload a cover image (1600 × 900 px recommended), choose or create a category, and set a search description.
Choose Draft to keep working, Published to go live — or set a future publish date to schedule it. Tick Feature to pin it at the top of the blog.
Use Preview to see it exactly as visitors will (drafts are only visible to staff).
Article content is cleaned automatically: scripts, embedded frames and unsafe links are removed, so a pasted snippet can never harm visitors.
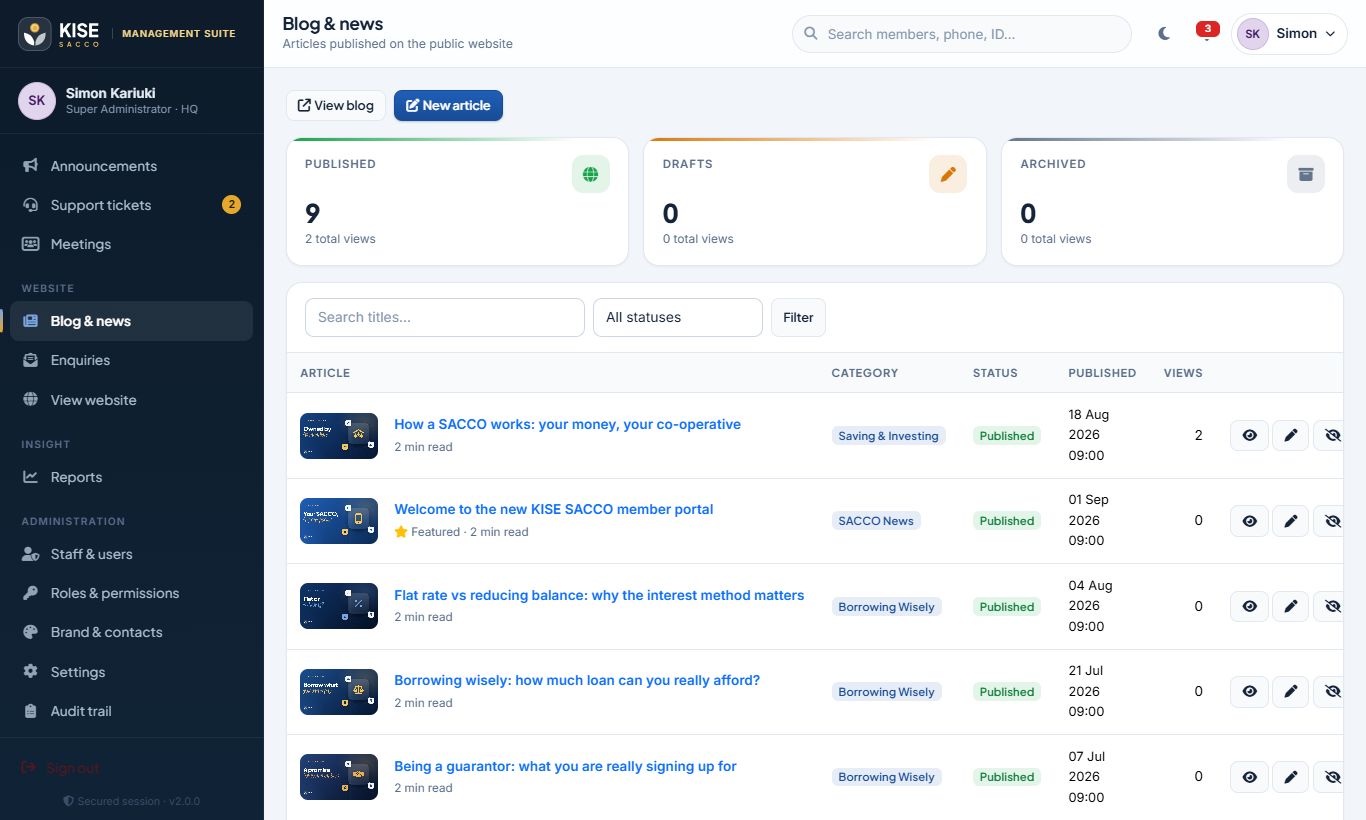
Articles, status and views.The article editor.
Website enquiries and newsletter
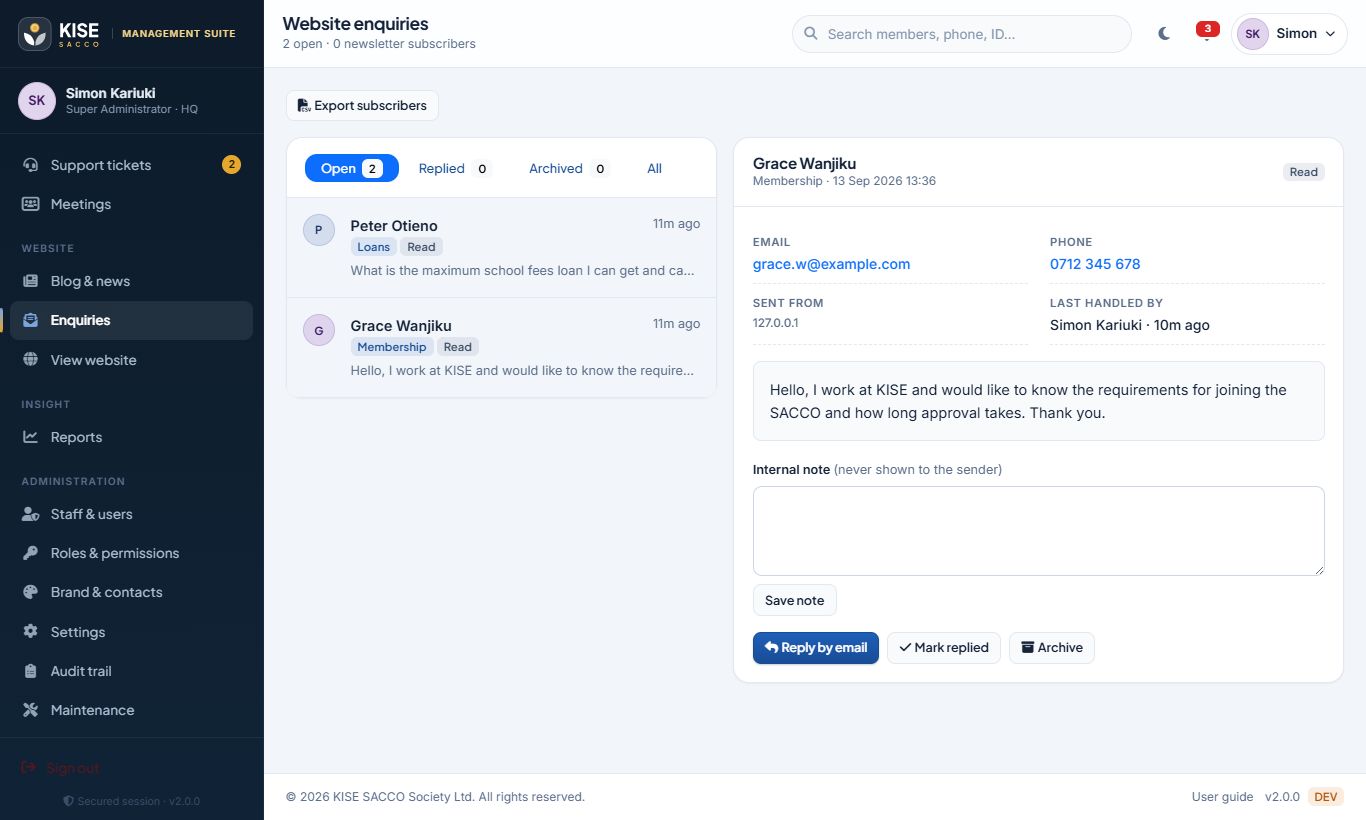
The enquiries inbox.
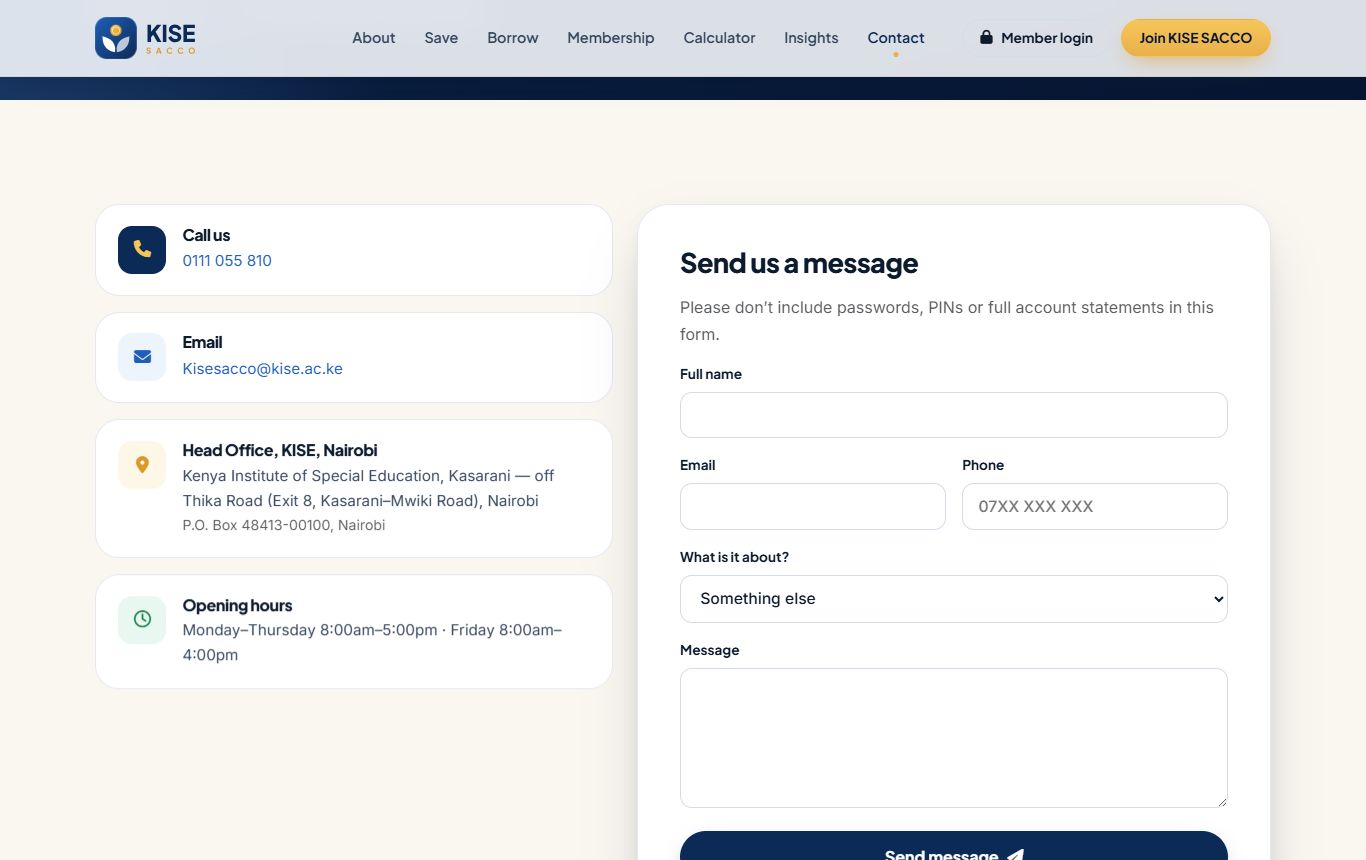
Messages from /contact.php arrive in Website → Enquiries; staff with website rights get a notification.
Open a message, Reply by email or call, add an internal note, then Mark replied or Archive.
Export subscribers downloads newsletter sign-ups (logged in the audit trail).
Spam protection is built in: hidden bot traps, a minimum fill time and per-network limits.
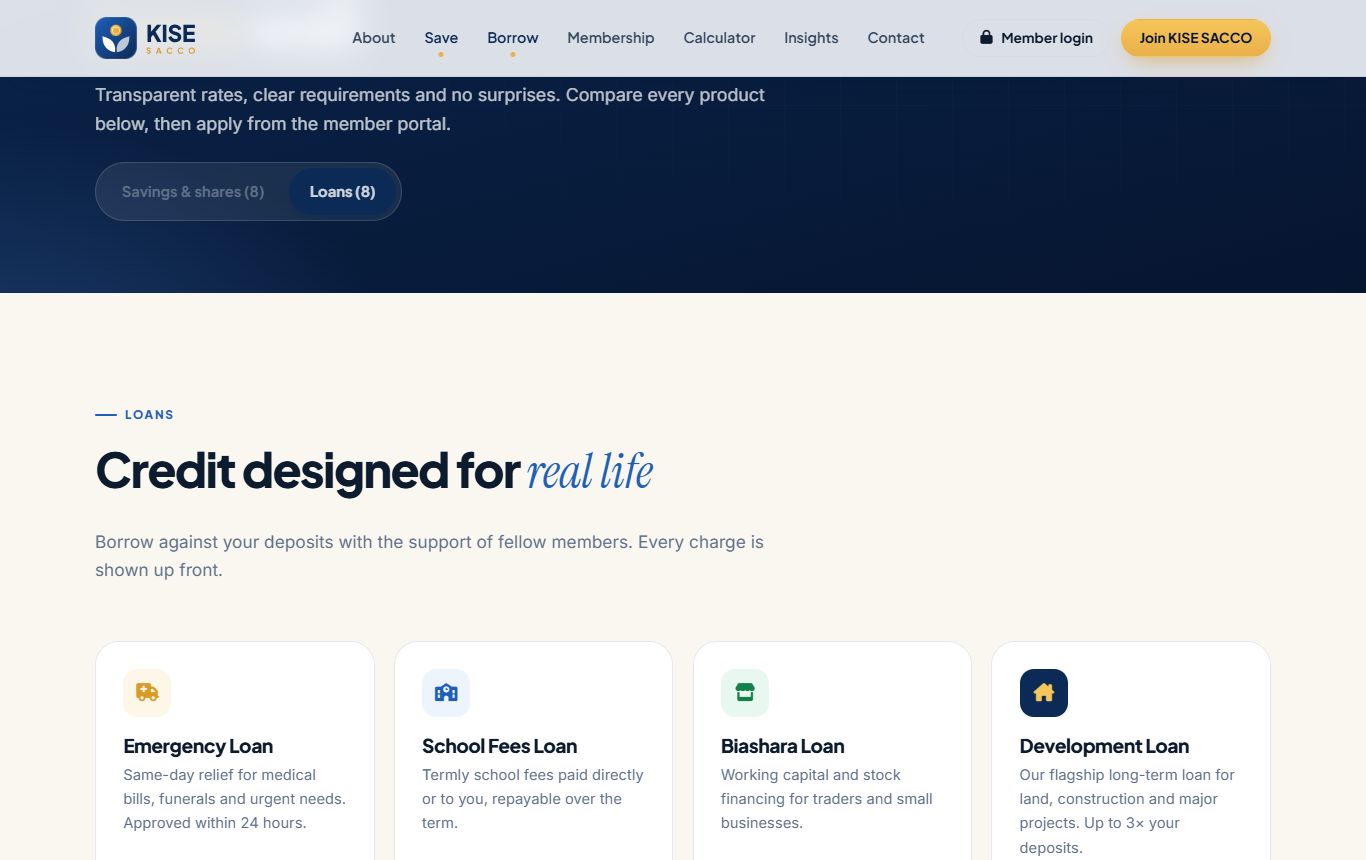
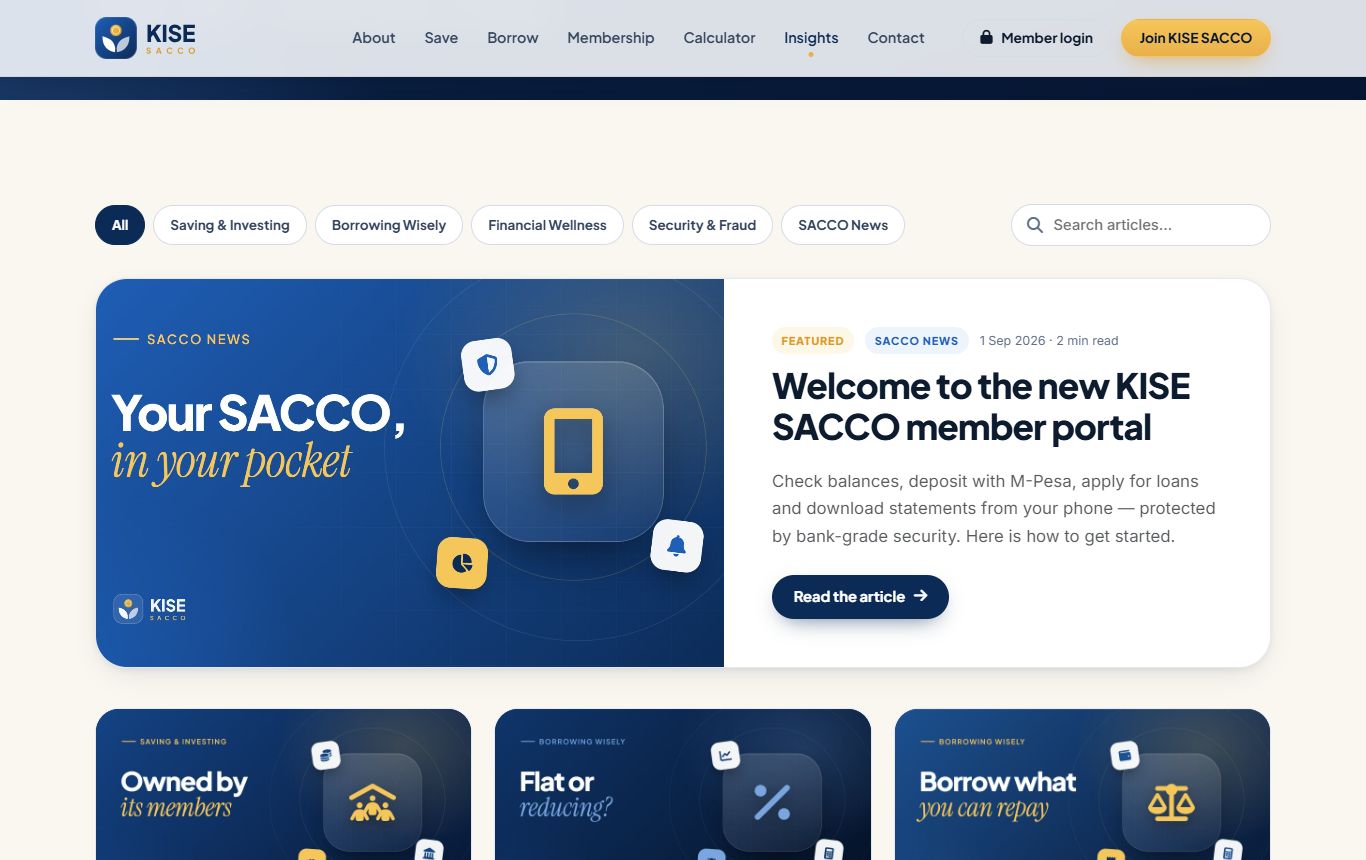
Products are read live from the product catalogue.Insights (blog) with categories and search.Contact page with map and enquiry form.
Administration & security
Brand and contacts, staff accounts, roles, settings, the audit trail and maintenance.
Super AdministratorIT SupportHR (staff accounts)SACCO AdministratorAuditor (audit trail)
Organisation profile, logos and official contacts (super administrator)
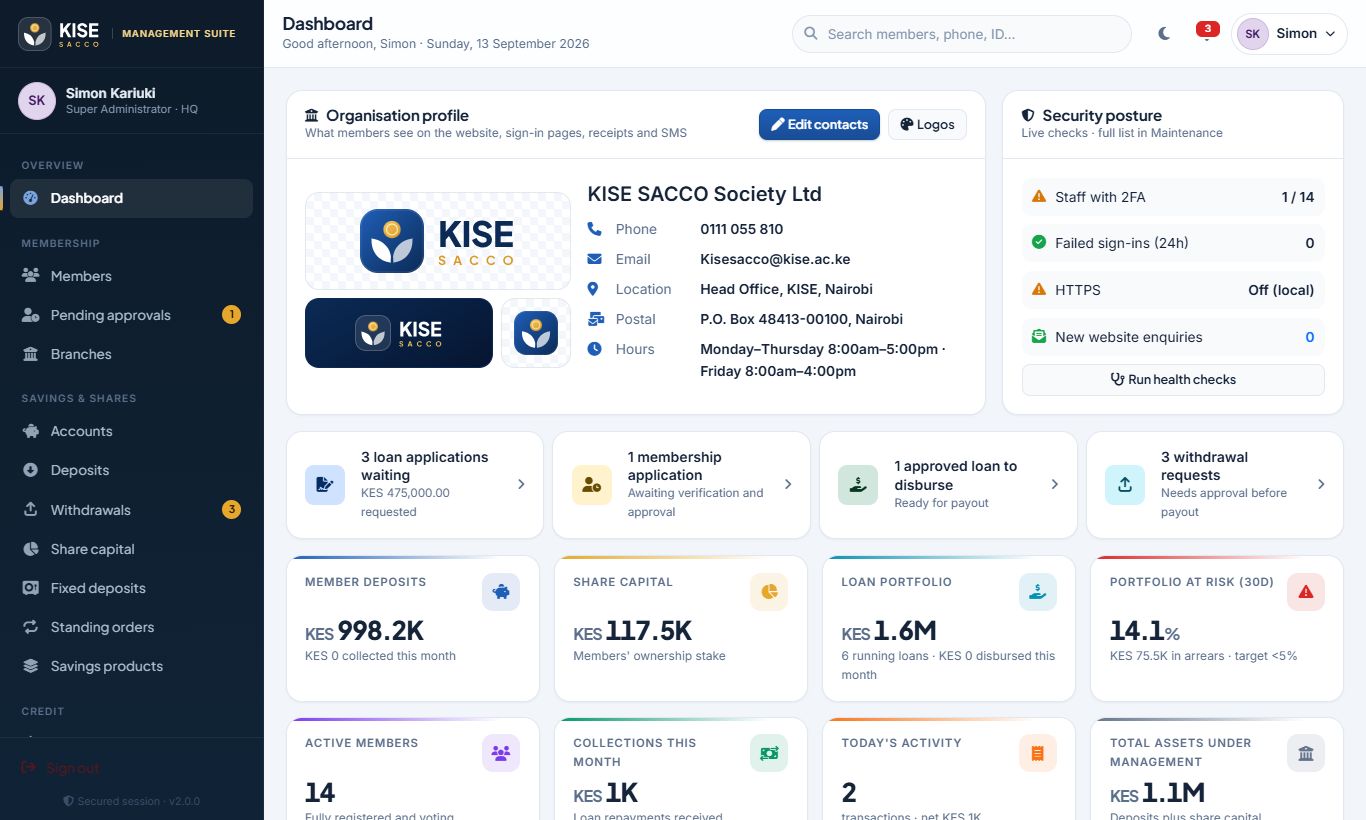
The super administrator’s dashboard opens with the Organisation profile: the logos in use, the official phone, email, location, postal address and hours, and a live security posture summary.
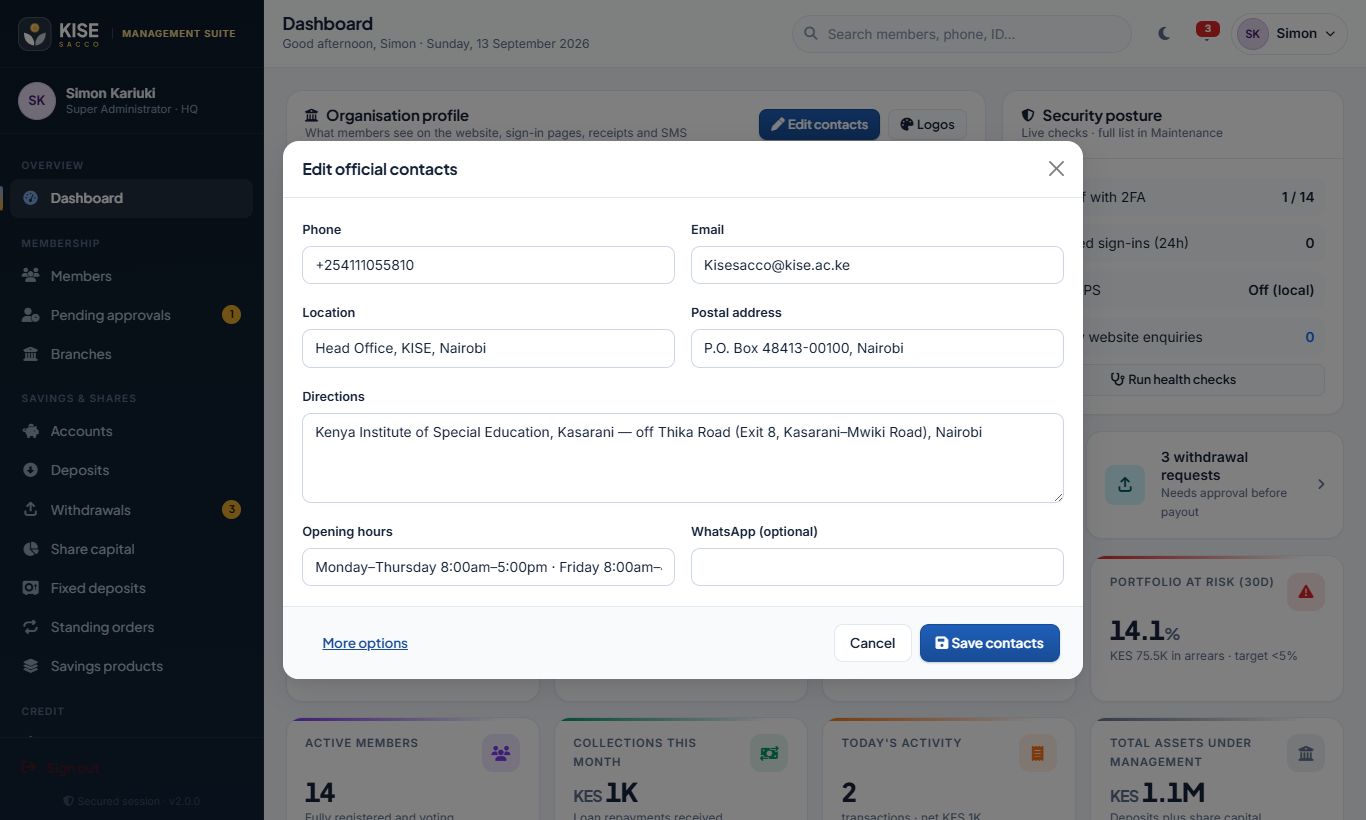
Click Edit contacts on the dashboard to change phone, email, location, postal address, directions, hours or WhatsApp — then Save contacts. The website, sign-in pages and receipts update instantly.
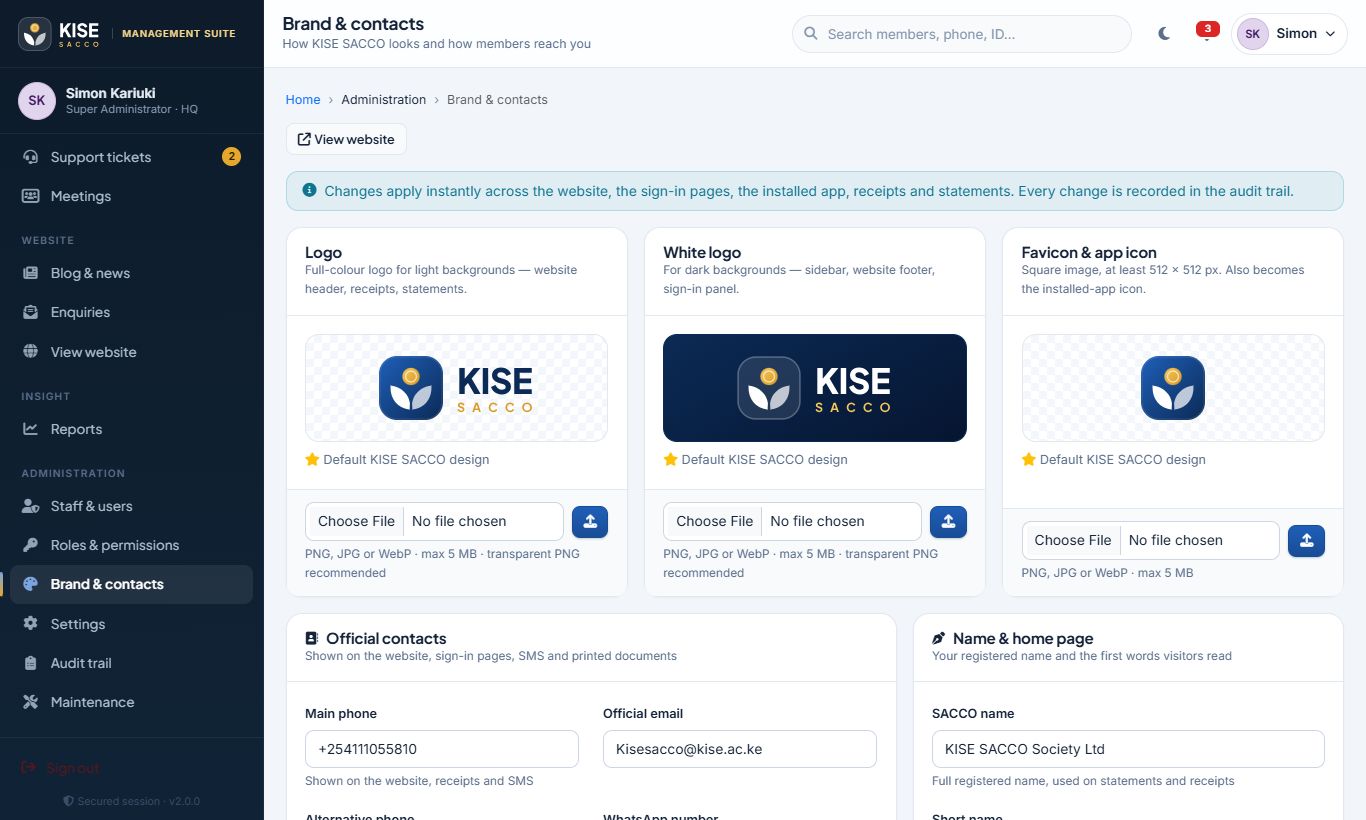
Click Logos (or Administration → Brand & contacts) to upload a new logo (for light backgrounds), white logo (for dark backgrounds) or favicon (square, at least 512 × 512 px). The favicon also regenerates the installed-app icons.
Restore default brings back the original KISE SACCO design at any time.
The same page edits the SACCO name, home-page headline and introduction, mission, vision, values and social media links.
Use PNG with a transparent background for logos. Uploaded images are re-processed for safety, which also removes hidden metadata such as GPS location.
Organisation profile on the super administrator dashboard.Editing the official contacts.
Brand & contacts: logo, white logo, favicon, contacts and home-page text.
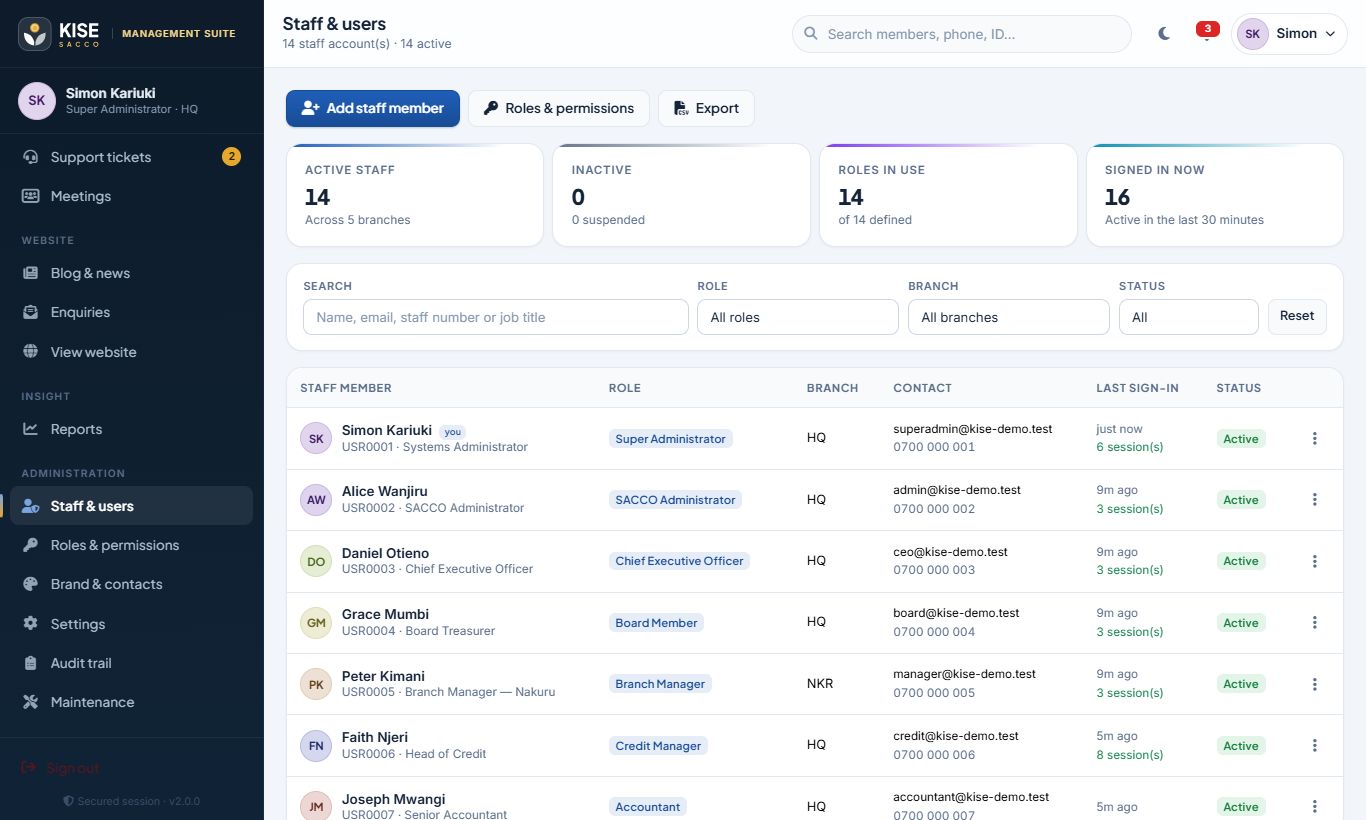
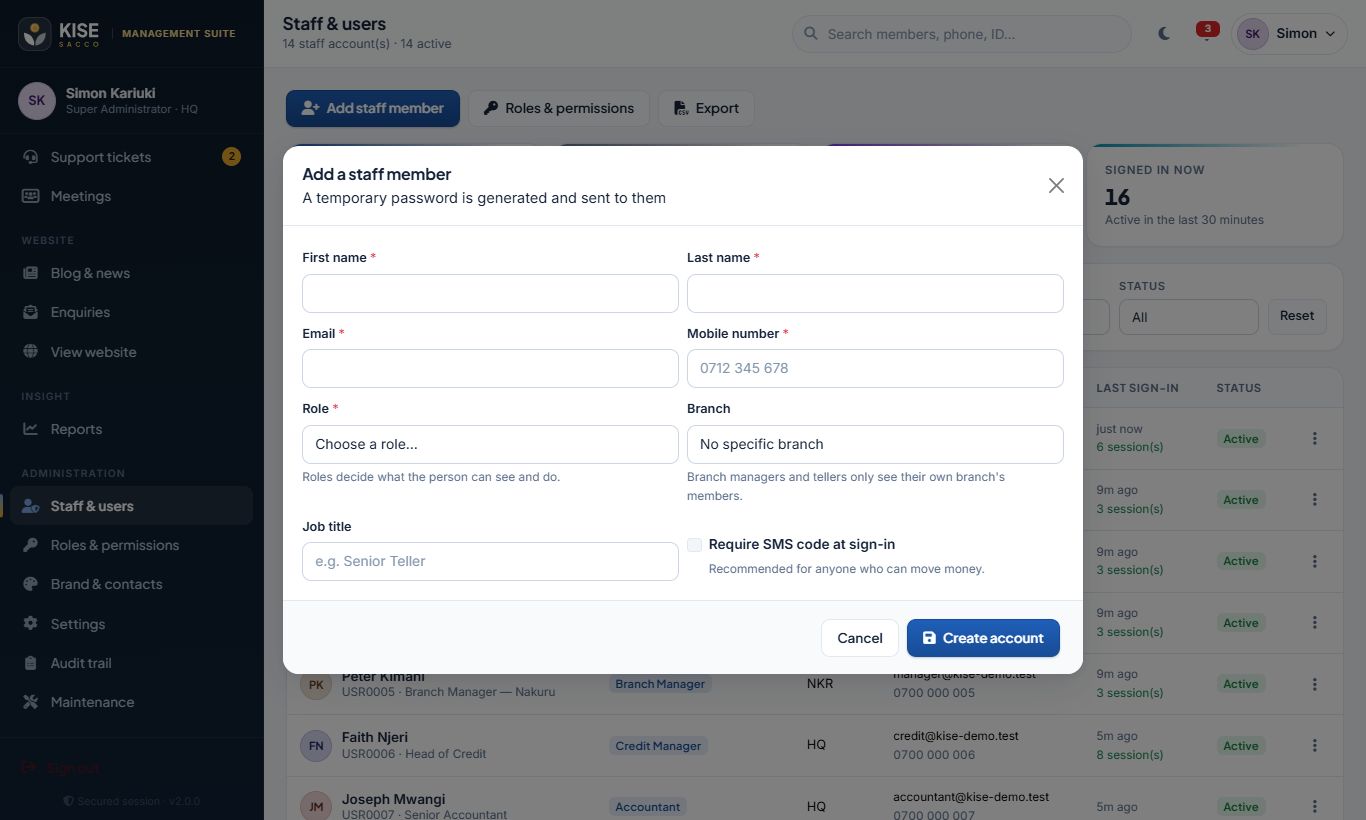
A strong temporary password is shown once and sent by SMS/email; the staff member must change it and set up 2FA at first sign-in.
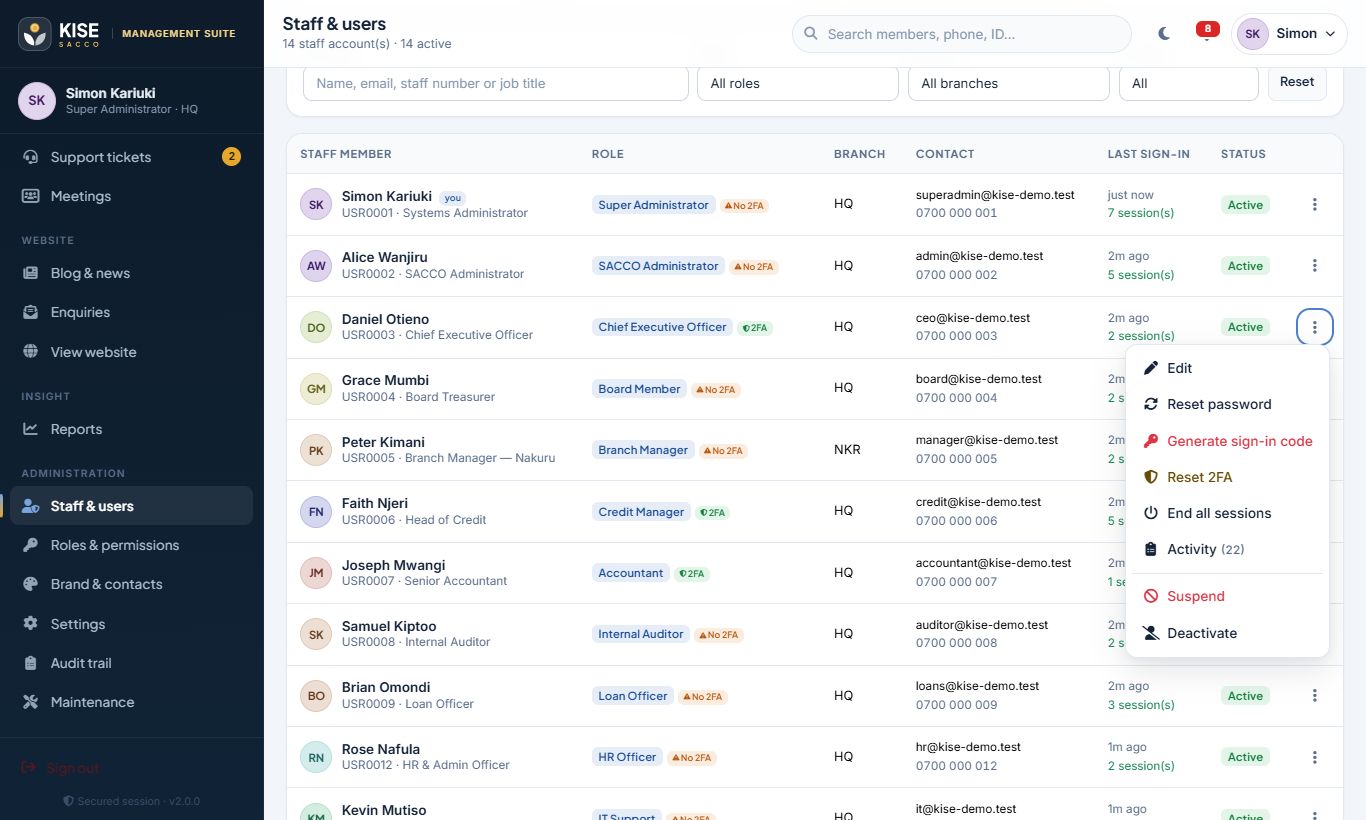
Use the row menu to Edit, Reset password, Unlock, Suspend, Deactivate, End all sessions, Generate sign-in code (super administrators — see below) or Reset 2FA (removes the authenticator entirely; the person enrols again at next sign-in).
You can only manage accounts less senior than your own, and the last active super administrator cannot be deactivated. The 2FA / No 2FA badge shows who still needs to enrol.
More than one super administrator. A super administrator can add another by choosing the Super Administrator role when adding or editing a staff member. We recommend two named individuals, so one can always issue a sign-in code or restore access for the other. Super administrators cannot issue a code for their own account, and every sign-in code issued is notified to all the other super administrators.
Staff accounts.Adding a staff member.
Issuing a one-time sign-in code (super administrator)
When a staff member or member cannot access their authenticator app and has no recovery codes, a super administrator can send them a one-time sign-in code.
This is the most sensitive action in the system — attackers frequently pose as a user who has “lost their phone” — so follow every step.
Verify the person first. See their ID in person, or call them back on the phone number already on their account. Never use a number, email or WhatsApp contact supplied in the request itself.
Open Administration → Staff & users, open the person’s row menu ⋮ and choose Generate sign-in code. For a member, open their profile and use Generate sign-in code in the Portal access card.
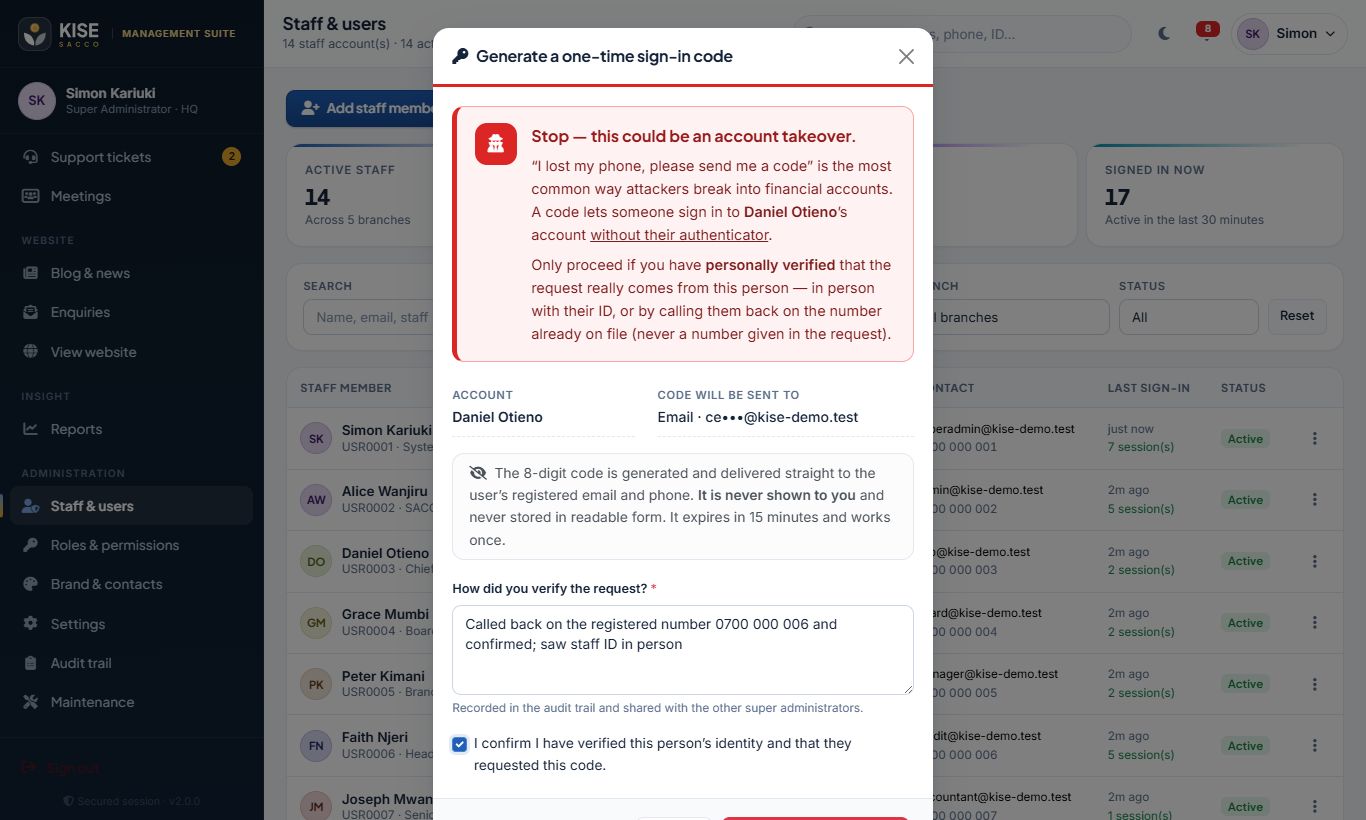
Read the red warning. Check where the code will be sent (masked email and phone on file).
Describe how you verified the request, tick the confirmation box and click Proceed & send code.
The system emails the code through the SMTP settings and texts it through the SMS settings. You will not see the code — only a confirmation of where it was sent.
Tell the person to click Start over, sign in with their password and enter the 8-digit code. They will be asked to set up their authenticator on their current phone straight away.
Safeguard
What it means
Never displayed
The code goes only to the registered email and phone; logs keep a redacted copy.
Short-lived
Valid for 15 minutes, works once, 5 attempts maximum.
Limited
At most 3 codes per account per hour; you cannot issue one for yourself.
Recorded
Critical audit entry with your reason; the user and all other super administrators are notified.
Needs a live channel
If neither SMTP email nor live SMS is configured, no code is generated.
The action in the staff member’s menu.The red account-takeover warning and confirmation.
Roles & permissions and branches
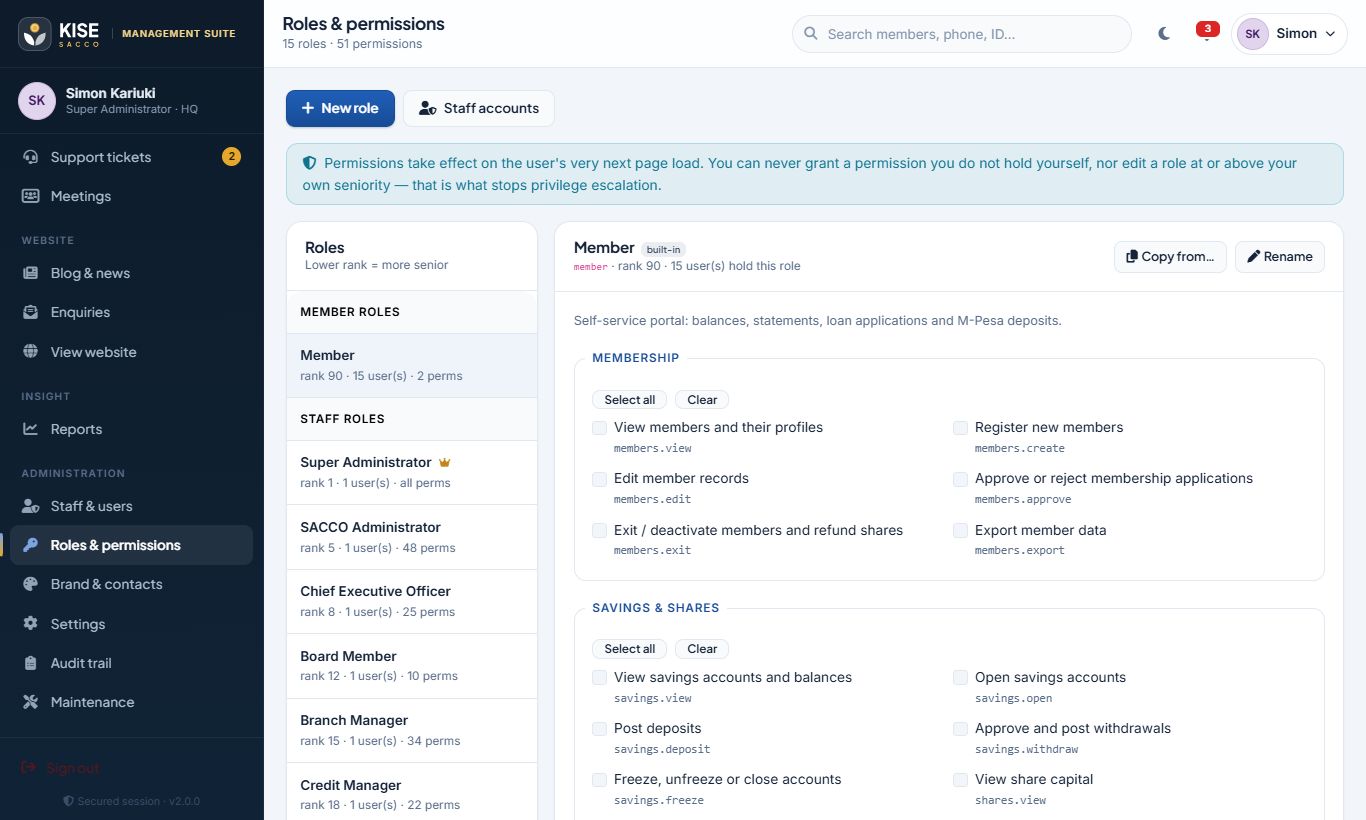
The permission matrix.
Roles & permissions — tick the permissions each role holds and Save permissions. Create a role from scratch or Copy an existing one.
You can never grant a permission you do not hold, nor edit a role at or above your own seniority.
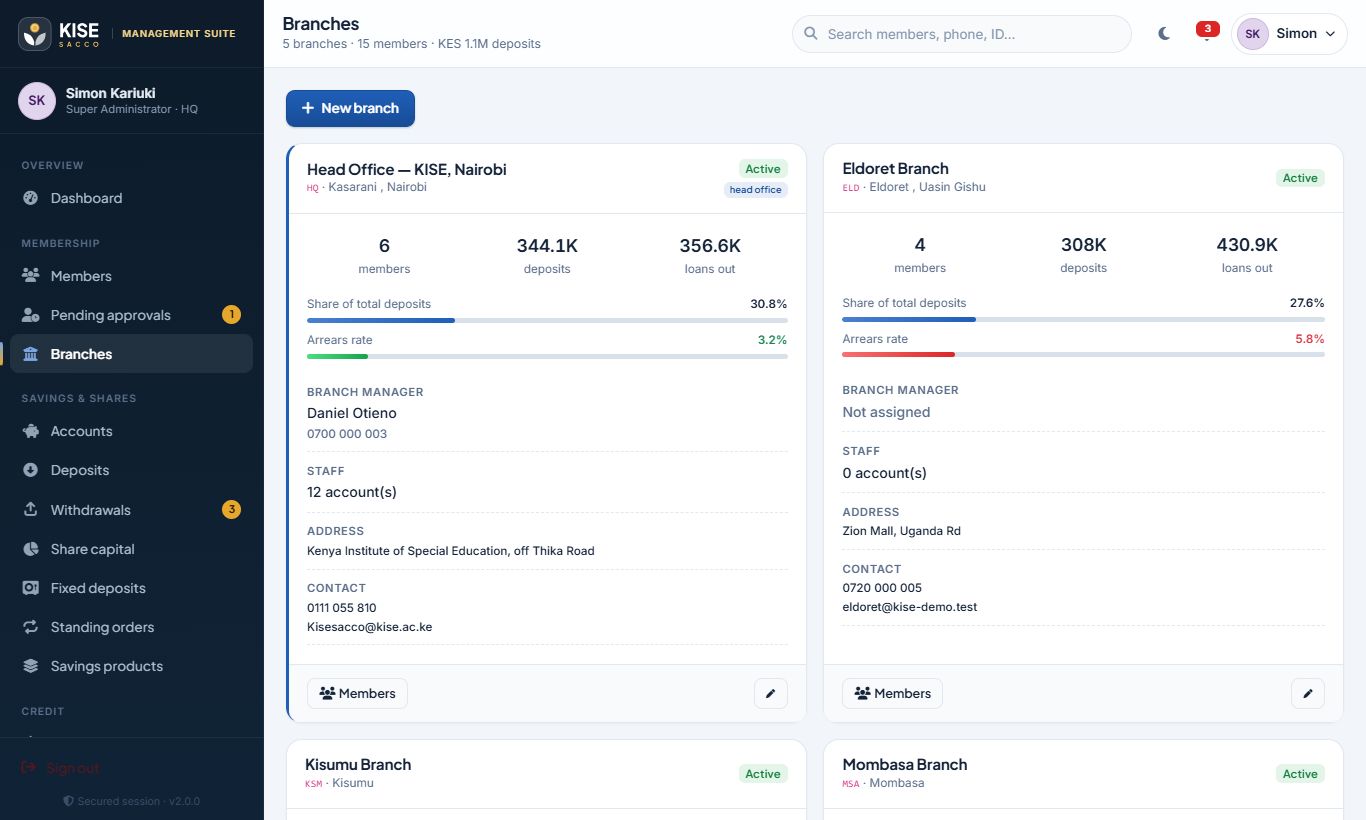
Branches — add branches, set the manager and contacts. Branch managers and tellers only see their own branch’s members.
Keep super administrators to one or two named individuals. Review roles at least twice a year.
Branches.
Settings and integrations
SACCO details — registered name, registration and licence numbers, fees and minimums, dormancy period.
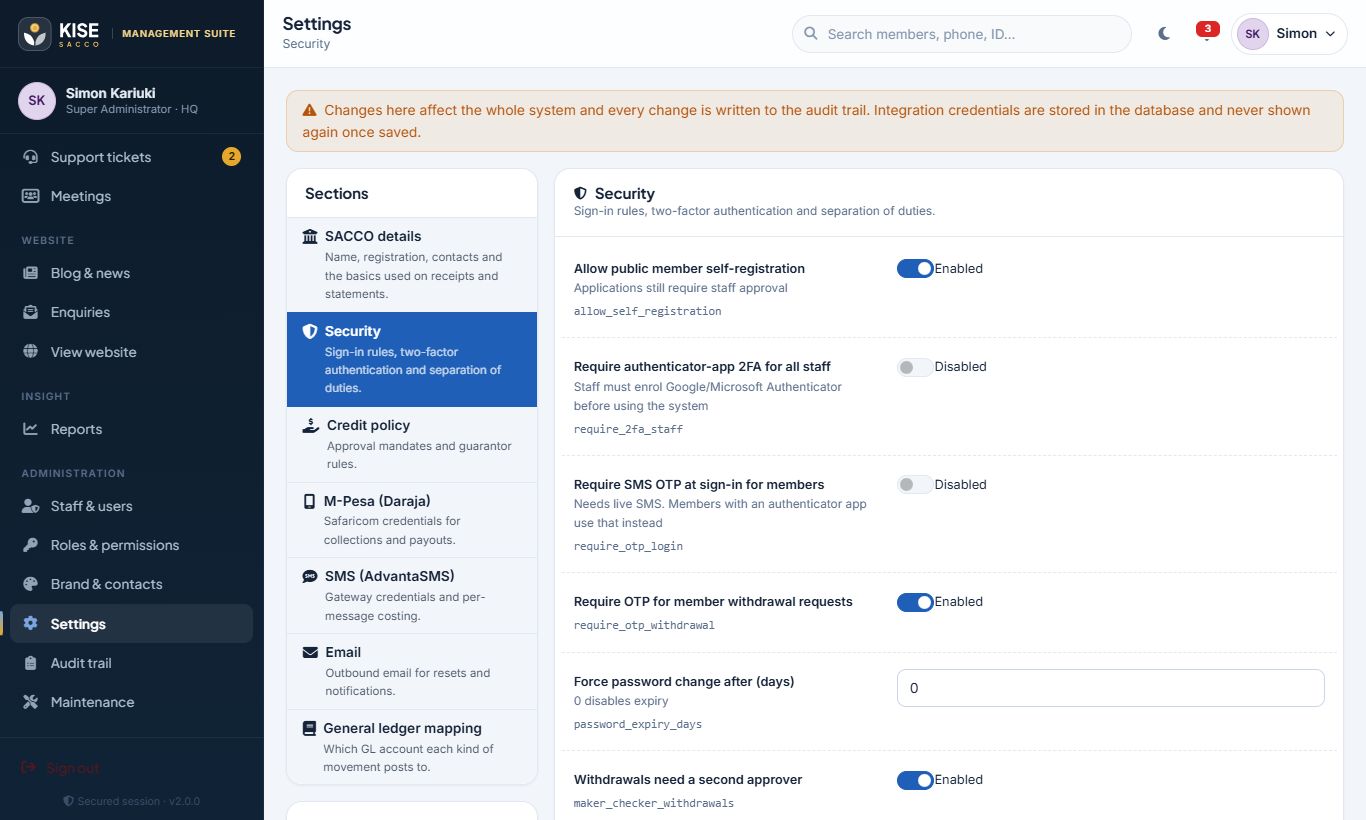
Security — require 2FA for staff, SMS OTP for members, OTP on withdrawals, password expiry, maker-checker withdrawals, self-registration.
Credit policy — approval mandates and guarantor release.
M-Pesa (Daraja) — consumer key and secret, shortcode, passkey, B2C details, the public callback base and the Safaricom IP allow-list. Copy the callback URLs shown (they contain secret keys) into the Daraja portal and click Test connection.
SMS (AdvantaSMS) — credentials and a test button.
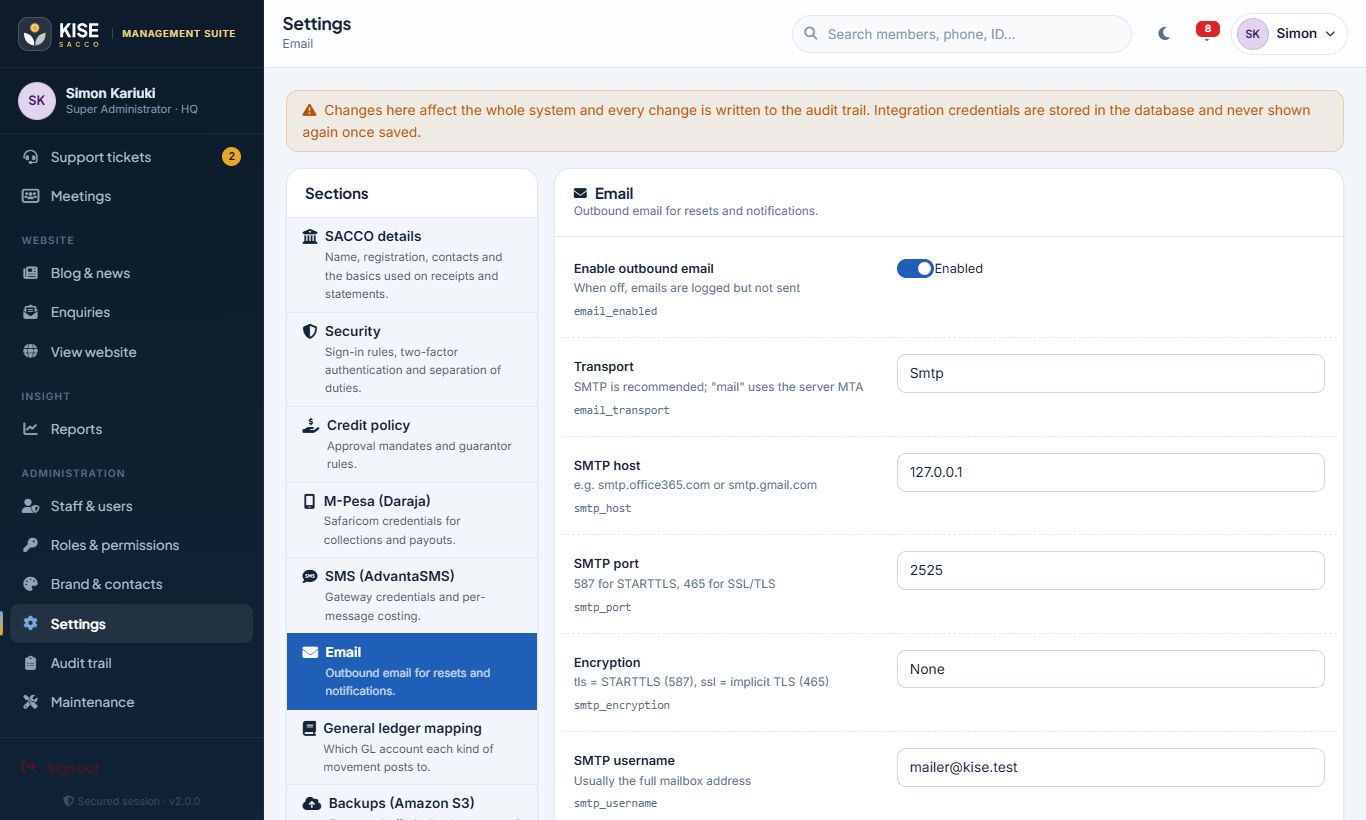
Email (SMTP) — host, port, encryption (tls for port 587, ssl for 465), username, password (or app password) and sender. Use Send a test email after saving. Email is used for password resets, account notices and administrator-issued sign-in codes.
Backups (Amazon S3) — super administrators only; see Backups.
General ledger mapping — which account each automatic posting uses.
Passwords and API keys are encrypted in the database and never shown again once saved — leave a field blank to keep the stored value. Every change is recorded with before and after values.
Security settings.M-Pesa settings and signed callback URLs.Email (SMTP) settings.
Backups to Amazon S3 (super administrator)
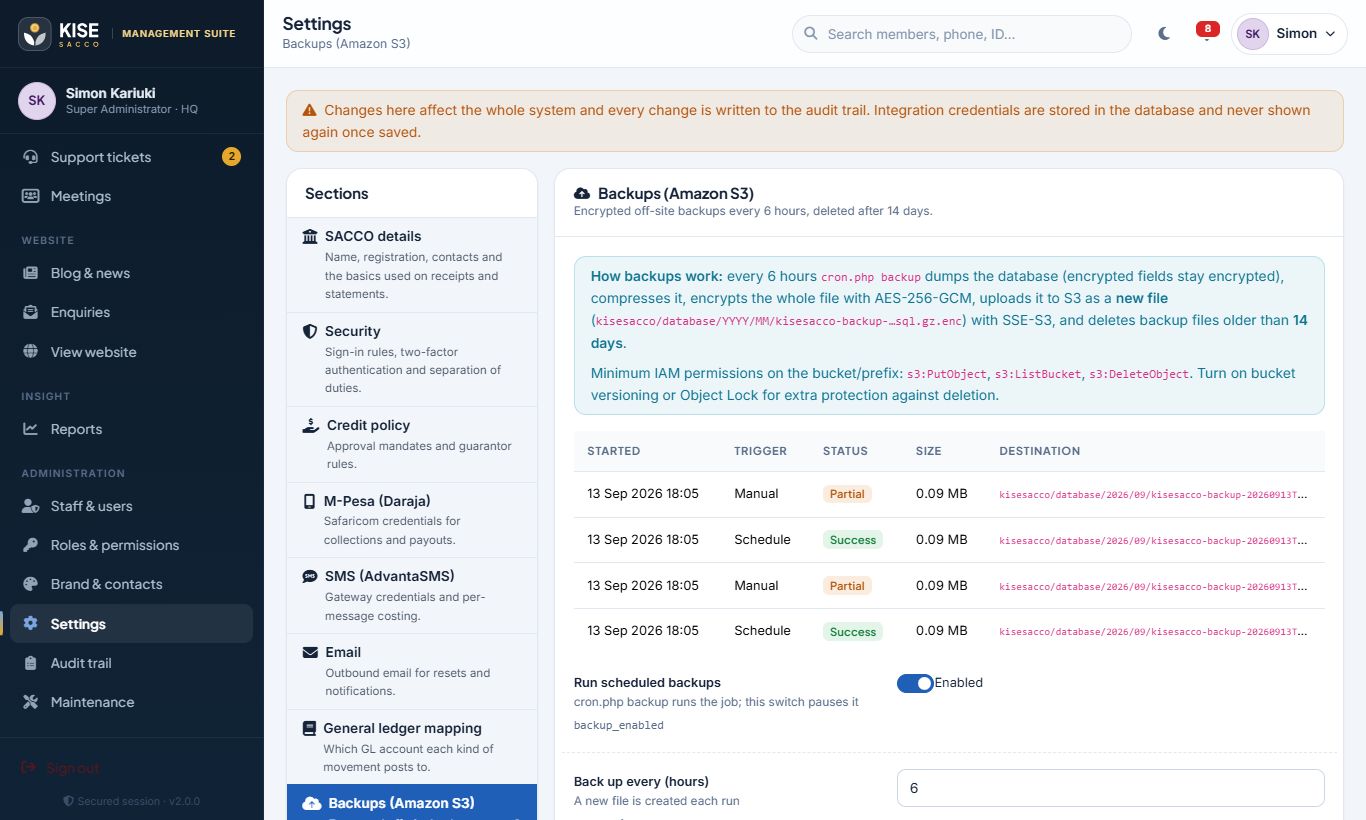
The system backs itself up automatically every 6 hours. Each run creates a new, encrypted file in your S3 bucket, and backup files older than 14 days are deleted automatically.
Create a private S3 bucket (for example in af-south-1 — Cape Town) and an IAM user that may only PutObject, ListBucket and DeleteObject on it.
Open Administration → Settings → Backups (Amazon S3) (visible to super administrators only).
Switch on Upload to Amazon S3 and enter the bucket name, region, folder (prefix), access key ID and secret access key. Keep Back up every at 6 hours and Delete backups older than at 14 days unless your policy says otherwise.
Click Save, then Test S3 connection — it uploads, lists and deletes a small test file.
Click Run backup now and confirm a Success row appears in the history table.
Backups are protected three times: sensitive fields are already encrypted inside the database, the whole backup file is encrypted with AES-256-GCM before it leaves the server, and S3 encrypts it again at rest. A backup can only be read on a server holding the KISE SACCO installation key.
If an upload fails, the encrypted file is kept on the server, the run is marked Partial and every super administrator is notified. Check the history table after changing any setting. Restoring a backup is a technical task — see the README for your IT team.
You can also create a backup and download an encrypted copy from Administration → Maintenance → Back up now & download encrypted copy.
Backup settings and run history.
The audit trail
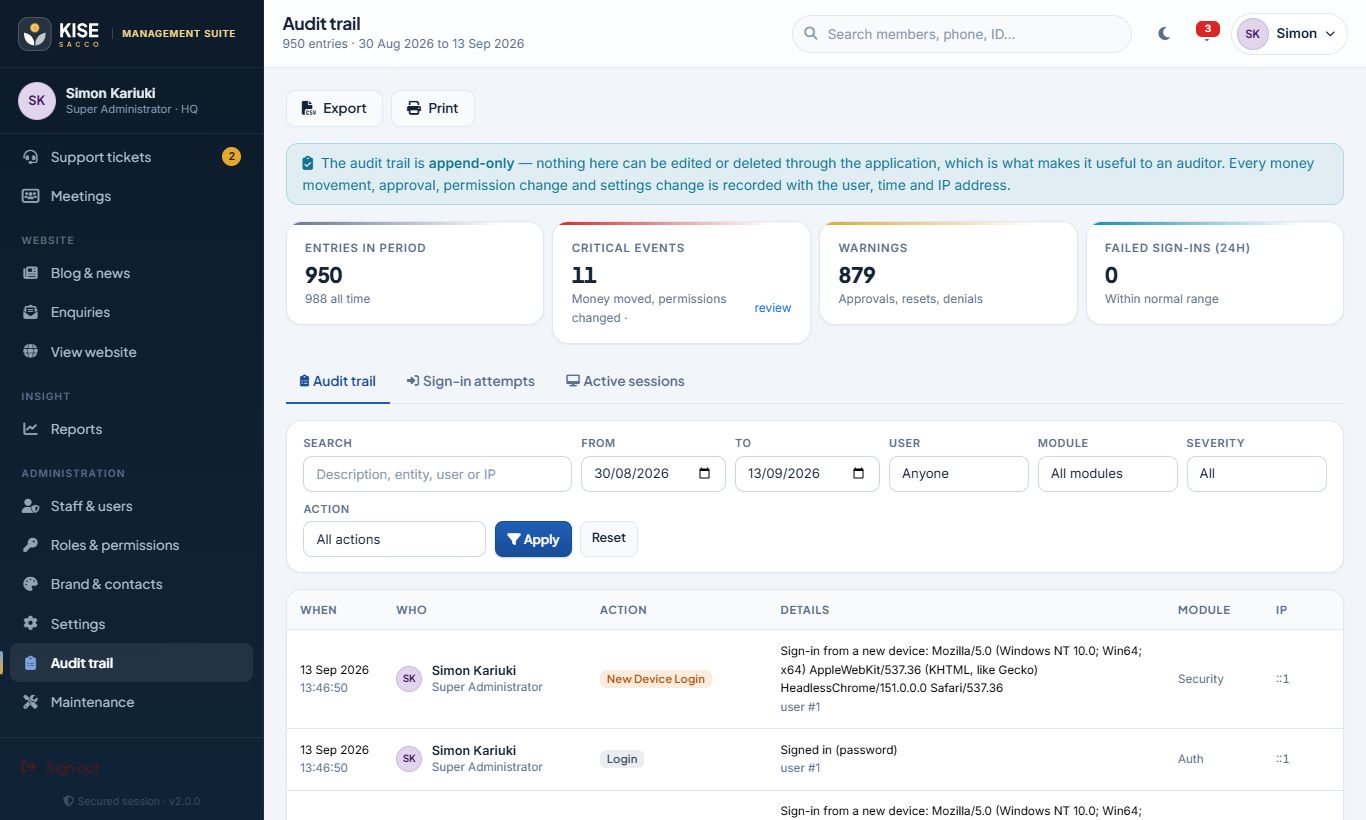
Every action, who did it, from where, with before/after values.
Filter by user, module, action, severity and date. Open an entry to compare old and new values.
Security events are highlighted: failed sign-ins, lock-outs, access denied, rejected M-Pesa callbacks, 2FA changes and document views.
The Active sessions tab shows who is signed in right now.
The trail is tamper-evident: the database refuses edits and deletions, and each entry is sealed with a cryptographic hash of the one before it. Maintenance verifies the whole chain.
Maintenance, health checks and backups
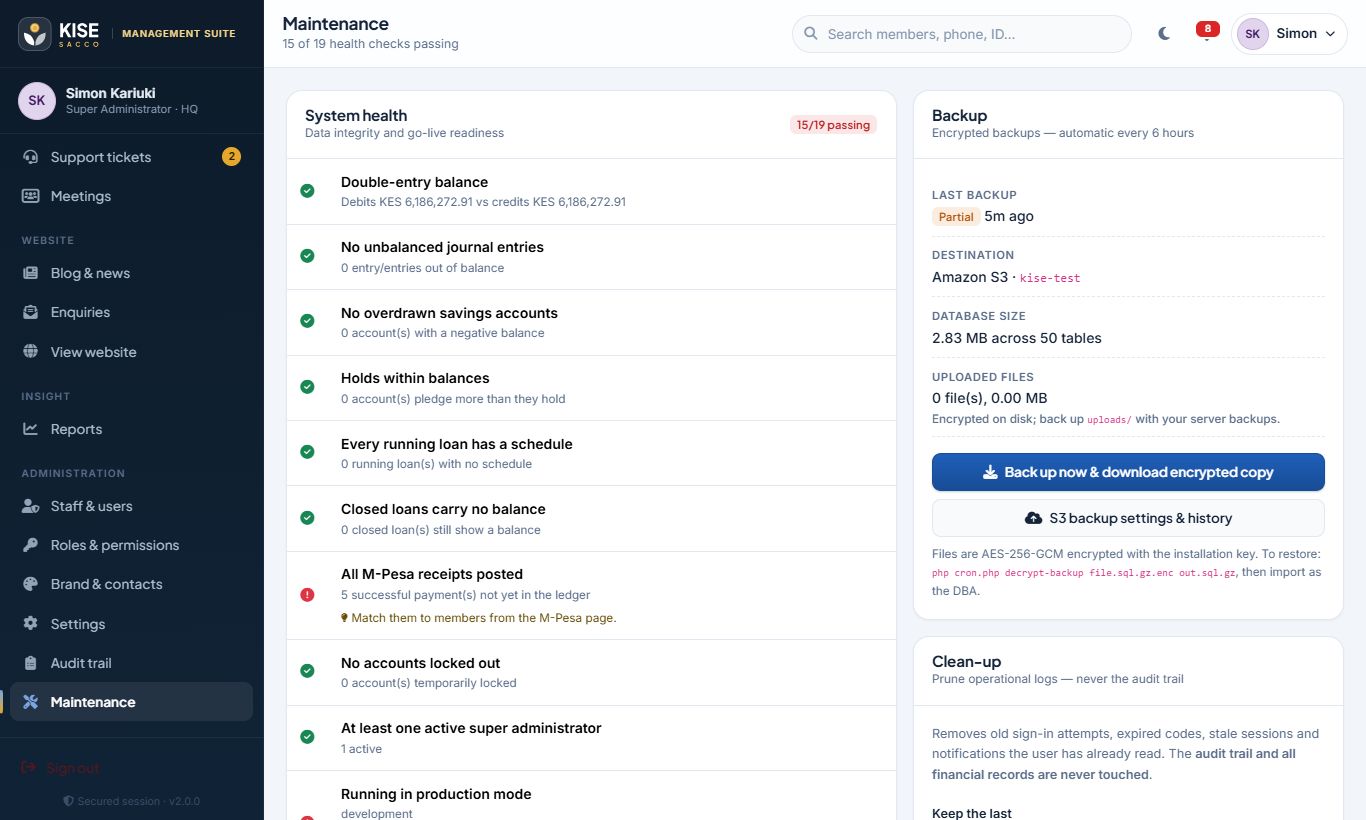
Health checks — books balance, no overdrawn accounts, audit chain intact, HTTPS, least-privilege database account, 2FA coverage, M-Pesa callback protection and more. Fix anything shown in amber or red.
Scheduled jobs — run loan ageing, standing orders, reminders, dormancy and interest by hand if the scheduler missed a run.
Backup — shows the last automatic backup and lets a super administrator create a backup now and download the encrypted copy (logged as a critical action).
Health checks also confirm that the database is encrypted at rest and that a successful off-site backup ran within the schedule.
Clean up logs — removes old operational logs. The audit trail is never pruned.
Health checks and jobs.
Roles at a glance
What each role is for. Administrators can adjust permissions in Roles & permissions.
Role
Purpose
Typical tasks in this guide
Super Administrator (one or more)
Unrestricted access, including settings, roles, brand, backups, sign-in codes and the audit trail.
Check caps lock and try your phone number instead of email (or the reverse). After 5 attempts the account locks — use Forgot password? or ask an administrator to unlock.
“Your membership application is still under review”
Your application has not been approved yet. You will receive an SMS once it is.
My authenticator code is rejected
Set your phone’s date and time to automatic, wait for a fresh code, and make sure you are using the KISE SACCO entry in the app.
I lost my phone
Sign in with a recovery code, then set up the authenticator again. No recovery codes? Contact a Super Administrator for a one-time sign-in code — it is sent to your registered email and phone after they verify your identity.
I received a sign-in code I didn’t ask for
Do not share it. Call the SACCO immediately and change your password — someone may be trying to access your account.
I was signed out
Sessions end after 15 minutes of inactivity, 8 hours in total, or when your password changes. Sign in again.
“Please confirm it’s you”
Normal for sensitive administration. Re-enter your password and code; you won’t be asked again for 15 minutes.
M-Pesa prompt didn’t appear
Check the phone number, that the phone is on and has network, then try again. If money left your M-Pesa but hasn’t posted within 10 minutes, raise a ticket with the M-Pesa receipt number.
“Security check failed”
The page was open too long. Go back, reload the page and submit again — nothing was saved.
I can’t see a menu item
Your role doesn’t include that permission. Ask your administrator.
The Install button doesn’t show
The app may already be installed, you may be on a browser that doesn’t support installation, or you dismissed it in the last 7 days. Use the browser menu → Install app.
Glossary
Term
Meaning
BOSA deposits
Non-withdrawable member deposits that determine borrowing power and earn interest.
Share capital
A member’s ownership stake; earns dividends.
Guarantor
A member who pledges part of their deposits to secure another member’s loan.
Hold
Part of a balance pledged as loan security and temporarily not withdrawable.
Flat rate / reducing balance
Interest on the original amount throughout vs. on the outstanding balance.
PAR 30
Portfolio at risk — the balance of loans more than 30 days overdue as a share of the portfolio.
STK push
An M-Pesa prompt sent to a phone for the customer to approve with their PIN.